Lexus RX (RX 350L, RX450h) 2016-2026 Repair Manual: On-vehicle Inspection
ON-VEHICLE INSPECTION
PROCEDURE
1. CHECK FUEL PUMP OPERATION AND INSPECT FOR FUEL LEAK
(a) Check fuel pump operation.
(1) Connect the Techstream to the DLC3.
(2) Turn the engine switch on (IG).
NOTICE:
Do not start the engine.
(3) Turn the Techstream on.
(4) Enter the following menus: Powertrain / Engine / Active Test / Activate the Circuit Relay.
Powertrain > Engine > Active Test| Tester Display |
|---|
| Activate the Circuit Relay |
(5) Check for pressure in the fuel tube sub-assembly from the fuel line. Check that sounds of fuel flowing from the fuel tank assembly can be heard. If no sounds can be heard, check the relay, fuel pump, ECM and wiring connectors.
(b) Inspect for fuel leaks.
(1) Check that there are no fuel leaks from the fuel system after doing any maintenance or repairs. If there is a fuel leak, repair or replace parts as necessary.
(c) Turn the engine switch off.
(d) Disconnect the Techstream from the DLC3.
2. CHECK FUEL PRESSURE
(a) Discharge fuel system pressure.
Click here .gif)
(b) Measure the battery voltage.
Standard Voltage:
11 to 14 V
(c) Disconnect the cable from the negative (-) battery terminal.
NOTICE:
When disconnecting the cable, some systems need to be initialized after the cable is reconnected.
Click here
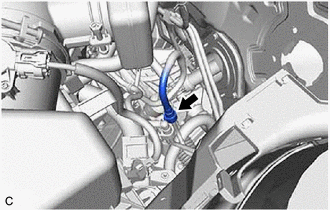
| (d) Remove the No. 2 fuel pipe clamp from the fuel tube connector. |
|
.png)
(e) Disconnect the No. 2 fuel tube sub-assembly (for Direct Injection).
| (1) Disconnect the No. 2 fuel tube sub-assembly from the fuel pipe. Click here |
|
(f) Disconnect the fuel tube sub-assembly (for Port Injection).
| (1) Disconnect the fuel tube sub-assembly from the fuel pipe. Click here |
|
.png)
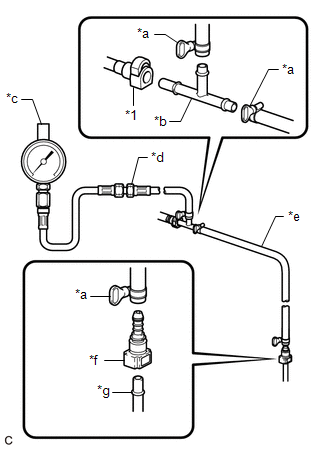
| (g) Install SST (EFI fuel pressure gauge) as shown in the illustration. SST: 09268-45101 09268-41250 09268-41260 09268-41280 09268-41500 09268-41700 95336-08070 |
|
(h) Wipe up any spilled fuel.
(i) Connect the cable to the negative (-) battery terminal.
NOTICE:
When disconnecting the cable, some systems need to be initialized after the cable is reconnected.
Click here
(j) Connect the Techstream to the DLC3.
(k) Turn the engine switch on (IG).
NOTICE:
Do not start the engine.
(l) Turn the Techstream on.
(m) Enter the following menus: Powertrain / Engine / Active Test / Activate the Circuit Relay.
Powertrain > Engine > Active Test| Tester Display |
|---|
| Activate the Circuit Relay |
(n) Measure the fuel pressure.
Standard Fuel Pressure:
196 to 833 kPa (2.0 to 8.5 kgf/cm2, 28 to 121 psi)
- If the fuel pressure is less than the standard, check the fuel hoses and their connections, fuel pump, fuel filter and fuel main valve assembly.
- If the result is not as specified, replace the fuel main valve assembly.
(o) Disconnect the Techstream from the DLC3.
(p) Start the engine.
(q) Measure the fuel pressure at idle.
Standard Fuel Pressure:
196 to 833 kPa (2.0 to 8.5 kgf/cm2, 28 to 121 psi)
HINT:
Refer to Standard Idle Speed.
Click here
(r) Stop the engine.
(s) Check that the fuel pressure remains as specified for 5 minutes.
Standard Fuel Pressure:
98 kPa (1.0 kgf/cm2, 14 psi) or more
If the result is not as specified, check the fuel pump, fuel main valve assembly and/or fuel injector assemblies.
(t) After checking the fuel pressure, disconnect the cable from the negative (-) battery terminal and carefully remove SST to prevent fuel from spraying.
NOTICE:
When disconnecting the cable, some systems need to be initialized after the cable is reconnected.
Click here
(u) Connect the fuel tube sub-assembly (for Port Injection).
(1) Connect the fuel tube sub-assembly to the fuel pipe.
Click here
(v) Connect the No. 2 fuel tube sub-assembly (for Direct Injection).
(1) Connect the No. 2 fuel tube sub-assembly to the fuel pipe.
Click here
(w) Install the No. 2 fuel pipe clamp to the fuel tube connector.
(x) Inspect for fuel leaks.
Click here
3. CHECK FUEL PRESSURE (for High Pressure)
(a) Connect the Techstream to the DLC3.
(b) Turn the engine switch on (IG).
(c) Turn the Techstream on.
(d) Start and warm up the engine.
(e) Enter the following menus: Powertrain / Engine / Data List / Fuel Pressure (High).
Powertrain > Engine > Data List| Tester Display |
|---|
| Fuel Pressure (High) |
(f) Check the high pressure side fuel pressure at 3000 rpm (shift lever in N, engine warmed up and A/C off).
Standard Fuel Pressure:
2400 to 19500 kPa (24.5 to 198.8 kgf/cm2, 348 to 2828 psi)
If the result is not as specified, check the fuel pump, fuel pump assembly, fuel pressure sensor and wire harnesses.
(g) Stop the engine.
 System Diagram
SYSTEM DIAGRAM FUEL FLOW DIAGRAM *A for Direct Injection - - *1 Fuel Injector Assembly *2 Throttle Body with Motor Assembly *3 Fuel Pressure Sensor (for High Pressure) *4 ...
 Fuel Tank
...
Other materials:
Lexus RX (RX 350L, RX450h) 2016-2026 Repair Manual > Audio And Visual System (for 8 Inch Display): Touch Pad Vibration Driver Malfunction (B155A)
DESCRIPTION This DTC is stored if the remote touch (remote operation controller assembly) detects a malfunction in itself, such as internal hardware failure or remote touch screen vibration driver malfunction. DTC No. Detection Item DTC Detection Condition Trouble Area B155A Touch Pad ...
Lexus RX (RX 350L, RX450h) 2016-2026 Repair Manual > Dynamic Torque Control Awd System: Cancellation of 4WD Control (C1299)
DESCRIPTION This DTC is stored if the heat generated by the transmission coupling assembly exceeds a certain amount or the estimated oil temperature of the transfer exceeds a certain amount while driving. DTC No. Detection Item DTC Detection Condition Trouble Area C1299 Cancellation o ...
Lexus RX (RX 350L, RX450h) 2016-{YEAR} Owners Manual
- For your information
- Pictorial index
- For safety and security
- Instrument cluster
- Operation of each component
- Driving
- Lexus Display Audio system
- Interior features
- Maintenance and care
- When trouble arises
- Vehicle specifications
- For owners
Lexus RX (RX 350L, RX450h) 2016-{YEAR} Repair Manual

0.0084