
Lexus RX (RX 350L, RX450h) 2016-2026 Repair Manual: ECU Power Source Circuit
DESCRIPTION
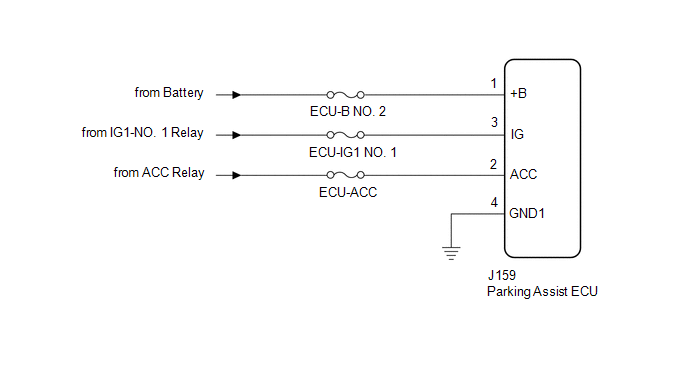
This circuit is the power source circuit to operate the parking assist ECU. The parking assist ECU controls the panoramic view monitor system.
WIRING DIAGRAM
CAUTION / NOTICE / HINT
NOTICE:
Inspect the fuse for circuits related to this system before performing the following inspection procedure.
HINT:
If the parking assist ECU does not operate due to a power source problem, other system DTCs may be stored due to a CAN communication interruption.
PROCEDURE
| 1. | CHECK HARNESS AND CONNECTOR (PARKING ASSIST ECU - BODY GROUND) |
(a) Disconnect the J159 parking assist ECU connector.
(b) Measure the resistance according to the value(s) in the table below.
Standard Resistance:
| Tester Connection | Condition | Specified Condition |
|---|---|---|
| J159-4 (GND1) - Body ground | Always | Below 1 Ω |
| NG | .gif) | REPAIR OR REPLACE HARNESS OR CONNECTOR |
|
.gif)
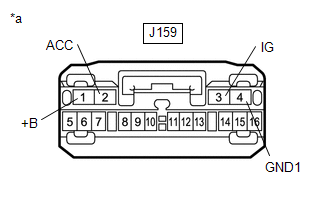
| 2. | CHECK HARNESS AND CONNECTOR (PARKING ASSIST ECU POWER SOURCE) |
| (a) Measure the voltage according to the value(s) in the table below. Standard Voltage:
|
|
| OK | | PROCEED TO NEXT SUSPECTED AREA SHOWN IN PROBLEM SYMPTOMS TABLE |
| NG | | REPAIR OR REPLACE HARNESS OR CONNECTOR |
 "CHK" message(s) are displayed on the SIGNAL CHECK screen.
DESCRIPTION On the SIGNAL CHECK screen, it is possible to check if the signals sent to the parking assist ECU are normal. Click here HINT:
On the SIGNAL CHECK screen, "OK" (blue) is displayed for ...
 Image from Camera for Panoramic View Monitor is Abnormal
DESCRIPTION The display signal from the rear television camera assembly is transmitted to the multi-display assembly via the parking assist ECU. WIRING DIAGRAM CAUTION / NOTICE / HINT NOTICE:
Whe ...
Other materials:
Lexus RX (RX 350L, RX450h) 2016-2026 Repair Manual > Outer Mirror Control Ecu: Installation
INSTALLATION CAUTION / NOTICE / HINT HINT:
Use the same procedure for the RH side and LH side.
The following procedure is for the LH side.
PROCEDURE 1. INSTALL OUTER MIRROR CONTROL ECU ASSEMBLY (a) Install 2 new grommets. (b) Install the outer mirror control ECU assembly with the 2 screws. ( ...
Lexus RX (RX 350L, RX450h) 2016-2026 Repair Manual > Power Tilt And Power Telescopic Steering Column System: Vehicles Speed Malfunction (B2624)
DESCRIPTION The multiplex tilt and telescopic ECU forms a network with the ECUs of other systems via CAN communication. Each ECU informs the other ECUs that it is connected to the network by sending a specified signal (periodic signal) onto the communication bus on a regular basis. The multiplex til ...
Lexus RX (RX 350L, RX450h) 2016-{YEAR} Owners Manual
- For your information
- Pictorial index
- For safety and security
- Instrument cluster
- Operation of each component
- Driving
- Lexus Display Audio system
- Interior features
- Maintenance and care
- When trouble arises
- Vehicle specifications
- For owners
Lexus RX (RX 350L, RX450h) 2016-{YEAR} Repair Manual

0.01