Lexus RX (RX 350L, RX450h) 2016-2026 Repair Manual: Reassembly
REASSEMBLY
CAUTION / NOTICE / HINT
NOTICE:
-
If the rear disc brake cylinder assembly has been disassembled, perform air bleeding for the rear disc brake cylinder assembly.
Click here
.gif)
- Make sure not to scratch, damage or apply excessive force to any of the internal components of the rear disc brake cylinder.
- To prevent rusting on the inside of the rear disc brake cylinder, perform the rear disc brake piston removal and installation quickly.
- Do not clean the interior of the rear disc brake cylinder with brake cleaner.
- Do not remove any parts unless specifically instructed to do so, and only remove the parts indicated.
PROCEDURE
1. TEMPORARILY TIGHTEN REAR DISC BRAKE BLEEDER PLUG
HINT:
Fully tighten the rear disc brake bleeder plug after bleeding the system.
2. INSTALL REAR DISC BRAKE BLEEDER PLUG CAP
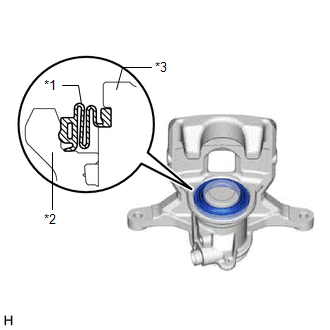
3. INSTALL PISTON SEAL
(a) Apply lithium soap base glycol grease to the entire circumference of a new piston seal.
.png) | Lithium Soap Base Glycol Grease |
(b) Install the piston seal to the rear disc brake cylinder.
NOTICE:
- Do not damage the inner surface or piston seal groove of the rear disc brake cylinder.
- Do not allow the nut to rotate. If the nut is accidentally allowed to rotate, return it to its original position.
4. INSTALL REAR DISC BRAKE PISTON
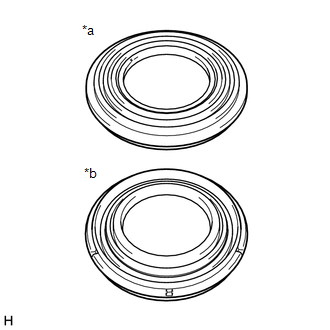
(a) Apply a light layer of lithium soap base glycol grease to the entire circumference of a new cylinder boot.

| *1 | Cylinder Boot |
| *2 | Rear Disc Brake Piston |
| | Lithium Soap Base Glycol Grease |
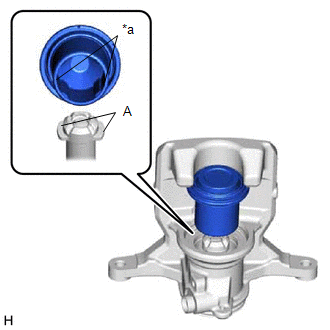
(b) Apply a light layer of lithium soap base glycol grease to the contact surfaces of the rear disc brake piston.
| (c) Install the cylinder boot to the rear disc brake piston. NOTICE: The front and back sides of the cylinder boot are different. Make sure not to install the cylinder boot backwards. |
|
| (d) Install the rear disc brake piston to the rear disc brake cylinder. NOTICE:
|
|
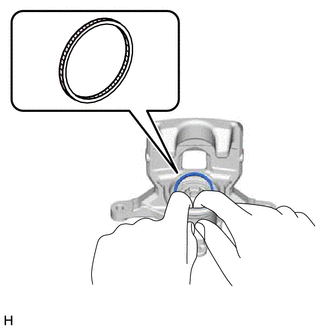
| (e) Install the cylinder boot to the rear disc brake cylinder as shown in the illustration. NOTICE:
|
|
 Inspection
INSPECTION PROCEDURE 1. INSPECT PAD LINING THICKNESS (a) Using a ruler, measure the rear disc brake pad lining thickness. Standard Thickness: 9.5 mm (0.374 in.) Minimum Thickness: 1.0 mm (0.0394 ...
 Installation
INSTALLATION CAUTION / NOTICE / HINT HINT:
Use the same procedure for the RH side and LH side.
The following procedure is for the LH side.
PROCEDURE 1. INSTALL REAR DISC (a) Align the match ...
Other materials:
Lexus RX (RX 350L, RX450h) 2016-2026 Repair Manual > Power Tilt And Power Telescopic Steering Column System: ECU Power Source Circuit Malfunction (B2620)
DESCRIPTION The ECU power source circuit supplies positive (+) voltage to the multiplex tilt and telescopic ECU. DTC No. Detection Item DTC Detection Condition Trouble Area B2620 ECU Power Source Circuit Malfunction The voltage of the ECU power source drops to 8 V or less and this c ...
Lexus RX (RX 350L, RX450h) 2016-2026 Repair Manual > Telephone And Gps Antenna (for Front Side): Installation
INSTALLATION PROCEDURE 1. INSTALL TELEPHONE AND GPS ANTENNA BRACKET 2. INSTALL TELEPHONE AND GPS ANTENNA ASSEMBLY (a) Engage the 6 guides and 2 claws to install the telephone and GPS antenna assembly as shown in the illustration. Install in this Direction 3. INSTALL TELEPHONE AND GPS ANTEN ...
Lexus RX (RX 350L, RX450h) 2016-{YEAR} Owners Manual
- For your information
- Pictorial index
- For safety and security
- Instrument cluster
- Operation of each component
- Driving
- Lexus Display Audio system
- Interior features
- Maintenance and care
- When trouble arises
- Vehicle specifications
- For owners
Lexus RX (RX 350L, RX450h) 2016-{YEAR} Repair Manual

0.0096