Lexus RX (RX 350L, RX450h) 2016-2026 Repair Manual: Replacement
REPLACEMENT
CAUTION / NOTICE / HINT
NOTICE:
After replacing the rear disc brake pads, the brake pedal may feel soft due to clearance between the rear disc brake pads and rear disc. Depress the brake pedal several times until the brake pedal feels firm.
HINT:
- Use the same procedure for the RH side and LH side.
- The following procedure is for the LH side.
PROCEDURE
1. PRECAUTION
Click here .gif)
2. PERFORM REAR BRAKE PAD REPLACEMENT MODE
Click here
3. REMOVE REAR WHEEL
Click here
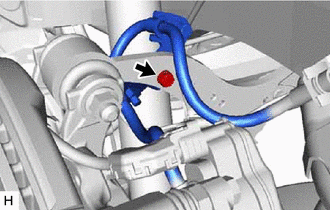
4. SEPARATE REAR FLEXIBLE HOSE
| (a) Remove the bolt and separate the rear flexible hose. |
|
5. DISCONNECT NO. 2 PARKING BRAKE WIRE ASSEMBLY
Click here
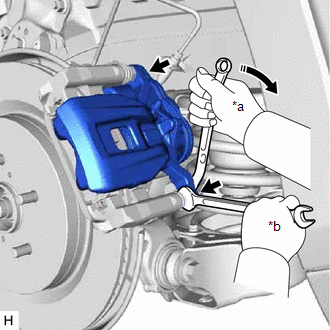
6. SEPARATE REAR DISC BRAKE CYLINDER ASSEMBLY
| (a) Hold the 2 rear disc brake cylinder slide pins and remove the 2 bolts and separate the rear disc brake cylinder assembly. |
|
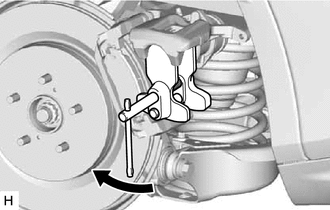
7. REMOVE REAR DISC BRAKE PAD
CAUTION:
Be careful not to get pinched by the rear disc brake cylinder assembly or other parts when removing the rear disc brake pads.
| (a) Remove the 2 rear disc brake pads from the rear disc brake cylinder mounting. |
|
.png)
8. REMOVE REAR DISC BRAKE ANTI-SQUEAL SHIM
Click here
9. INSTALL REAR DISC BRAKE ANTI-SQUEAL SHIM
Click here
10. INSTALL REAR DISC BRAKE PAD
CAUTION:
Be careful not to get pinched by the rear disc brake cylinder assembly or other parts when installing the rear disc brake pads.
| (a) Using SST, push in the rear disc brake piston. SST: 09719-77010 NOTICE:
|
|
(b) Install the 2 rear disc brake pads to the rear disc brake cylinder mounting.
NOTICE:
Install the rear disc brake pad so that the rear disc brake pad wear indicator plate is mounted on the lower side of the vehicle.
HINT:
If the rear disc brake pad has an identification mark, be sure to confirm the installation location.
.png)
| *A | for TMC Made |
| *B | for TMMC Made |
| *a | Inner Side (Light Blue) |
| *b | Outer Side (Pink) |
| *c | Inner Side (White) |
| *d | Outer Side (White) |
11. INSTALL REAR DISC BRAKE CYLINDER ASSEMBLY
(a) Hold the 2 rear disc brake cylinder slide pins, and install the rear disc brake cylinder assembly to the rear disc brake cylinder mounting with 2 new bolts.
Torque:
34.3 N·m {350 kgf·cm, 25 ft·lbf}
12. CONNECT NO. 2 PARKING BRAKE WIRE ASSEMBLY
Click here
13. INSTALL REAR FLEXIBLE HOSE
(a) Install the rear flexible hose with the bolt.
Torque:
18.8 N·m {192 kgf·cm, 14 ft·lbf}
14. INSPECT BRAKE FLUID LEVEL IN RESERVOIR
Click here
15. INSTALL REAR WHEEL
Click here
16. NORMAL CONDITION RECOVERY
Click here


Other materials:
Lexus RX (RX 350L, RX450h) 2016-2026 Repair Manual > Air Conditioning Pressure Sensor: Components
COMPONENTS ILLUSTRATION *1 AIR CONDITIONER PRESSURE SENSOR - - N*m (kgf*cm, ft.*lbf): Specified torque ● Non-reusable part Compressor oil ND-OIL 12 or equivalent - - ...
Lexus RX (RX 350L, RX450h) 2016-2026 Owners Manual > Do-it-yourself
maintenance: Do-it-yourself service
precautions
If you perform maintenance by yourself, be sure to follow the correct
procedure
as given in these sections.
Items
Parts and tools
12-volt battery condition
Grease
Conventional wrench (for terminal clamp bolts)
Brake fluid level
...
Lexus RX (RX 350L, RX450h) 2016-{YEAR} Owners Manual
- For your information
- Pictorial index
- For safety and security
- Instrument cluster
- Operation of each component
- Driving
- Lexus Display Audio system
- Interior features
- Maintenance and care
- When trouble arises
- Vehicle specifications
- For owners
Lexus RX (RX 350L, RX450h) 2016-{YEAR} Repair Manual

0.0117