Lexus RX (RX 350L, RX450h) 2016-2026 Repair Manual: Test Mode Procedure
TEST MODE PROCEDURE
REAR BRAKE PAD REPLACEMENT MODE
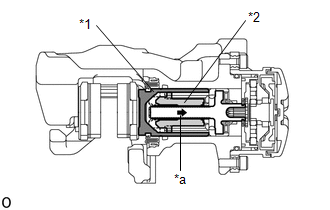
| *1 | Rear Disc Brake Piston |
| *2 | Nut |
| *a | The nut moves inward in pad replacement mode |
HINT:
When replacing the rear disc brake pad and rear disc, since the nut inside the rear disc brake cylinder assembly is in an advanced position, it is necessary to move the nut back inside the cylinder. The nut can be moved back using pad replacement mode.
(a) Pad replacement mode
- Turn the engine switch off.
- Connect the Techstream to the DLC3.
- Turn the engine switch on (IG).
- Turn the Techstream on.
-
Enter the following menus: Chassis / Brake/EPB / Utility / EPB Full Release
NOTICE:
The parking brake must be released.
- Follow the Techstream display and select "Next".
-
Push and hold the electric parking brake switch (electric parking brake switch assembly) to the release side for 5 seconds or more.
NOTICE:
- Make sure to perform this procedure with the engine switch on (IG).
- Make sure that the brake pedal is not depressed when performing this procedure.
- When the system changes to pad replacement mode, DTC C060E2A, C06132A or C13B800 may be stored. If the DTC is stored, clear the DTCs after the procedure (rear brake pad replacement, etc.) is complete.
HINT:
Once the operation finishes, the parking brake indicator light flashes slowly (1 second intervals) (nut moves back inside the cylinder and system enters pad replacement mode).
| Tester Display |
|---|
| EPB Full Release |
- Turn the engine switch off.
- Turn the engine switch on (IG).
-
Within 8 seconds, operate the electric parking brake switch (electric parking brake switch assembly) to perform 3 lock side ON operations (from off (release) to on (pull)) and then 3 release side ON operations (from off (release) to on (push)).
NOTICE:
- If the operation is performed too quickly, the system may not respond. If the system does not respond, perform the operation again at a slower speed.
- The parking brake must be released.
HINT:
The parking brake indicator light (red) flashes (0.25 seconds intervals).
-
Push and hold the electric parking brake switch (electric parking brake switch assembly) to the release side for 5 seconds or more.
NOTICE:
- Make sure to perform this procedure with the engine switch on (IG).
- Make sure that the brake pedal is not depressed when performing this procedure.
- When the system changes to pad replacement mode, DTC C060E2A, C06132A or C13B800 may be stored. If the DTC is stored, clear the DTCs after the procedure (rear brake pad replacement, etc.) is complete.
HINT:
After a short time passes, the parking brake actuator assembly operates, and once the assembly finishes operating, the parking brake indicator light flashes slowly (1 second intervals) (nut moves back inside the cylinder and system enters pad replacement mode).
(b) Turn the engine switch off.
NOTICE:
Do not operate the electric parking brake switch (electric parking brake switch assembly) until the procedure is complete. If operated, the system will return to its normal condition.
- Disconnect the Techstream from the DLC3.
(c) Normal condition recovery
(1) After the procedure (rear brake pad replacement, etc.) is complete, turn the engine switch on (IG) and pull the electric parking brake switch (electric parking brake switch assembly) to the lock side for 5 seconds or more.
NOTICE:
- When performing work (replacing the rear brake pad, etc.), do not operate the electric parking brake switch (electric parking brake switch assembly) or turn the engine switch on (IG) and operate the shift lever. If the electric parking brake switch (electric parking brake switch assembly) or shift lever is operated, the parking brake may operate and the rear disc brake piston may fall off. Also, make sure to disconnect the connector of the parking brake actuator assembly or disconnect the cable from the negative (-) battery terminal.
- When DTC C060E2A, C06132A or C13B800 is stored, clear the DTCs.
 Problem Symptoms Table
PROBLEM SYMPTOMS TABLE HINT:
Use the table below to help determine the cause of problem symptoms. If multiple suspected areas are listed, the potential causes of the symptoms are listed in order of ...
 Terminals Of Ecu
TERMINALS OF ECU CHECK SKID CONTROL ECU (BRAKE ACTUATOR ASSEMBLY) *a Component without harness connected (Skid Control ECU (Brake Actuator Assembly)) - - (a) Disconnect the A41 skid contr ...
Other materials:
Lexus RX (RX 350L, RX450h) 2016-2026 Repair Manual > Lighting (ext): Back-up Light Bulb
ReplacementREPLACEMENT CAUTION / NOTICE / HINT HINT:
Use the same procedure for the RH side and LH side.
The following procedure is for the LH side.
PROCEDURE 1. REMOVE NO. 3 BACK DOOR SERVICE HOLE COVER (a) Disengage the 5 guides to remove the No. 3 back door service hole cover. ...
Lexus RX (RX 350L, RX450h) 2016-2026 Repair Manual > Blind Spot Monitor System: How To Proceed With Troubleshooting
CAUTION / NOTICE / HINT HINT:
Use the following procedure to troubleshoot the blind spot monitor system.
*: Use the Techstream.
PROCEDURE 1. VEHICLE BROUGHT TO WORKSHOP
NEXT 2. CUSTOMER PROBLEM ANALYSIS HINT: If there are any scratches or impact marks on th ...
Lexus RX (RX 350L, RX450h) 2016-{YEAR} Owners Manual
- For your information
- Pictorial index
- For safety and security
- Instrument cluster
- Operation of each component
- Driving
- Lexus Display Audio system
- Interior features
- Maintenance and care
- When trouble arises
- Vehicle specifications
- For owners
Lexus RX (RX 350L, RX450h) 2016-{YEAR} Repair Manual

0.0114