Lexus RX (RX 350L, RX450h) 2016-2026 Repair Manual: Adjustment
ADJUSTMENT
CAUTION / NOTICE / HINT
NOTICE:
Before installing the transmission control cable assembly, check that the park/neutral position switch assembly and the shift lever are in neutral.
PROCEDURE
1. SECURE VEHICLE
(a) Fully apply the parking brake and chock a wheel.
CAUTION:
- Make sure to apply the parking brake and chock a wheel before performing this procedure.
- If the vehicle is not secure and the shift lever is moved to N, the vehicle may suddenly move, possibly resulting in an accident or serious injury.
.png)
2. REMOVE CONSOLE BOX ASSEMBLY
Click here .gif)
3. REMOVE FRONT NO. 1 CONSOLE BOX INSERT
Click here
4. ADJUST SHIFT LEVER POSITION (for TMC Made)
(a) Move the shift lever to N.
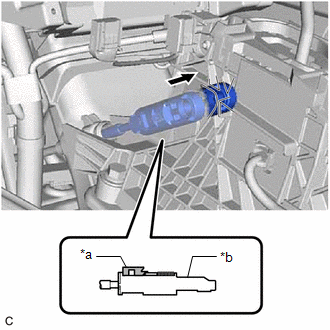
| (b) Disconnect the transmission control cable assembly from the transmission floor shift assembly. |
|
.png)
| (c) Disengage the 2 claws and disconnect the transmission control cable assembly from the transmission floor shift assembly. |
|
.png)
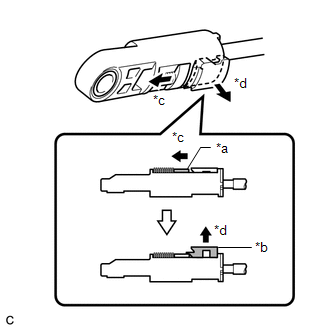
| (d) Slide the slider of the transmission control cable assembly and pull the lock piece outward as shown in the illustration. |
|
| (e) Engage the 2 claws to connect the transmission control cable assembly to the transmission floor shift assembly. NOTICE: Make sure that the transmission control cable assembly is securely connected. |
|
| (f) Connect the transmission control cable assembly to the transmission floor shift assembly. NOTICE:
|
|
| (g) Push the lock piece into the adjuster case. NOTICE:
|
|
(h) After adjusting the shift lever position, check the position and operation of the shift lever. If there is a problem, adjust the shift lever position again.
5. ADJUST SHIFT LEVER POSITION (for TMMC Made)
(a) Move the shift lever to N.
| (b) Disconnect the transmission control cable assembly from the transmission floor shift assembly. |
|
| (c) Disengage the 2 claws and disconnect the transmission control cable assembly from the transmission floor shift assembly. |
|
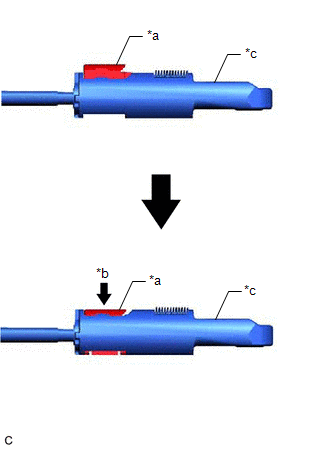
| (d) Slide the cover of the transmission control cable assembly and pull the lock piece outward as shown in the illustration. |
|
.png)
| (e) Engage the 2 claws to connect the transmission control cable assembly to the transmission floor shift assembly. NOTICE: Make sure that the transmission control cable assembly is securely connected. |
|
| (f) Connect the transmission control cable assembly to the transmission floor shift assembly. NOTICE:
|
|
.png)
(g) Using your fingers, gently pull the cable rod towards the rear of the vehicle to remove backlash.
| (h) Push the lock piece into the adjuster case. NOTICE: Make sure that the park/neutral position switch assembly and the shift lever are in neutral. |
|
.png)
| (i) Slide the cover of the transmission control cable assembly as shown in the illustration. NOTICE:
|
|
.png)
(j) After adjusting the shift lever position, check the position and operation of the shift lever. If there is a problem, adjust the shift lever position again.
6. INSTALL FRONT NO. 1 CONSOLE BOX INSERT
Click here
7. INSTALL CONSOLE BOX ASSEMBLY
Click here
 Removal
REMOVAL CAUTION / NOTICE / HINT The necessary procedures (adjustment, calibration, initialization or registration) that must be performed after parts are removed and installed, or replaced during tran ...
 Installation
INSTALLATION PROCEDURE 1. INSTALL TRANSMISSION CONTROL CABLE ASSEMBLY (for TMC Made) NOTICE: Before installing the transmission control cable assembly, check that the park/neutral position switch asse ...
Other materials:
Lexus RX (RX 350L, RX450h) 2016-2026 Repair Manual > Door Courtesy Light: Inspection
INSPECTION PROCEDURE 1. INSPECT COURTESY LIGHT ASSEMBLY (Bulb Type) (a) Apply battery voltage to the connector and check that the courtesy light comes on. OK: Measurement Condition Condition Specified Condition Battery positive (+) → 1 Battery negative (-) → 2 Always Courtesy ...
Lexus RX (RX 350L, RX450h) 2016-2026 Repair Manual > Luggage Speaker (w/o Rear No. 2 Seat): Components
COMPONENTS ILLUSTRATION *A for TMC Made *B for TMMC Made *1 DECK BOARD ASSEMBLY *2 DECK SIDE TRIM BOX RH *3 FRONT DECK FLOOR BOX *4 REAR DECK FLOOR BOX *5 REAR FLOOR FINISH PLATE *6 REAR NO. 3 FLOOR BOARD *7 REAR NO. 4 FLOOR BOARD *8 TONNEAU COVER AS ...
Lexus RX (RX 350L, RX450h) 2016-{YEAR} Owners Manual
- For your information
- Pictorial index
- For safety and security
- Instrument cluster
- Operation of each component
- Driving
- Lexus Display Audio system
- Interior features
- Maintenance and care
- When trouble arises
- Vehicle specifications
- For owners
Lexus RX (RX 350L, RX450h) 2016-{YEAR} Repair Manual

0.0108