
Lexus RX (RX 350L, RX450h) 2016-2026 Repair Manual: Coolant
Replacement
REPLACEMENT
CAUTION / NOTICE / HINT
CAUTION:
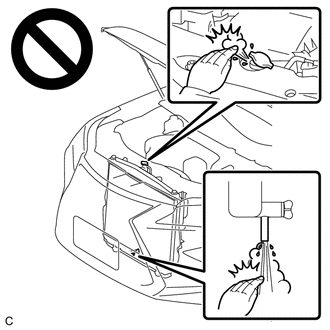
Do not remove the radiator cap sub-assembly or radiator drain cock plug while the engine and radiator assembly are still hot. Pressurized, hot engine coolant and steam may be released and cause serious burns.
PROCEDURE
1. DRAIN ENGINE COOLANT
CAUTION:
Do not remove the radiator cap sub-assembly or radiator drain cock plug while the engine and radiator assembly are still hot. Pressurized, hot engine coolant and steam may be released and cause serious burns.
| (a) Remove the 2 bolts and clip. |
|
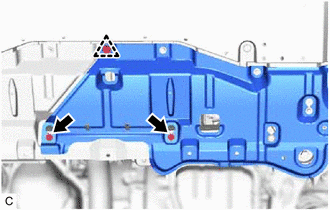
(b) Pull down the No. 3 engine under cover.
| (c) Connect a hose with an inside diameter of 9 mm (0.354 in.) to the radiator drain cock as shown in the illustration. |
|
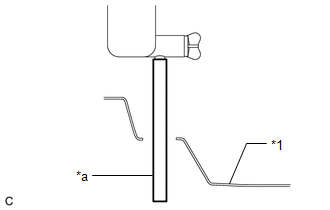
(d) Loosen the radiator drain cock plug.
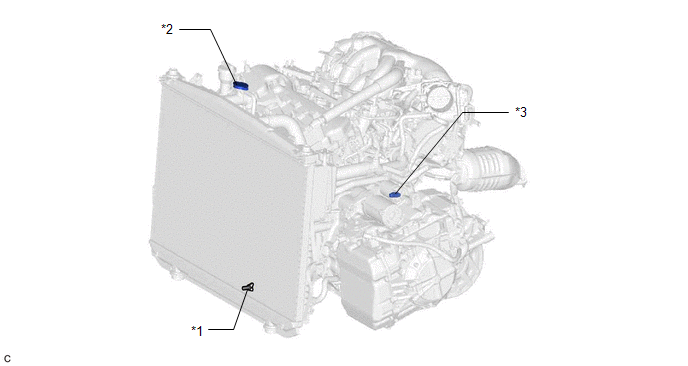
| *1 | Radiator Drain Cock Plug | *2 | Radiator Cap Sub-assembly |
| *3 | Cylinder Block Drain Cock Plug | - | - |
(e) Loosen the cylinder block drain cock plug.
(f) Remove the radiator cap sub-assembly. Then drain the engine coolant.
HINT:
Collect the engine coolant in a container and dispose of it according to the regulations in your area.
(g) Tighten the radiator drain cock plug by hand.
(h) Tighten the cylinder block drain cock plug.
Torque:
12.7 N·m {130 kgf·cm, 9 ft·lbf}
(i) Disconnect the hose from the radiator drain cock.
(j) Install the 2 bolts and clip.
2. ADD ENGINE COOLANT
(a) Slowly fill the radiator assembly with engine coolant.
Specified Capacity:
| w/o Rear No. 2 Seat | w/o Engine Oil Cooler | 9.0 liters (9.5 US qts, 7.9 Imp. qts) |
| w/ Engine Oil Cooler | 9.9 liters (10.5 US qts, 8.7 Imp. qts) | |
| w/ Rear No. 2 Seat | 12.4 liters (13.1 US qts, 10.9 Imp. qts) | |
NOTICE:
Do not substitute plain water for engine coolant.
HINT:
LEXUS vehicles are filled with TOYOTA SLLC at the factory. In order to avoid damaging the engine cooling system and other technical problems, only use TOYOTA SLLC or similar high quality ethylene glycol based non-silicate, non-amine, non-nitrite, non-borate coolant with long-life hybrid organic acid technology (coolant with long-life hybrid organic acid technology is a combination of low phosphates and organic acids).
(b) Remove the reserve tank cap.
(c) Slowly pour engine coolant into the radiator reserve tank assembly until it reaches the FULL line.
(d) Squeeze the No. 1 radiator hose and No. 2 radiator hose several times by hand, and then check the level of the engine coolant.
If the engine coolant level is low, add engine coolant.
(e) Install the radiator cap sub-assembly and reserve tank cap.
(f) Bleed air from the cooling system.
NOTICE:
- Before starting the engine, turn the A/C switch off.
- Adjust the heater control to the maximum hot setting.
- Adjust the blower speed to the low setting.
(1) Warm up the engine until the water inlet with thermostat sub-assembly opens. While the water inlet with thermostat sub-assembly is open, circulate the engine coolant for several minutes.
HINT:
The water inlet with thermostat sub-assembly open timing can be confirmed by squeezing the No. 2 radiator hose by hand, and sensing vibrations when the engine coolant starts to flow inside the No. 2 radiator hose.
(2) Maintain the engine speed at 2500 to 3000 rpm.
(3) Squeeze the No. 1 radiator hose and No. 2 radiator hose several times by hand to bleed air from the cooling system.
CAUTION:
When squeezing the No. 1 radiator hose and No. 2 radiator hose:
- Wear protective gloves.
- Be careful as the No. 1 radiator hose and No. 2 radiator hose are hot.
- Keep your hands away from the fan and No. 2 fan.
NOTICE:
- If the coolant temperature gauge indicates an excessive temperature, turn off the engine and let it cool.
- Make sure that the radiator reserve tank assembly still has some engine coolant in it.
- If the radiator reserve tank assembly does not have enough engine coolant, the engine may overheat or be seriously damaged.
- If the radiator reserve tank assembly does not have enough engine coolant, perform the following: 1) stop the engine, 2) wait until the engine coolant has cooled down, and 3) add engine coolant until the radiator reserve tank assembly is filled to the FULL line.
(g) Stop the engine, and wait until the engine coolant cools down.
(h) Add engine coolant to the FULL line on the radiator reserve tank assembly.
3. INSPECT FOR COOLANT LEAK
Click here 

 Cooling Fan Ecu
On-vehicle InspectionON-VEHICLE INSPECTION PROCEDURE 1. CHECK COOLING FAN SYSTEM CAUTION: To prevent injury due to contact with an operating cooling fan, keep your hands and clothing away from the coo ...
Other materials:
Lexus RX (RX 350L, RX450h) 2016-2026 Repair Manual > Navigation System: "No GPS signal" mark is displayed
CAUTION / NOTICE / HINT NOTICE: Depending on the parts that are replaced during vehicle inspection or maintenance, performing initialization, registration or calibration may be needed. Refer to Precaution for Navigation System. Click here PROCEDURE 1. CHECK CABIN (a) Check the cabin for a ...
Lexus RX (RX 350L, RX450h) 2016-2026 Repair Manual > Window / Glass: Front Passenger Side Power Window Switch
ComponentsCOMPONENTS ILLUSTRATION *1 POWER WINDOW REGULATOR SWITCH ASSEMBLY *2 POWER WINDOW REGULATOR SWITCH ASSEMBLY WITH FRONT DOOR UPPER ARMREST BASE PANEL RemovalREMOVAL PROCEDURE 1. REMOVE POWER WINDOW REGULATOR SWITCH ASSEMBLY WITH FRONT DOOR UPPER ARMREST BASE PANEL Click here ...
Lexus RX (RX 350L, RX450h) 2016-{YEAR} Owners Manual
- For your information
- Pictorial index
- For safety and security
- Instrument cluster
- Operation of each component
- Driving
- Lexus Display Audio system
- Interior features
- Maintenance and care
- When trouble arises
- Vehicle specifications
- For owners
Lexus RX (RX 350L, RX450h) 2016-{YEAR} Repair Manual

0.0085