Lexus RX (RX 350L, RX450h) 2016-2026 Repair Manual: Cooling Fan Ecu
On-vehicle Inspection
ON-VEHICLE INSPECTION
PROCEDURE
1. CHECK COOLING FAN SYSTEM
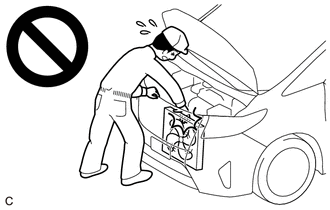
CAUTION:
To prevent injury due to contact with an operating cooling fan, keep your hands and clothing away from the cooling fans when inspecting the cooling fan system.
(a) Check and ensure the following conditions:
(1) The engine switch is off.
(2) The engine coolant temperature is less than 95 °C (203 °F).
(3) The battery voltage is between 11 to 14 V.
(4) The A/C switch is off.
(b) Connect the pickup of a clamp-on ammeter around either of the 2 wires for the cooling fan motor.
(c) Turn the engine switch on (IG) and wait for approximately 10 seconds. Check that the cooling fans are not operating.
(d) Start the engine. Check that the cooling fans are not operating with the engine idling.
HINT:
- Make sure that the engine coolant temperature is less than 95°C (203°F).
- Turn the A/C switch off.
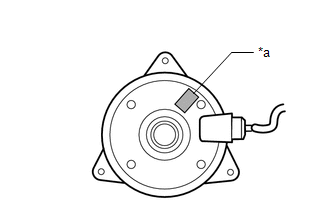
| (e) Confirm the code mark on the cooling fan motor LH. |
|
(f) Check that the cooling fans operate when the A/C switch is turned on.
(g) Measure the current while the cooling fan motors are operating.
Standard Current:
| Item | Code Mark / Motor Type | Condition | Specified Condition |
|---|---|---|---|
| Cooling fan motor RH | Cooling Fan Motor 100 W Type | Battery voltage applied at 20°C (68°F) | 18.0 to 24.0 A |
| Cooling Fan Motor 200 W Type | 26.0 to 32.0 A | ||
| Cooling fan motor LH | S | 18.0 to 24.0 A | |
| M | 26.0 to 32.0 A |
HINT:
Make sure that the engine coolant temperature is less than 95°C (203°F).
(h) Check that the cooling fans operate when the engine coolant temperature sensor connector is disconnected.
(i) Measure the current while the cooling fan motors are operating.
Standard Current:
| Item | Code Mark / Motor Type | Condition | Specified Condition |
|---|---|---|---|
| Cooling fan motor RH | Cooling Fan Motor 100 W Type | Battery voltage applied at 20°C (68°F) | 18.0 to 24.0 A |
| Cooling Fan Motor 200 W Type | 26.0 to 32.0 A | ||
| Cooling fan motor LH | S | 18.0 to 24.0 A | |
| M | 26.0 to 32.0 A |
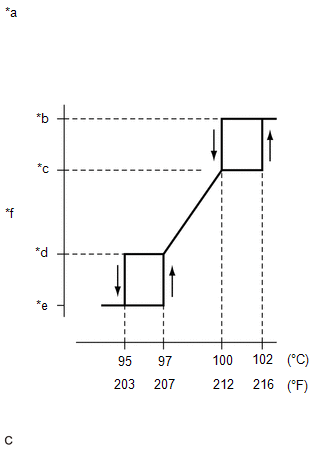
| (j) After the engine is warmed up, check that the cooling fans operate as shown in the illustration. HINT:
|
|
 Coolant
ReplacementREPLACEMENT CAUTION / NOTICE / HINT CAUTION: Do not remove the radiator cap sub-assembly or radiator drain cock plug while the engine and radiator assembly are still hot. Pressurized, hot e ...

Other materials:
Lexus RX (RX 350L, RX450h) 2016-2026 Repair Manual > Audio And Visual System (for 12.3 Inch Display): Panel Switches do not Function
CAUTION / NOTICE / HINT NOTICE: Depending on the parts that are replaced during vehicle inspection or maintenance, performing initialization, registration or calibration may be needed. Refer to Precaution for Audio and Visual System. Click here PROCEDURE 1. CHECK PANEL SWITCH (a) Check fo ...
Lexus RX (RX 350L, RX450h) 2016-2026 Repair Manual > Rear Blower Motor: Removal
REMOVAL PROCEDURE 1. REMOVE REAR NO. 2 SEAT ASSEMBLY Click here 2. REMOVE REAR FLOOR FINISH PLATE Click here 3. REMOVE REAR DOOR SCUFF PLATE RH HINT: Use the same procedure as for the LH side. Click here 4. REMOVE REAR DOOR INSIDE SCUFF PLATE RH HINT: Use the same procedure as for the LH sid ...
Lexus RX (RX 350L, RX450h) 2016-{YEAR} Owners Manual
- For your information
- Pictorial index
- For safety and security
- Instrument cluster
- Operation of each component
- Driving
- Lexus Display Audio system
- Interior features
- Maintenance and care
- When trouble arises
- Vehicle specifications
- For owners
Lexus RX (RX 350L, RX450h) 2016-{YEAR} Repair Manual

0.009