Lexus RX (RX 350L, RX450h) 2016-2026 Repair Manual: On-vehicle Inspection
ON-VEHICLE INSPECTION
CAUTION / NOTICE / HINT
CAUTION:
Do not remove the radiator cap sub-assembly while the engine and radiator assembly are still hot. Pressurized, hot engine coolant and steam may be released and cause serious burns.
.png)
PROCEDURE
1. CHECK RADIATOR CAP SUB-ASSEMBLY
CAUTION:
Do not remove the radiator cap sub-assembly while the engine and radiator assembly are still hot. Pressurized, hot engine coolant and steam may be released and cause serious burns.
(a) Measure the valve opening pressure.
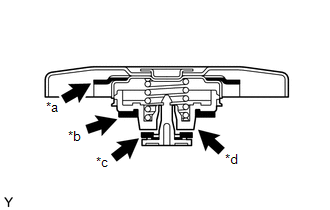
| *a | Rubber Packing (1) |
| *b | Rubber Packing (2) |
| *c | Rubber Packing (3) |
| *d | Valve Seat |
(1) If there are water stains or foreign matter on the rubber packings (1), (2) or (3), clean the part(s) with water and finger scouring.
(2) Check that the rubber packings (1), (2) and (3) are not deformed, cracked or swollen.
(3) Check that the rubber packing (3) and valve seat are not stuck together.
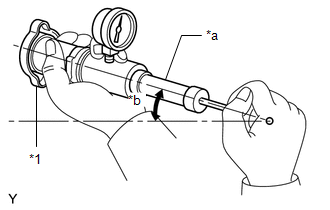
(4) Apply engine coolant to the rubber packings (2) and (3) before using the radiator cap tester.
(5) When using the radiator cap tester, tilt it upward 30° or more.
| (6) Pump the radiator cap tester several times, and check the maximum pressure. Pumping Speed: 1 pump per second HINT: Even if the radiator cap sub-assembly cannot maintain the maximum pressure, it is not a defect. Result:
If the maximum pressure is less than the minimum pressure, replace the radiator cap sub-assembly. |
|
2. INSPECT FINS FOR BLOCKAGE

(a) If the fins are clogged, wash them with water or asteam cleaner and dry them with compressed air.
NOTICE:
- To avoid damaging the fins, keep the tip of nozzle at right angles to the core surface.
-
If the nozzle of the steam cleaner is too close to the core, there is a possibility of damaging the fins. Always maintain the following distances from the core when using a steam cleaner. Standard Steam Cleaner Nozzle Distance
Steam Pressure
Specified Condition
2942 to 4903 kPa (30.0 to 50.0 kgf/cm2, 427 to 711 psi)
300 mm (11.8 in.)
4903 to 7845 kPa (50.0 to 80.0 kgf/cm2, 711 to 1138 psi)
500 mm (19.7 in.)
- If the fins are bent, straighten them with a screwdriver or pliers.
- Do not expose electronic components to water.
 Components
COMPONENTS ILLUSTRATION *1 FRONT WHEEL OPENING EXTENSION PAD LH *2 FRONT WHEEL OPENING EXTENSION PAD RH *3 NO. 1 ENGINE UNDER COVER *4 NO. 3 ENGINE UNDER COVER ILLUSTRATION ...
 Installation
INSTALLATION PROCEDURE 1. INSTALL LOWER RADIATOR SUPPORT (a) Install the 2 lower radiator supports to the radiator assembly. 2. INSTALL RADIATOR SUPPORT CUSHION (a) Install the 2 radiator support cush ...
Other materials:
Lexus RX (RX 350L, RX450h) 2016-2026 Repair Manual > Ambient Light(for Front Door): Components
COMPONENTS ILLUSTRATION *A for Driver Side *B for Front Passenger Side *1 COURTESY LIGHT ASSEMBLY *2 DOOR ARMREST COVER *3 FRONT DOOR INSIDE HANDLE BEZEL PLUG *4 FRONT DOOR NO. 1 STIFFENER CUSHION *5 FRONT DOOR TRIM BOARD SUB-ASSEMBLY *6 MULTIPLEX NETWORK MAST ...
Lexus RX (RX 350L, RX450h) 2016-2026 Repair Manual > Curtain Shield Airbag Assembly (w/o Rear No. 2 Seat): Removal
REMOVAL CAUTION / NOTICE / HINT The necessary procedures (adjustment, calibration, initialization, or registration) that must be performed after parts are removed, installed, or replaced during the curtain shield airbag assembly removal/installation are shown below. Necessary Procedure After Parts R ...
Lexus RX (RX 350L, RX450h) 2016-{YEAR} Owners Manual
- For your information
- Pictorial index
- For safety and security
- Instrument cluster
- Operation of each component
- Driving
- Lexus Display Audio system
- Interior features
- Maintenance and care
- When trouble arises
- Vehicle specifications
- For owners
Lexus RX (RX 350L, RX450h) 2016-{YEAR} Repair Manual

0.0149