Lexus RX (RX 350L, RX450h) 2016-2026 Repair Manual: Inspection
INSPECTION
PROCEDURE
1. INSPECT CANISTER (CHARCOAL CANISTER ASSEMBLY)
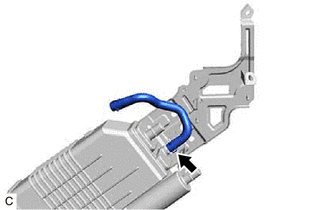
| (a) Slide the clip and disconnect the purge line hose from the canister (charcoal canister assembly). |
|
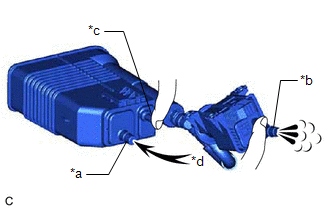
(b) Visually check the canister (charcoal canister assembly).
(1) Visually check the canister (charcoal canister assembly) for cracks or damage.
If cracks or damage is found, replace the canister (charcoal canister assembly).
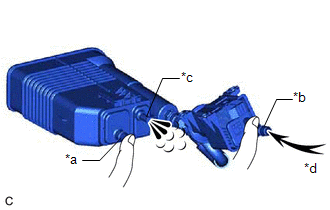
(c) Check canister (charcoal canister assembly) operation.
| (1) With the purge line port closed, blow 0.5 kPa (0.005 kgf/cm2, 0.1 psi) of air into the vent line port, and check that air flows from the air line port. If the result is not as specified, replace the canister (charcoal canister assembly). |
|
| (2) With the vent line port closed, blow 0.5 kPa (0.005 kgf/cm2, 0.1 psi) of air into the air line port, and check that air flows from the purge line port. If the result is not as specified, replace the canister (charcoal canister assembly). |
|
(d) Check for air leaks.
| (1) Connect a pressure gauge to the vent line port. |
|
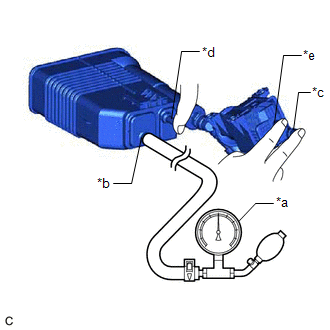
(2) With the purge line port, air line port and charcoal canister leak detection pump sub-assembly connector closed, apply 20 kPa (150 mmHg, 5.91 in. Hg) of pressurized air into the vent line port, then confirm that pressure is maintained for 1 minute.
If the result is not as specified, replace the canister (charcoal canister assembly).
(e) Check the charcoal canister leak detection pump sub-assembly.
| (1) Connect a positive (+) battery lead to terminal 5 and a negative (-) battery lead to terminal 1. |
|
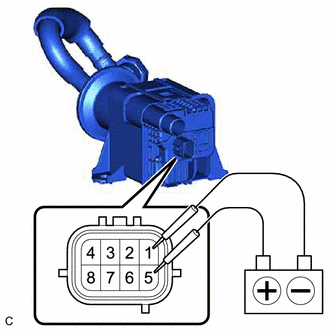
(2) Check that a clicking sound is heard from the charcoal canister leak detection pump sub-assembly.
If the result is not as specified, replace the charcoal canister leak detection pump sub-assembly.
(f) Connect the purge line hose to the canister (charcoal canister assembly) and slide the clip to secure it.
 Components
COMPONENTS ILLUSTRATION *A w/o Rear No. 2 Seat *B w/ Rear No. 2 Seat *1 TAIL EXHAUST PIPE ASSEMBLY *2 EXHAUST PIPE GASKET *3 EXHAUST PIPE SUPPORT - - N*m (kgf*cm, ...
 Removal
REMOVAL CAUTION / NOTICE / HINT The necessary procedures (adjustment, calibration, initialization or registration) that must be performed after parts are removed and installed, or replaced during cani ...
Other materials:
Lexus RX (RX 350L, RX450h) 2016-2026 Repair Manual > Rear Brake: Removal
REMOVAL CAUTION / NOTICE / HINT HINT:
Use the same procedure for the RH side and LH side.
The following procedure is for the LH side.
PROCEDURE 1. PRECAUTION Click here 2. PERFORM REAR BRAKE PAD REPLACEMENT MODE Click here 3. REMOVE REAR WHEEL Click here 4. DRAIN BRAKE FLUID NOTICE: ...
Lexus RX (RX 350L, RX450h) 2016-2026 Repair Manual > Telematics System: Terminals Of Ecu
TERMINALS OF ECU HINT: Check from the rear of the connector while it is connected to the components. DCM (TELEMATICS TRANSCEIVER) Terminal No. (Symbol) Wiring Color Terminal Description Condition Specified Condition J157-1 (+B) - J157-20 (E) Y - W-B Power source (+B) Always 1 ...
Lexus RX (RX 350L, RX450h) 2016-{YEAR} Owners Manual
- For your information
- Pictorial index
- For safety and security
- Instrument cluster
- Operation of each component
- Driving
- Lexus Display Audio system
- Interior features
- Maintenance and care
- When trouble arises
- Vehicle specifications
- For owners
Lexus RX (RX 350L, RX450h) 2016-{YEAR} Repair Manual

0.0103