Lexus RX (RX 350L, RX450h) 2016-2026 Repair Manual: Removal
REMOVAL
CAUTION / NOTICE / HINT
The necessary procedures (adjustment, calibration, initialization or registration) that must be performed after parts are removed and installed, or replaced during canister (charcoal canister assembly) removal/installation are shown below.
Necessary Procedures After Parts Removed/Installed/Replaced| Replaced Part or Performed Procedure | Necessary Procedure | Effect/Inoperative Function when Necessary Procedure not Performed | Link |
|---|---|---|---|
| Gas leak from exhaust system is repaired | Inspection After Repair |
| |
PROCEDURE
1. REMOVE TAIL EXHAUST PIPE ASSEMBLY (w/o Rear No. 2 Seat)
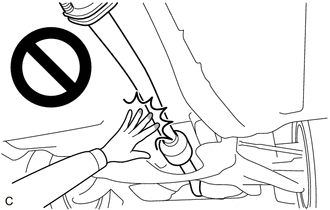
CAUTION:
To prevent burns, do not touch the engine, exhaust pipe or other high temperature components while the engine is hot.
| (a) Remove the 4 bolts and disconnect the tail exhaust pipe assembly from the center exhaust pipe assembly (TWC: Rear Catalyst) and No. 2 tail exhaust pipe assembly. |
|
(b) Remove the tail exhaust pipe assembly from the 2 exhaust pipe supports.
(c) Remove the 2 exhaust pipe gaskets from the center exhaust pipe assembly (TWC: Rear Catalyst) and tail exhaust pipe assembly.
2. REMOVE TAIL EXHAUST PIPE ASSEMBLY (w/ Rear No. 2 Seat)
Click here .gif)
3. REMOVE CHARCOAL CANISTER PROTECTOR

.png) | Bolt |
 | Nut |
(a) Remove the 4 bolts, 3 nuts and charcoal canister protector.
4. REMOVE CANISTER (CHARCOAL CANISTER ASSEMBLY)
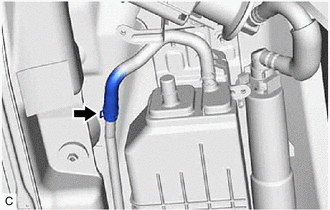
(a) Disconnect the vent line hose from the canister (charcoal canister assembly).
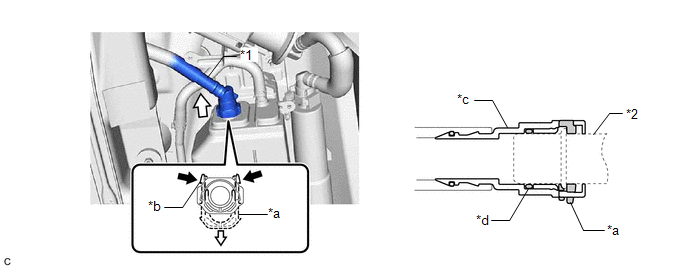
| *1 | Vent Line Hose | *2 | Pipe (Canister (Charcoal Canister Assembly)) |
| *a | Retainer | *b | Tab |
| *c | Tube Connector | *d | O-Ring |
| | Pinch | | Pull off |
NOTICE:
- Remove any dirt or foreign matter on the tube connector before performing this work.
- Do not allow any scratches or foreign matter to get on the parts when disconnecting them as the tube connector has an O-ring that seals the pipe.
- Perform this work by hand. Do not use any tools.
- Do not forcibly bend, twist or turn the vent line hose.
- Protect the disconnected parts by covering them with plastic bags after disconnecting the vent line hose.
- If the tube connector and pipe are stuck, push and pull to release them.
HINT:
Do not remove the retainer.
(1) Pinch the tabs of the retainer to disengage the lock claws and pull it down.
(2) Pull off the vent line hose.
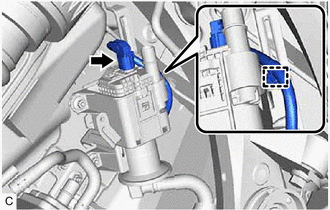
(b) Disconnect the air line tube from the charcoal canister leak detection pump sub-assembly.
NOTICE:
- Remove any dirt or foreign matter on the tube connector before performing this work.
- Do not allow any scratches or foreign matter to get on the parts when disconnecting them as the tube connector has an O-ring that seals the pipe.
- Perform this work by hand. Do not use any tools.
- Do not forcibly bend, twist or turn the air line tube.
- Protect the disconnected parts by covering them with plastic bags after disconnecting the air line tube.
- If the tube connector and pipe are stuck, push and pull to release them.
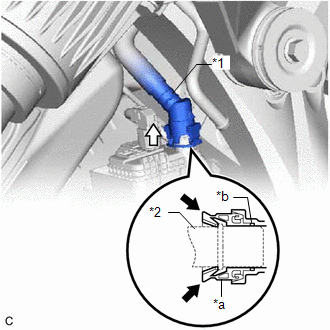
| *1 | Air Line Tube |
| *2 | Pipe (Canister (Charcoal Canister Assembly)) |
| *a | Tube Connector |
| *b | O-Ring |
| | Pinch |
| | Pull off |
(1) Push the air line tube firmly toward the charcoal canister leak detection pump sub-assembly.
(2) Pinch the tube connector as shown in the illustration.
(3) Pull off the air line tube to the pipe (charcoal canister leak detection pump sub-assembly).
| (c) Slide the clip and disconnect the purge line hose from the fuel tube. |
|
| (d) Disengage the clamp and disconnect the charcoal canister leak detection pump sub-assembly connector. |
|
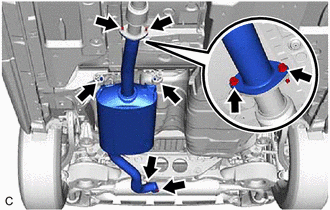
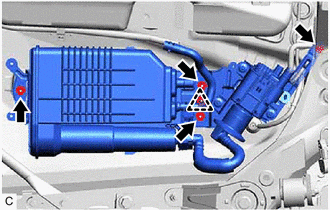
| (e) Remove the bolt, 3 nuts and disengage the clip to remove the canister (charcoal canister assembly) from the vehicle body. |
|
5. REMOVE CHARCOAL CANISTER LEAK DETECTION PUMP SUB-ASSEMBLY
HINT:
Only perform this procedure when replacement of the charcoal canister leak detection pump sub-assembly is necessary.
(a) Before removing the charcoal canister leak detection pump sub-assembly, clean the charcoal canister sub-assembly by blowing air into it to ensure that the charcoal canister sub-assembly is free of foreign matter.
NOTICE:
- Make sure to clean the charcoal canister sub-assembly using air only.
- Do not use gasoline, thinners or solvents.
(b) Disconnect the fuel tank vent hose sub-assembly.
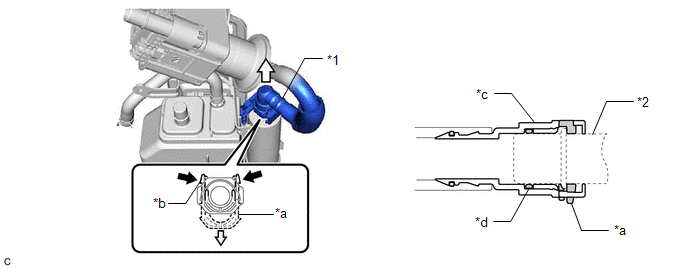
| *1 | Fuel Tank Vent Hose Sub-assembly | *2 | Pipe (Charcoal Canister Sub-assembly) |
| *a | Retainer | *b | Tab |
| *c | Tube Connector | *d | O-Ring |
| | Pinch | | Pull off |
NOTICE:
- Remove any dirt or foreign matter on the tube connector before performing this work.
- Do not allow any scratches or foreign matter to get on the parts when disconnecting them as the tube connector has an O-ring that seals the pipe.
- Perform this work by hand. Do not use any tools.
- Do not forcibly bend, twist or turn the fuel tank vent hose sub-assembly.
- Protect the disconnected parts by covering them with plastic bags after disconnecting the fuel tank vent hose sub-assembly.
- If the tube connector and pipe are stuck, push and pull to release them.
HINT:
Do not remove the retainer.
(1) Pinch the tabs of the retainer to disengage the lock claws and pull it down.
(2) Pull off the fuel tank vent hose sub-assembly.
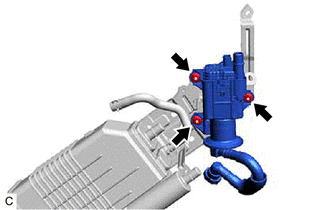
| (c) Remove the 3 nuts and No. 2 charcoal canister sub-assembly. |
|
| (d) Remove the charcoal canister cap. |
|

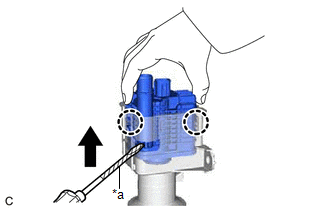
| (e) While disengaging the 2 claws as shown in the illustration, push the charcoal canister leak detection pump sub-assembly upwards using a screwdriver with its tip wrapped with protective tape to remove it. |
|
(f) Check if the No. 2 charcoal canister sub-assembly contains foreign matter such as mud or water.
| (1) Visually check that the inside of the No. 2 charcoal canister sub-assembly is free of foreign matter. |
|
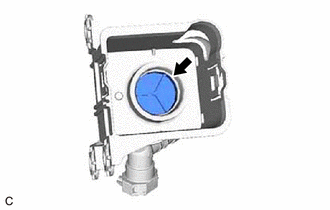
(2) Hold the No. 2 charcoal canister sub-assembly upside down to make sure that it is free of foreign matter.
If the No. 2 charcoal canister sub-assembly contains foreign matter, replace the canister (charcoal canister assembly).
 Inspection
INSPECTION PROCEDURE 1. INSPECT CANISTER (CHARCOAL CANISTER ASSEMBLY) (a) Slide the clip and disconnect the purge line hose from the canister (charcoal canister assembly). (b) Visually ...
 Installation
INSTALLATION PROCEDURE 1. INSTALL CHARCOAL CANISTER LEAK DETECTION PUMP SUB-ASSEMBLY HINT: Only perform this procedure when replacement of the charcoal canister leak detection pump sub-assembly is nec ...
Other materials:
Lexus RX (RX 350L, RX450h) 2016-2026 Repair Manual > Airbag System: Lost Communication with Front Door Pressure Sensor RH (B166D,B166E)
DESCRIPTION The side collision sensor RH circuit (bus 1) consists of the airbag sensor assembly, door side airbag sensor RH and rear airbag sensor RH. The door side airbag sensor RH and rear airbag sensor RH detect impacts to the vehicle and send signals to the airbag sensor assembly to determine if ...
Lexus RX (RX 350L, RX450h) 2016-2026 Repair Manual > Navigation System: MOST Communication Malfunction (B15D0)
DESCRIPTION Navigation system components communicate with each other via MOST communication. If a line short or short to ground occurs in a MOST communication line, communication will not be possible and the navigation system will not operate normally. After the engine switch is turned on (ACC), if ...
Lexus RX (RX 350L, RX450h) 2016-{YEAR} Owners Manual
- For your information
- Pictorial index
- For safety and security
- Instrument cluster
- Operation of each component
- Driving
- Lexus Display Audio system
- Interior features
- Maintenance and care
- When trouble arises
- Vehicle specifications
- For owners
Lexus RX (RX 350L, RX450h) 2016-{YEAR} Repair Manual

0.0098