Lexus RX (RX 350L, RX450h) 2016-2026 Repair Manual: Installation
INSTALLATION
PROCEDURE
1. INSTALL CHARCOAL CANISTER LEAK DETECTION PUMP SUB-ASSEMBLY
HINT:
Only perform this procedure when replacement of the charcoal canister leak detection pump sub-assembly is necessary.
| (a) Engage the 2 claws to install a new charcoal canister leak detection pump sub-assembly to the charcoal canister sub-assembly. NOTICE:
|
|
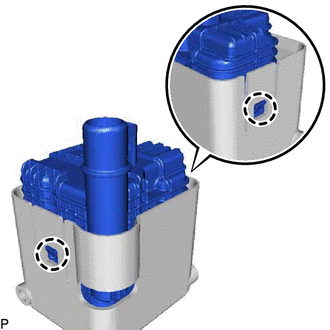
(b) Install the charcoal canister cap.
(c) Install the No. 2 charcoal canister sub-assembly with the 3 nuts.
Torque:
5.4 N·m {55 kgf·cm, 48 in·lbf}
(d) Push in the fuel tank vent hose sub-assembly onto the charcoal canister sub-assembly and push in the retainer to engage the lock claws.
NOTICE:
- Check that there are no scratches or foreign matter around the connecting parts of the tube connector and pipe (charcoal canister sub-assembly) before performing this work.
- After connecting the fuel tank vent hose sub-assembly, check that the fuel tank vent hose sub-assembly is securely connected by pulling on the tube connector.
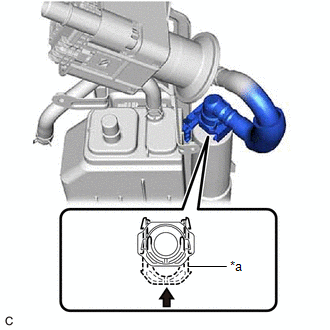
| *a | Retainer |
.png) | Push in |
2. INSTALL CANISTER (CHARCOAL CANISTER ASSEMBLY)
(a) Engage the clip and install the canister (charcoal canister assembly) to the vehicle body with the bolt and 3 nuts.
Torque:
5.5 N·m {56 kgf·cm, 49 in·lbf}
(b) Connect the charcoal canister leak detection pump sub-assembly connector and engage the clamp.
(c) Connect the purge line hose to the fuel tube and slide the clip to secure it.
(d) Push in the air line tube to the pipe (charcoal canister leak detection pump sub-assembly) until the air line tube makes a "click" sound.
NOTICE:
- Check that there are no scratches or foreign matter around the connecting parts of the tube connector and pipe (charcoal canister leak detection pump sub-assembly) before performing this work.
- After connecting the air line tube, check that the air line tube is securely connected by pulling on the tube connector.
(e) Push the vent line hose onto the canister (charcoal canister assembly) and push in the retainer to engage the lock claws.
NOTICE:
- Check that there are no scratches or foreign matter around the connecting parts of the tube connector and pipe (canister (charcoal canister assembly)) before performing this work.
- After connecting the vent line hose, check that the vent line hose is securely connected by pulling on the tube connector.
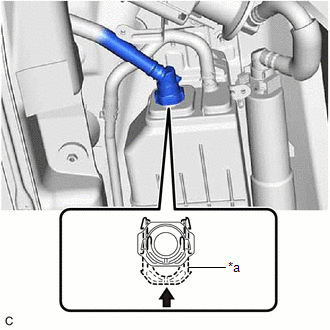
| *a | Retainer |
| | Push in |
3. INSTALL CHARCOAL CANISTER PROTECTOR
(a) Install the charcoal canister protector with the 4 bolts and 3 nuts.
Torque:
5.5 N·m {56 kgf·cm, 49 in·lbf}
4. INSTALL TAIL EXHAUST PIPE ASSEMBLY (w/o Rear No. 2 Seat)
(a) Install 2 new exhaust pipe gaskets to the center exhaust pipe assembly (TWC: Rear Catalyst) and tail exhaust pipe assembly.
(b) Connect the tail exhaust pipe assembly to the 2 exhaust pipe supports.
(c) Install the tail exhaust pipe assembly to the center exhaust pipe assembly (TWC: Rear Catalyst) and No. 2 tail exhaust pipe assembly with the 4 bolts.
Torque:
55 N·m {561 kgf·cm, 41 ft·lbf}
5. INSTALL TAIL EXHAUST PIPE ASSEMBLY (w/ Rear No. 2 Seat)
Click here .gif)
6. INSPECT FOR EXHAUST GAS LEAK
Click here
 Removal
REMOVAL CAUTION / NOTICE / HINT The necessary procedures (adjustment, calibration, initialization or registration) that must be performed after parts are removed and installed, or replaced during cani ...

Other materials:
Lexus RX (RX 350L, RX450h) 2016-2026 Repair Manual > Garage Door Opener System: Parts Location
PARTS LOCATION ILLUSTRATION *1 INNER REAR VIEW MIRROR ASSEMBLY - GARAGE DOOR OPENER *2 MAP LIGHT ASSEMBLY *3 INSTRUMENT PANEL JUNCTION BLOCK ASSEMBLY - ECU-DCC NO. 2 FUSE - IG1 NO. 4 FUSE - - ...
Lexus RX (RX 350L, RX450h) 2016-2026 Repair Manual > Power Seat Switch (for Rear No. 2 Seat): Inspection
INSPECTION PROCEDURE 1. INSPECT FOLD SEAT SWITCH ASSEMBLY (a) Inspect fold seat switch assembly (1) Measure the resistance according to the value(s) in the table below. Standard Resistance: Ground Tester Connection Condition Specified Condition 8 - 7 Fold switch (RH) pushed Below ...
Lexus RX (RX 350L, RX450h) 2016-{YEAR} Owners Manual
- For your information
- Pictorial index
- For safety and security
- Instrument cluster
- Operation of each component
- Driving
- Lexus Display Audio system
- Interior features
- Maintenance and care
- When trouble arises
- Vehicle specifications
- For owners
Lexus RX (RX 350L, RX450h) 2016-{YEAR} Repair Manual

0.0137