Lexus RX (RX 350L, RX450h) 2016-2026 Repair Manual: Installation
INSTALLATION
CAUTION / NOTICE / HINT
CAUTION:
- The engine assembly with transaxle is very heavy. Be sure to follow the procedure described in the repair manual, or the engine lifter may suddenly drop or the engine assembly with transaxle may fall off the engine lifter.
- To prevent burns, do not touch the engine, exhaust manifold or other high temperature components while the engine is hot.
PROCEDURE
1. INSTALL CAMSHAFT TIMING GEAR BOLT (for Exhaust Side of Bank 1)
NOTICE:
There are different types of camshaft timing gear bolts. Make sure to check the identification mark to determine the tightening torque.
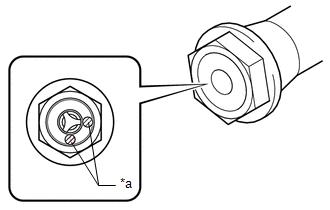
| *a | Identification Mark Stamp |
| Item | Identification Mark Stamp | |
|---|---|---|
| Intake Side | Exhaust Side | |
| Type A | A | B |
| Type B | D | G |
(a) Make sure that the No. 1 cylinder is at TDC/compression.
HINT:
Check that the cutout of the camshaft timing gear assembly is at the top and align the timing mark (cutout) of the crankshaft pulley with the timing mark on the timing chain cover assembly.
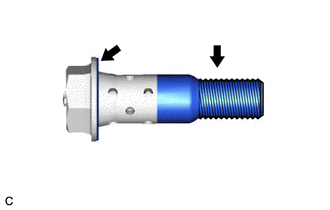
| (b) Apply engine oil to the areas of the camshaft timing gear bolt shown in the illustration. |
|
(c) While holding the crankshaft pulley, temporarily install the camshaft timing gear bolt.
Torque:
10 N·m {102 kgf·cm, 7 ft·lbf}
NOTICE:
- If the camshaft timing gear bolt has been struck or dropped, replace it.
- If there is any abnormal resistance when temporarily installing the camshaft timing gear bolt, loosen it and make sure that the No. 1 cylinder is at TDC/compression, and then temporarily install the camshaft timing gear bolt again.
HINT:
Make sure that the flange part of the camshaft timing gear bolt contacts the entire circumference of the camshaft timing gear assembly.
(d) While holding the crankshaft pulley, tighten the camshaft timing gear bolt.
Torque:
Type A :
120 N·m {1224 kgf·cm, 89 ft·lbf}
Type B :
95 N·m {969 kgf·cm, 70 ft·lbf}
NOTICE:
Do not use an impact wrench.
2. INSTALL CAMSHAFT TIMING GEAR BOLT (for Intake Side of Bank 1)
NOTICE:
There are different types of camshaft timing gear bolts. Make sure to check the identification mark to determine the tightening torque.
| *a | Identification Mark Stamp |
| Item | Identification Mark Stamp | |
|---|---|---|
| Intake Side | Exhaust Side | |
| Type A | A | B |
| Type B | D | G |
(a) Make sure that the No. 1 cylinder is at TDC/compression.
HINT:
Check that the cutout of the camshaft timing gear assembly is at the top and align the timing mark (cutout) of the crankshaft pulley with the timing mark on the timing chain cover assembly.
| (b) Apply engine oil to the areas of the camshaft timing gear bolt shown in the illustration. |
|

(c) While holding the crankshaft pulley, temporarily install the camshaft timing gear bolt.
Torque:
10 N·m {102 kgf·cm, 7 ft·lbf}
NOTICE:
- If the camshaft timing gear bolt has been struck or dropped, replace it.
- If there is any abnormal resistance when temporarily installing the camshaft timing gear bolt, loosen it and make sure that the No. 1 cylinder is at TDC/compression, and then temporarily install the camshaft timing gear bolt again.
HINT:
Make sure that the flange part of the camshaft timing gear bolt contacts the entire circumference of the camshaft timing gear assembly.
(d) While holding the crankshaft pulley, loosen the camshaft timing gear bolt 60 to 180°.
(e) Turn the crankshaft pulley counterclockwise 30 to 90°.
(f) While holding the crankshaft pulley, tighten the camshaft timing gear bolt.
Torque:
Type A :
120 N·m {1224 kgf·cm, 89 ft·lbf}
Type B :
95 N·m {969 kgf·cm, 70 ft·lbf}
NOTICE:
Do not use an impact wrench.
3. INSTALL CAMSHAFT TIMING OIL CONTROL SOLENOID ASSEMBLY (for Exhaust Side of Bank 1)
Click here .gif)
4. INSTALL CAMSHAFT TIMING OIL CONTROL SOLENOID ASSEMBLY (for Intake Side of Bank 1)
Click here
5. INSTALL ENGINE ASSEMBLY WITH TRANSAXLE
Click here
 On-vehicle Inspection
ON-VEHICLE INSPECTION PROCEDURE 1. REMOVE CAMSHAFT TIMING OIL CONTROL SOLENOID ASSEMBLY Click here 2. INSPECT CAMSHAFT TIMING GEAR BOLT (a) for intake side: (1) Check the stroke of the plunger ...
 Removal
REMOVAL CAUTION / NOTICE / HINT The necessary procedures (adjustment, calibration, initialization or registration) that must be performed after parts are removed and installed, or replaced during cams ...
Other materials:
Lexus RX (RX 350L, RX450h) 2016-2026 Owners Manual > Rear seats: Folding the second-row seat seatbacks (RX450h)
■ Before folding the rear seatbacks
1. Stow the center seat seat belt buckle.
2. Lower the rear seat head restraints to the lowest position.
■ Folding the rear seatbacks (manual seat)
Using the seatback angle adjustment lever
Pull the lever and fold the rear seatback.
Using the lever in ...
Lexus RX (RX 350L, RX450h) 2016-2026 Repair Manual > Front Door Lock: Removal
REMOVAL CAUTION / NOTICE / HINT The necessary procedures (adjustment, calibration, initialization or registration) that must be performed after parts are removed and installed, or replaced during front door lock with motor assembly removal/installation are shown below. Necessary Procedures After Par ...
Lexus RX (RX 350L, RX450h) 2016-{YEAR} Owners Manual
- For your information
- Pictorial index
- For safety and security
- Instrument cluster
- Operation of each component
- Driving
- Lexus Display Audio system
- Interior features
- Maintenance and care
- When trouble arises
- Vehicle specifications
- For owners
Lexus RX (RX 350L, RX450h) 2016-{YEAR} Repair Manual

0.0112