Lexus RX (RX 350L, RX450h) 2016-2026 Repair Manual: Installation
INSTALLATION
PROCEDURE
1. INSTALL KNOCK CONTROL SENSOR
HINT:
Perform "Inspection After Repair" after replacing a knock control sensor.
Click here .gif)
(a) Temporarily install the 2 knock control sensors to the cylinder block sub-assembly with the 2 bolts so that the knock control sensor installation position is as shown in the illustration.
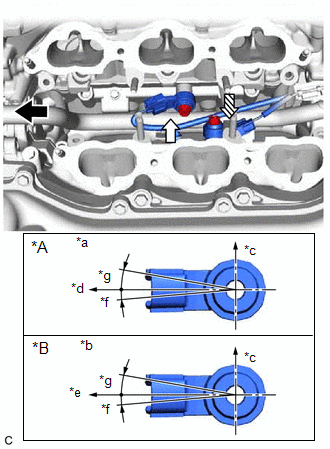
| *A | for Bank 1 |
| *B | for Bank 2 |
| *a | View A |
| *b | View B |
| *c | Top |
| *d | Engine Front |
| *e | Engine Rear |
| *f | 5° |
| *g | 10° |
.png) | Front |
.png) | View A |
 | View B |
NOTICE:
- If a knock control sensor has been struck or dropped, replace it.
- Make sure that the knock control sensor is installed in the correct position.
| (b) Tighten the bolt (A). Torque: 20 N·m {204 kgf·cm, 15 ft·lbf} |
|
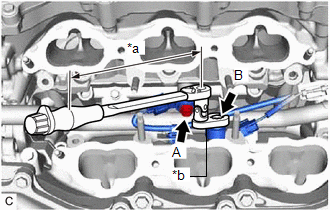
(c) Using a 10 mm union nut wrench, tighten the bolt (B).
Torque:
Specified tightening torque :
20 N·m {204 kgf·cm, 15 ft·lbf}
HINT:
-
Calculate the torque wrench reading when changing the fulcrum length of the torque wrench.
Click here
-
When using a 10 mm union nut wrench (fulcrum length of 22 mm (0.866 in.)) + torque wrench (fulcrum length of 162 mm (6.38 in.)):
17.6 N*m (179 kgf*cm, 13 ft.*lbf)
(d) Connect the 2 knock control sensor connectors.
2. INSTALL FUEL DELIVERY PIPE
Click here
3. PERFORM INITIALIZATION
(a) Perform "Inspection After Repair" after replacing a knock control sensor.
Click here
 Inspection
INSPECTION PROCEDURE 1. INSPECT KNOCK CONTROL SENSOR (a) Measure the resistance according to the value(s) in the table below. Standard Resistance: Tester Connection Condition Specified Cond ...

Other materials:
Lexus RX (RX 350L, RX450h) 2016-2026 Repair Manual > Curtain Shield Airbag Assembly (w/o Rear No. 2 Seat): Disposal
DISPOSAL CAUTION / NOTICE / HINT CAUTION: Before performing pre-disposal deployment of any SRS part, review and closely follow all applicable environmental and hazardous material regulations. Pre-disposal deployment may be considered hazardous material treatment. PROCEDURE 1. PRECAUTION CAUTION:
...
Lexus RX (RX 350L, RX450h) 2016-2026 Repair Manual > Door Control Receiver: Components
COMPONENTS ILLUSTRATION *A w/o Rear No. 2 Seat *B for TMC Made *C for TMMC Made - - *1 DECK BOARD ASSEMBLY *2 DECK SIDE TRIM BOX RH *3 REAR DECK FLOOR BOX *4 REAR FLOOR FINISH PLATE *5 REAR NO. 3 FLOOR BOARD *6 REAR NO. 4 FLOOR BOARD *7 TONNEAU ...
Lexus RX (RX 350L, RX450h) 2016-{YEAR} Owners Manual
- For your information
- Pictorial index
- For safety and security
- Instrument cluster
- Operation of each component
- Driving
- Lexus Display Audio system
- Interior features
- Maintenance and care
- When trouble arises
- Vehicle specifications
- For owners
Lexus RX (RX 350L, RX450h) 2016-{YEAR} Repair Manual

0.0087