Lexus RX (RX 350L, RX450h) 2016-2026 Repair Manual: Removal
REMOVAL
CAUTION / NOTICE / HINT
The necessary procedures (adjustment, calibration, initialization or registration) that must be performed after parts are removed and installed, or replaced during mass air flow meter sub-assembly removal/installation are shown below.
Necessary Procedures After Parts Removed/Installed/Replaced| Replaced Part or Performed Procedure | Necessary Procedure | Effect/Inoperative Function when Necessary Procedure not Performed | Link |
|---|---|---|---|
| Replacement of mass air flow meter sub-assembly | Inspection After Repair |
| |
PROCEDURE
1. REMOVE AIR CLEANER CAP WITH AIR CLEANER HOSE
Click here .gif)
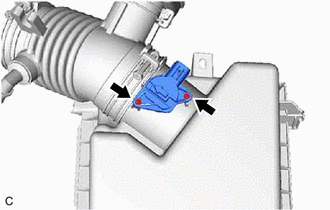
2. REMOVE MASS AIR FLOW METER SUB-ASSEMBLY
| (a) Remove the 2 screws and mass air flow meter sub-assembly from the air cleaner cap sub-assembly. NOTICE: If the mass air flow meter sub-assembly has been struck or dropped, replace it. |
|
 On-vehicle Inspection
ON-VEHICLE INSPECTION PROCEDURE 1. INSPECT MASS AIR FLOW METER SUB-ASSEMBLY HINT: Perform "Inspection After Repair" after replacing the mass air flow meter sub-assembly. Click here (a) Read the val ...
 Inspection
INSPECTION PROCEDURE 1. INSPECT MASS AIR FLOW METER SUB-ASSEMBLY (a) Perform a visual check for any foreign matter on the intake air temperature sensor (thermistor) of the mass air flow meter sub-a ...
Other materials:
Lexus RX (RX 350L, RX450h) 2016-2026 Repair Manual > Brake Control / Dynamic Control Systems: Brake Hold Switch
ComponentsCOMPONENTS ILLUSTRATION *1 BRAKE HOLD SWITCH (ELECTRIC PARKING BRAKE SWITCH ASSEMBLY) *2 CONSOLE PANEL SUB-ASSEMBLY RemovalREMOVAL PROCEDURE 1. PRECAUTION Click here 2. REMOVE CONSOLE PANEL SUB-ASSEMBLY Click here 3. REMOVE BRAKE HOLD SWITCH (ELECTRIC PARKING BRAKE SWIT ...
Lexus RX (RX 350L, RX450h) 2016-2026 Repair Manual > Wireless Charging System: Precaution
PRECAUTION PRECAUTION FOR DISCONNECTING CABLE FROM NEGATIVE BATTERY TERMINAL NOTICE: When disconnecting the cable from the negative (-) battery terminal, initialize the following systems after the terminal is reconnected. System Name See Procedure Lane Control System Pre-collision ...
Lexus RX (RX 350L, RX450h) 2016-{YEAR} Owners Manual
- For your information
- Pictorial index
- For safety and security
- Instrument cluster
- Operation of each component
- Driving
- Lexus Display Audio system
- Interior features
- Maintenance and care
- When trouble arises
- Vehicle specifications
- For owners
Lexus RX (RX 350L, RX450h) 2016-{YEAR} Repair Manual

0.0126