Lexus RX (RX 350L, RX450h) 2016-2026 Repair Manual: Replacement
REPLACEMENT
PROCEDURE
1. REPLACE STRAIGHT PIN
NOTICE:
If a straight pin is deformed, replace it.
(a) Using a plastic hammer, tap in new straight pins to the cylinder block sub-assembly.
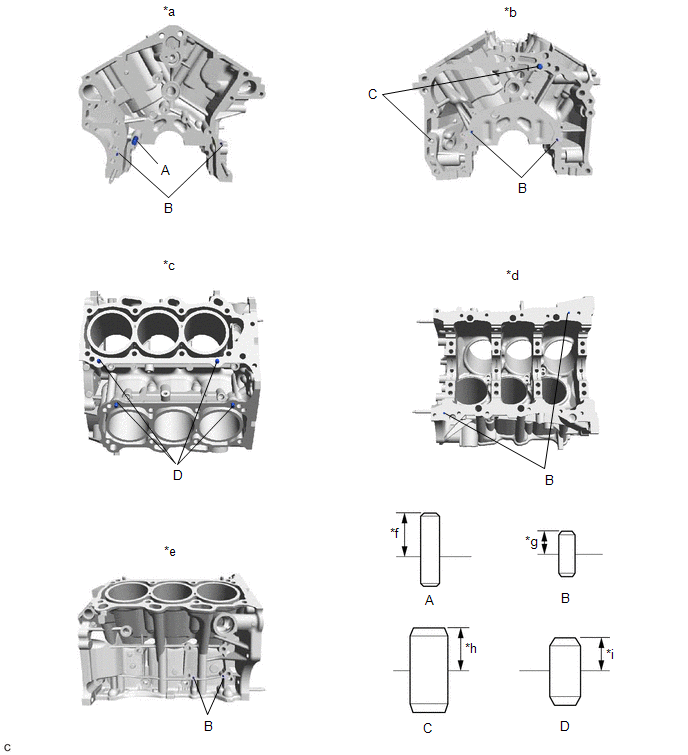
| *a | Front Side | *b | Rear Side |
| *c | Top Side | *d | Bottom Side |
| *e | RH Side | *f | 23 mm (0.906 in.) |
| *g | 6 mm (0.236 in.) | *h | 11 mm (0.433 in.) |
| *i | 9 mm (0.354 in.) | - | - |
Standard Protrusion Height:
| Item | Specified Condition |
|---|---|
| Pin (A) | 23 mm (0.906 in.) |
| Pin (B) | 6 mm (0.236 in.) |
| Pin (C) | 11 mm (0.433 in.) |
| Pin (D) | 9 mm (0.354 in.) |
2. REPLACE STUD BOLT
NOTICE:
If a stud bolt is deformed or its threads are damaged, replace it.
(a) Using E8 and E10 "TORX" socket wrenches, install the stud bolts to the cylinder block sub-assembly.
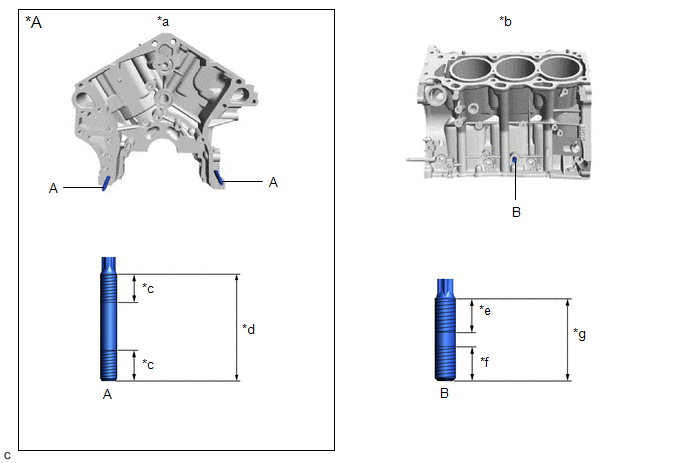
| *A | w/ Stud Bolt | - | - |
| *a | Front Side | *b | LH Side |
| *c | 12 mm (0.472 in.) | *d | 52 mm (2.05 in.) |
| *e | 23 mm (0.906 in.) | *f | 15 mm (0.591 in.) |
| *g | 40 mm (1.57 in.) | - | - |
Torque:
10 N·m {102 kgf·cm, 7 ft·lbf}
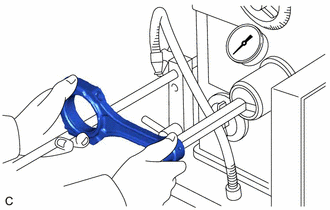
3. REPLACE CONNECTING ROD SMALL END BUSH
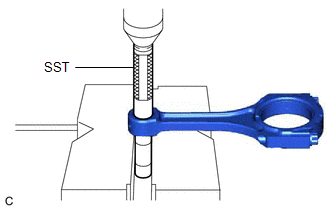
| (a) Using SST and a press, press out the connecting rod small end bush. SST: 09222-30010 |
|
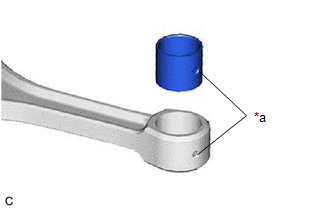
| (b) Align the oil hole of a new connecting rod small end bush with the oil hole of the connecting rod. |
|
| (c) Using SST and a press, install the connecting rod small end bush. SST: 09222-30010 |
|
| (d) Using a pin hole grinder, hone the connecting rod small end bush to obtain the standard oil clearance between the connecting rod small end bush and piston pin. Standard Oil Clearance: 0.001 to 0.007 mm (0.0000394 to 0.000276 in.) |
|
(e) Coat the piston pin with engine oil, and push it into the connecting rod with your thumb.
HINT:
Check that the piston pin fits at a normal room temperature.
 Components
COMPONENTS ILLUSTRATION *A w/ Stud Bolt - - *1 CONNECTING ROD BEARING *2 CRANKSHAFT *3 CRANKSHAFT BEARING *4 CRANKSHAFT THRUST WASHER SET *5 CYLINDER BLOCK SUB-ASSE ...
 Disassembly
DISASSEMBLY CAUTION / NOTICE / HINT The necessary procedures (adjustment, calibration, initialization, or registration) that must be performed after parts are removed and installed, or replaced during ...
Other materials:
Lexus RX (RX 350L, RX450h) 2016-2026 Repair Manual > Roof Headlining (w/ Rear No. 2 Seat): Removal
REMOVAL CAUTION / NOTICE / HINT The necessary procedures (adjustment, calibration, initialization or registration) that must be performed after parts are removed and installed, or replaced during roof headlining removal/installation are shown below. Necessary Procedures After Parts Removed/Installed ...
Lexus RX (RX 350L, RX450h) 2016-2026 Repair Manual > Vehicle Stability Control System: Brake System Control Module "A" System Voltage System Voltage Low (C137BA2)
DESCRIPTION If a malfunction is detected in the power supply circuit, the skid control ECU (brake actuator assembly) stores this DTC and the fail-safe function prohibits ABS operation. This DTC is stored when the +BS terminal voltage meets one of the DTC detection conditions due to a malfunction in ...
Lexus RX (RX 350L, RX450h) 2016-{YEAR} Owners Manual
- For your information
- Pictorial index
- For safety and security
- Instrument cluster
- Operation of each component
- Driving
- Lexus Display Audio system
- Interior features
- Maintenance and care
- When trouble arises
- Vehicle specifications
- For owners
Lexus RX (RX 350L, RX450h) 2016-{YEAR} Repair Manual

0.0114