Lexus RX (RX 350L, RX450h) 2016-2026 Repair Manual: Parts Location
PARTS LOCATION
ILLUSTRATION
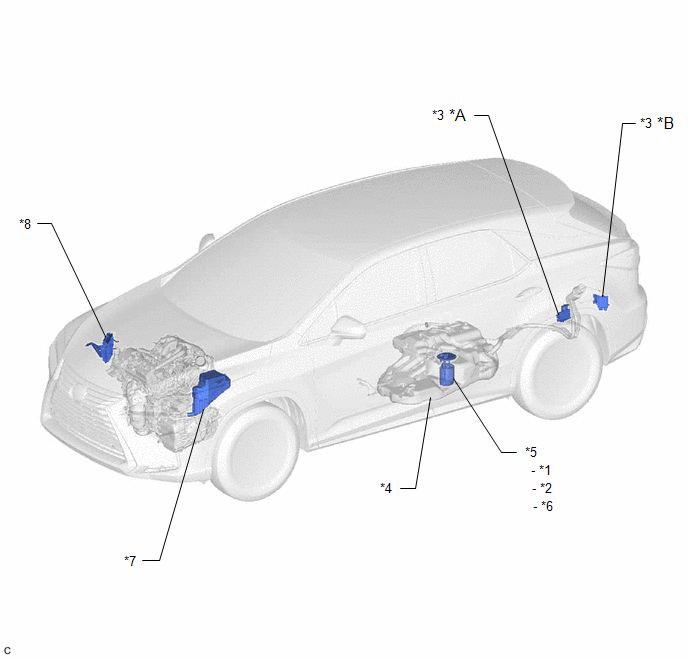
| *A | w/ Rear No. 2 Seat | *B | w/o Rear No. 2 Seat |
| *1 | FUEL SENDER GAUGE ASSEMBLY | *2 | FUEL PUMP (for Low Pressure) |
| *3 | FUEL PUMP CONTROL ECU ASSEMBLY | *4 | FUEL TANK ASSEMBLY |
| *5 | FUEL SUCTION TUBE WITH PUMP AND GAUGE ASSEMBLY | *6 | FUEL MAIN VALVE ASSEMBLY |
| *7 | ECM | *8 | NO. 1 ENGINE ROOM RELAY BLOCK AND NO. 1 JUNCTION BLOCK ASSEMBLY - FUEL PMP RELAY - FUEL PMP FUSE - P INJ FUSE - FL MAIN FUSE |
ILLUSTRATION
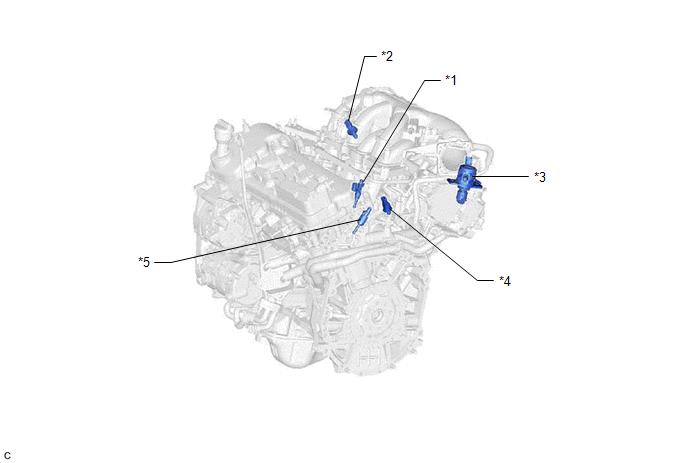
| *1 | FUEL INJECTOR ASSEMBLY (for Port Injection) | *2 | FUEL PRESSURE SENSOR (for Low Pressure) |
| *3 | FUEL PUMP ASSEMBLY (for High Pressure) | *4 | FUEL PRESSURE SENSOR (for High Pressure) |
| *5 | FUEL INJECTOR ASSEMBLY (for Direct Injection) | - | - |
 Fuel System
...
 Precaution
PRECAUTION CAUTION:
The fuel tank assembly is very heavy. Be sure to follow the procedure described in the repair manual, or the fuel tank assembly may fall off the engine lifter.
To prevent ser ...
Other materials:
Lexus RX (RX 350L, RX450h) 2016-2026 Repair Manual > Sliding Roof Housing (for Slidng Roof): Installation
INSTALLATION PROCEDURE 1. INSTALL SLIDING ROOF HOUSING ASSEMBLY (a) Loosen the 10 bolts of the brackets of the sliding roof housing assembly. (b) Temporarily install the sliding roof housing assembly with the 6 nuts and 8 bolts. (c) Tighten the 2 nuts. HINT: Tighten the 2 nuts in the order shown in ...
Lexus RX (RX 350L, RX450h) 2016-2026 Repair Manual > Vehicle Stability Control System: Terminals Of Ecu
TERMINALS OF ECU TERMINALS OF ECU *a Component without harness connected (Skid Control ECU (Brake Actuator Assembly)) - - Terminal No. (Symbol) Terminal Description 1 (GND1) Skid control ECU (brake actuator assembly) ground 2 - 3 - 4 (RL-) Rear wheel speed L ...
Lexus RX (RX 350L, RX450h) 2016-{YEAR} Owners Manual
- For your information
- Pictorial index
- For safety and security
- Instrument cluster
- Operation of each component
- Driving
- Lexus Display Audio system
- Interior features
- Maintenance and care
- When trouble arises
- Vehicle specifications
- For owners
Lexus RX (RX 350L, RX450h) 2016-{YEAR} Repair Manual

0.012