Lexus RX (RX 350L, RX450h) 2016-2026 Repair Manual: Removal
REMOVAL
CAUTION / NOTICE / HINT
The necessary procedures (adjustment, calibration, initialization, or registration) that must be performed after parts are removed and installed, or replaced during oil cooler assembly removal/installation are shown below.
Necessary Procedure After Parts Removed/Installed/Replaced| Replacement Part or Performed Procedure | Necessary Procedure | Effect/Inoperative Function when Necessary Procedure not Performed | Link |
|---|---|---|---|
| Replacement of air fuel ratio sensor | Inspection After Repair |
| |
| Gas leak from exhaust system is repaired |
PROCEDURE
1. DRAIN ENGINE COOLANT
Click here .gif)
2. DRAIN ENGINE OIL
Click here
3. REMOVE EXHAUST MANIFOLD ASSEMBLY LH
Click here
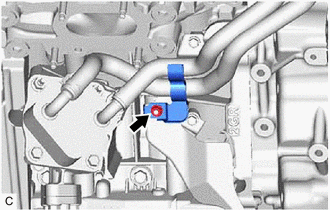
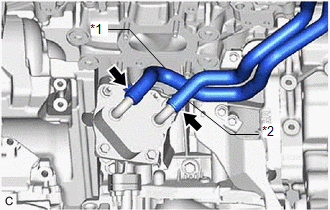
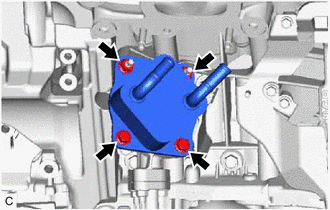
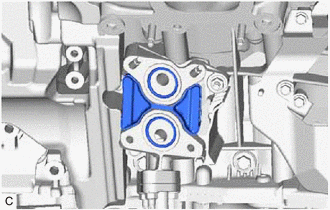
4. REMOVE OIL COOLER ASSEMBLY
| (a) Remove the nut and hose clamp. |
|
| (b) Slide the 2 clips and disconnect the No. 4 water by-pass hose and No. 5 water by-pass hose from the oil cooler assembly. |
|
| (c) Remove the 2 bolts, 2 nuts and oil cooler assembly. |
|
| (d) Remove the 2 O-rings and No. 1 cylinder block insulator. |
|
 Components
COMPONENTS ILLUSTRATION *1 OIL COOLER ASSEMBLY *2 HOSE CLAMP *3 NO. 4 WATER BY-PASS HOSE *4 NO. 5 WATER BY-PASS HOSE *5 O-RING *6 NO. 1 CYLINDER BLOCK INSULATOR N* ...
 Installation
INSTALLATION PROCEDURE 1. INSTALL OIL COOLER ASSEMBLY (a) Install the No. 1 cylinder block insulator and 2 new O-rings. (b) Install the oil cooler assembly with the 2 bolts and 2 nuts. Torque: 21 N· ...
Other materials:
Lexus RX (RX 350L, RX450h) 2016-2026 Repair Manual > Can Communication System: Suspension Control ECU Communication Stop Mode
DESCRIPTION Detection Item Symptom Trouble Area Suspension Control ECU Communication Stop Mode Either condition is met:
"Suspension Control (Air Suspension)" is not displayed on the CAN Bus Check screen of the Techstream.
Click here
Communication system DTCs (DTCs that start w ...
Lexus RX (RX 350L, RX450h) 2016-2026 Repair Manual > Audio And Visual System (for 8 Inch Display): D-Seat ECU Vehicle Information Reading/Writing Process Malfunction (B15F8)
DESCRIPTION This DTC is stored when items controlled by the main body ECU (multiplex network body ECU) cannot be customized via the audio and visual system vehicle customization screen. HINT: The main body ECU (multiplex network body ECU) controls the front power seat control system (w/ Memory) rela ...
Lexus RX (RX 350L, RX450h) 2016-{YEAR} Owners Manual
- For your information
- Pictorial index
- For safety and security
- Instrument cluster
- Operation of each component
- Driving
- Lexus Display Audio system
- Interior features
- Maintenance and care
- When trouble arises
- Vehicle specifications
- For owners
Lexus RX (RX 350L, RX450h) 2016-{YEAR} Repair Manual

0.0093