
Lexus RX (RX 350L, RX450h) 2016-2026 Repair Manual: Components
COMPONENTS
ILLUSTRATION
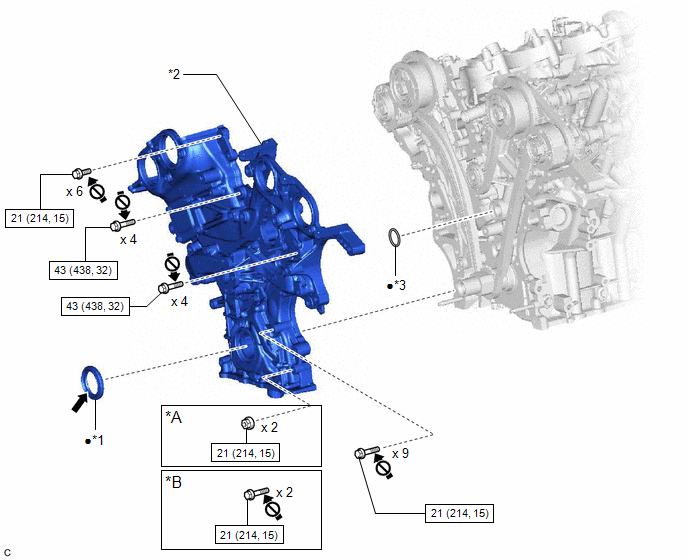
| *A | w/ Stud Bolt | *B | w/o Stud Bolt |
| *1 | TIMING CHAIN CASE OIL SEAL | *2 | TIMING CHAIN COVER ASSEMBLY |
| *3 | OIL PUMP GASKET | - | - |
.png) | N*m (kgf*cm, ft.*lbf): Specified torque | ● | Non-reusable part |
.png) | MP Grease | .png) | Do not apply lubricants to the threaded parts |
ILLUSTRATION
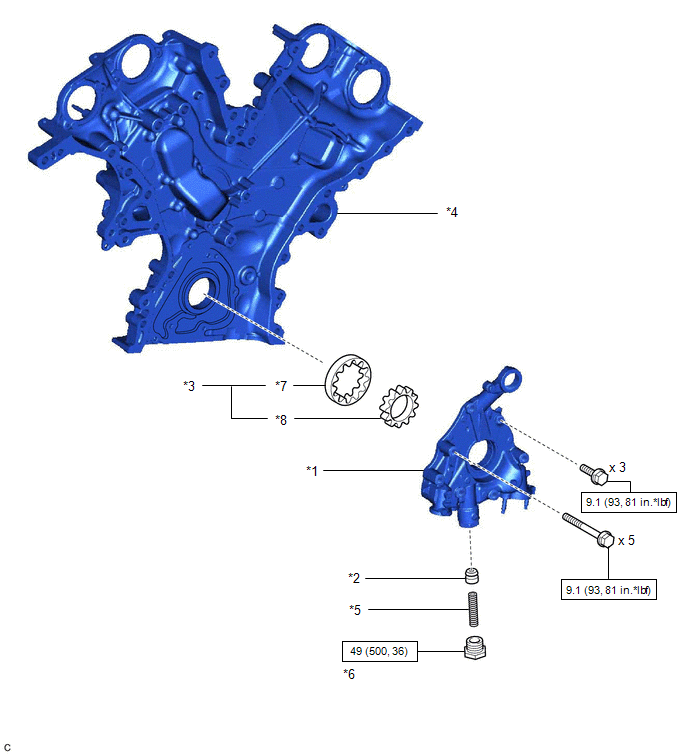
| *1 | OIL PUMP COVER | *2 | OIL PUMP RELIEF VALVE |
| *3 | OIL PUMP ROTOR SET | *4 | TIMING CHAIN COVER ASSEMBLY |
| *5 | OIL PUMP RELIEF VALVE SPRING | *6 | OIL PUMP RELIEF VALVE PLUG |
| *7 | DRIVEN ROTOR | *8 | DRIVE ROTOR |
| | N*m (kgf*cm, ft.*lbf): Specified torque | - | - |
 Oil Pump
...
 Removal
REMOVAL CAUTION / NOTICE / HINT The necessary procedures (adjustment, calibration, initialization, or registration) that must be performed after parts are removed and installed, or replaced during eng ...
Other materials:
Lexus RX (RX 350L, RX450h) 2016-2026 Repair Manual > Blind Spot Monitor System: Lost Communication with ECM / PCM "A" (U0100,U0125,U0126,U0129,U0142)
DESCRIPTION These DTCs are stored if there is a malfunction in the CAN communication system connected to the blind spot monitor sensor. HINT: If CAN communication system DTCs are stored, they may also be stored for other systems. DTC No. Detection Item DTC Detection Condition Trouble Area ...
Lexus RX (RX 350L, RX450h) 2016-2026 Repair Manual > Console Box Light (for Console Box Front Side): Components
COMPONENTS ILLUSTRATION *1 CONSOLE PANEL SUB-ASSEMBLY *2 INSTRUMENT CLUSTER FINISH PANEL ORNAMENT *3 LOWER NO. 1 INSTRUMENT PANEL FINISH PANEL *4 LOWER NO. 2 INSTRUMENT PANEL FINISH PANEL *5 NO. 1 INTERIOR ILLUMINATION LIGHT ASSEMBLY *6 REAR CONSOLE BOX GARNISH *7 ...
Lexus RX (RX 350L, RX450h) 2016-{YEAR} Owners Manual
- For your information
- Pictorial index
- For safety and security
- Instrument cluster
- Operation of each component
- Driving
- Lexus Display Audio system
- Interior features
- Maintenance and care
- When trouble arises
- Vehicle specifications
- For owners
Lexus RX (RX 350L, RX450h) 2016-{YEAR} Repair Manual

0.0113