Lexus RX (RX 350L, RX450h) 2016-2026 Repair Manual: Installation
INSTALLATION
PROCEDURE
1. INSTALL TIMING CHAIN COVER ASSEMBLY
(a) Clean the contact surfaces of the engine assembly, and confirm that no oil, moisture, or other foreign matter is on the surfaces.
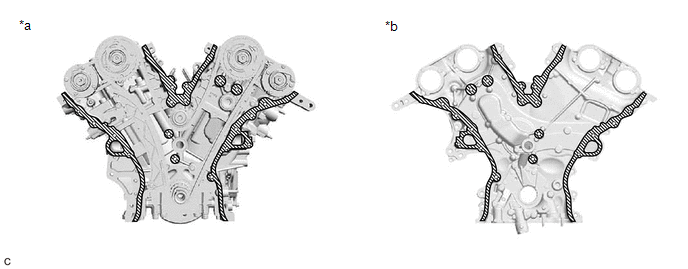
| *a | Engine Assembly Side | *b | Timing Chain Cover Assembly Side |
.png) | Clean | - | - |
NOTICE:
Be sure to clean the contact surfaces, especially the surfaces shown in the illustration.
(b) Apply seal packing to the timing chain cover assembly as shown in the illustration.
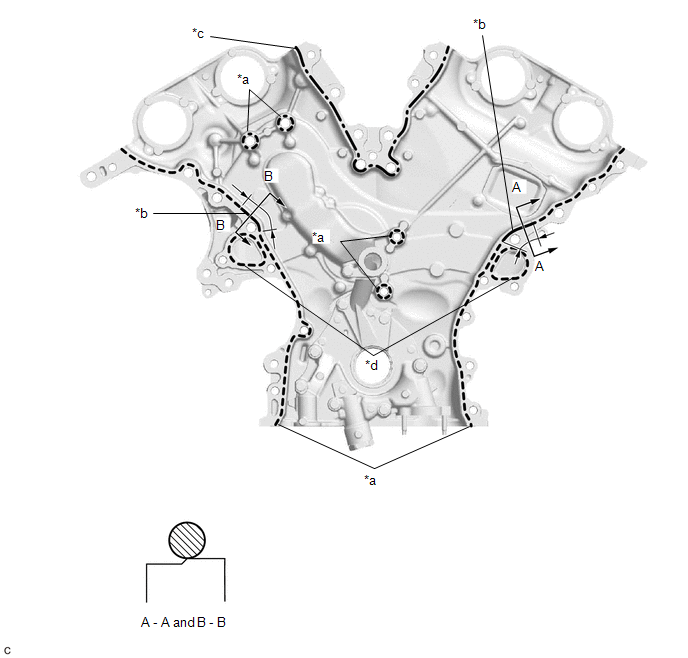
| *a | Dashed Line Area (Seal packing: Toyota Genuine Seal Packing Black, Three Bond 1207B or equivalent) | *b | Continuous Line Area (Seal packing: Toyota Genuine Seal Packing Black, Three Bond 1207B or equivalent) |
| *c | Alternate Long and Short Dashed Line Area (Seal packing: Toyota Genuine Seal Packing Black, Three Bond 1207B or equivalent) | *d | Dashed Line Area (Seal packing: Toyota Genuine Seal Packing 1282B, Three Bond 1282B or equivalent) |
| | 6.0 mm (0.236 in.) or more | - | - |
Seal Packing:
Toyota Genuine Seal Packing Black, Three Bond 1207B or equivalent
Toyota Genuine Seal Packing 1282B, Three Bond 1282B or equivalent
NOTICE:
If there is oil on the contact surfaces, wipe them with an oil-free cloth before applying seal packing.
Seal Packing Application Chart:
| Area | Seal Packing Diameter | Application Position from Inside Seal Line |
|---|---|---|
| Dashed Line Area (Seal packing: Toyota Genuine Seal Packing Black, Three Bond 1207B or equivalent) | 3.5 mm (0.138 in.) or more | 3.0 to 4.0 mm (0.118 to 0.157 in.) |
| Continuous Line Area (Seal packing: Toyota Genuine Seal Packing Black, Three Bond 1207B or equivalent) | 6.0 mm (0.236 in.) or more | 1.0 to 2.0 mm (0.0394 to 0.0787 in.) |
| Alternate Long and Short Dashed Line Area (Seal packing: Toyota Genuine Seal Packing Black, Three Bond 1207B or equivalent) | 4.5 mm (0.177 in.) or more | 3.0 to 4.0 mm (0.118 to 0.157 in.) |
| Dashed line area (Seal packing: Toyota Genuine Seal Packing 1282B, Three Bond 1282B or equivalent) | 3.5 mm (0.138 in.) or more | 2.0 to 3.0 mm (0.0787 to 0.118 in.) |
(c) Install a new oil pump gasket to the cylinder block sub-assembly.
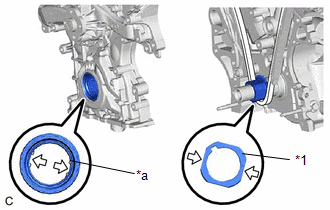
| (d) Align the drive rotor spline and the crankshaft as shown in the illustration. Install the drive rotor spline and timing chain cover assembly to the crankshaft. |
|
(e) w/ Stud Bolt:
(1) Install the 23 bolts and 2 nuts in the order shown in the illustration.
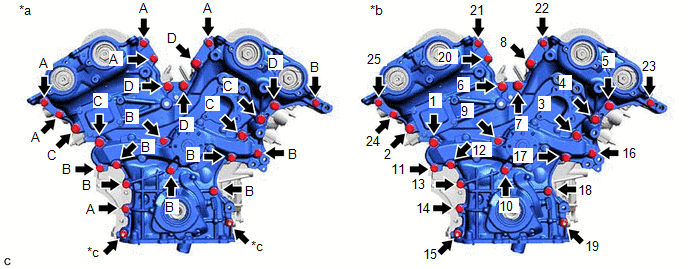
| *a | Torque | *b | Bolt and Nut Tightening Order |
| *c | Nut | - | - |
Bolt Length:
| Item | Length |
|---|---|
| (A) | 28 mm (1.10 in.) |
| (B) | 55 mm (2.17 in.) |
| (C) | 60 mm (2.36 in.) |
| (D) | 40 mm (1.57 in.) |
NOTICE:
Make sure that there is no oil on the threads of the bolts.
Torque:
Bolt (A), (B)
21 N*m (214 kgf*cm, 15 ft.*lbf)
Bolt (C), (D)
43 N*m (438 kgf*cm, 32 ft.*lbf)
Nut
21 N*m (214 kgf*cm, 15 ft.*lbf)
NOTICE:
- Tighten the bolts within 10 minutes of applying seal packing.
- Do not add engine oil for at least 2 hours after installation.
- Do not start the engine for at least 2 hours after installation.
(f) w/o Stud Bolt:
(1) Install the 25 bolts in the order shown in the illustration.
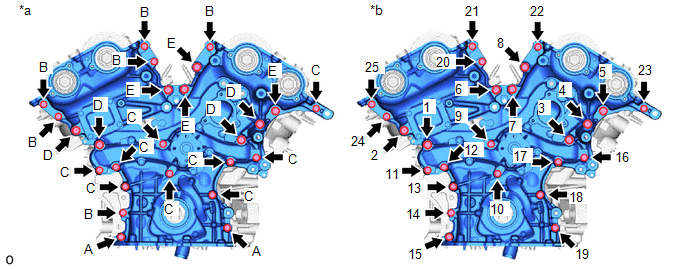
| *a | Torque | *b | Bolt Tightening Order |
Bolt Length:
| Item | Length |
|---|---|
| (A) | 45 mm (1.77 in.) |
| (B) | 28 mm (1.10 in.) |
| (C) | 55 mm (2.17 in.) |
| (D) | 60 mm (2.36 in.) |
| (E) | 40 mm (1.57 in.) |
NOTICE:
Make sure that there is no oil on the threads of the bolts.
Torque:
Bolt (A), (B), (C)
21 N*m (214 kgf*cm, 15 ft.*lbf)
Bolt (D), (E)
43 N*m (438 kgf*cm, 32 ft.*lbf)
NOTICE:
- Tighten the bolts within 10 minutes of applying seal packing.
- Do not add engine oil for at least 2 hours after installation.
- Do not start the engine for at least 2 hours after installation.
2. INSTALL TIMING CHAIN CASE OIL SEAL
Click here .gif)
3. INSTALL OIL PAN SUB-ASSEMBLY
Click here
 Reassembly
REASSEMBLY PROCEDURE 1. INSTALL OIL PUMP ROTOR SET (a) Coat the drive rotor and driven rotor with engine oil and place them into the timing chain cover assembly with the rotor marks facing up. Chec ...

Other materials:
Lexus RX (RX 350L, RX450h) 2016-2026 Repair Manual > Outer Rear View Mirror Glass: Installation
INSTALLATION CAUTION / NOTICE / HINT HINT:
Use the same procedure for the RH side and LH side.
The following procedure is for the LH side.
PROCEDURE 1. INSTALL OUTER MIRROR (a) Connect the 2 connectors. (b) Engage the clamp. (c) Engage the 4 claws to install the outer mirror. NOTICE: Do n ...
Lexus RX (RX 350L, RX450h) 2016-2026 Repair Manual > Combination Meter: Disassembly
DISASSEMBLY PROCEDURE 1. REMOVE COMBINATION METER GLASS (for Optitron Meter Type) (a) Disengage the 8 claws to remove the combination meter glass. 2. REMOVE COMBINATION METER GLASS (for TFT Meter Type) (a) Disengage the 9 claws to remove the combination meter glass. ...
Lexus RX (RX 350L, RX450h) 2016-{YEAR} Owners Manual
- For your information
- Pictorial index
- For safety and security
- Instrument cluster
- Operation of each component
- Driving
- Lexus Display Audio system
- Interior features
- Maintenance and care
- When trouble arises
- Vehicle specifications
- For owners
Lexus RX (RX 350L, RX450h) 2016-{YEAR} Repair Manual

0.011