Lexus RX (RX 350L, RX450h) 2016-2026 Repair Manual: Installation
INSTALLATION
PROCEDURE
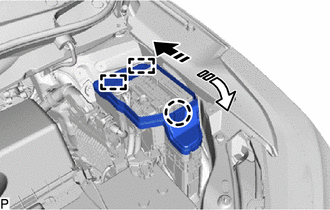
1. INSTALL SEMICONDUCTOR POWER INTEGRATION ECU
(a) Connect the 5 connectors.
(b) Engage the 2 claws to install the semiconductor power integration ECU as shown in the illustration.

.png) | Install in this Direction |
2. INSTALL NO. 1 RELAY BLOCK COVER
(a) Engage the 2 guides and claw to install the No. 1 relay block cover as indicated by the arrows, in the order shown in the illustration.
| | Install in this Direction (1) |
.png) | Install in this Direction (2) |
(b) Engage the 2 guides and claw to install the No. 1 relay block cover as indicated by the arrows, in the order shown in the illustration.
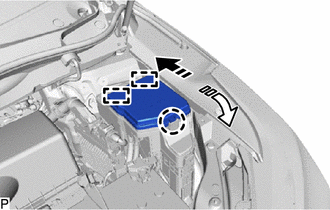
| | Install in this Direction (1) |
| | Install in this Direction (2) |
3. INSTALL RESERVOIR BRACKET
Click here .gif)
4. CONNECT BRAKE MASTER CYLINDER RESERVOIR ASSEMBLY
(a) Move the brake master cylinder reservoir assembly as shown in the illustration to engage the 2 claws.
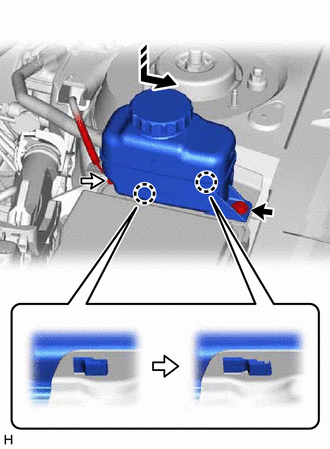
.png) | Bolt |
.png) | Connector |
| | Install in this Direction |
(b) Connect the reservoir level switch connector and install the bolt.
Torque:
9.0 N·m {92 kgf·cm, 80 in·lbf}
5. CONNECT CABLE FROM NEGATIVE BATTERY TERMINAL
NOTICE:
When disconnecting the cable, some systems need to be initialized after the cable is reconnected.
Click here
 Inspection
INSPECTION PROCEDURE 1. INSPECT SEMICONDUCTOR POWER INTEGRATION ECU (a) IG2 RELAY: (1) Measure the resistance according to the value(s) in the table below. Standard Resistance: Tester Connecti ...
 Main Body Ecu
...
Other materials:
Lexus RX (RX 350L, RX450h) 2016-2026 Repair Manual > Airbag System: Front Airbag Sensor (LH) (B1615)
DESCRIPTION The front airbag sensor LH circuit consists of the airbag sensor assembly and front airbag sensor LH. The front airbag sensor LH detects impacts to the vehicle and sends signals to the airbag sensor assembly to determine if the airbags, pretensioners and selectable force limiter should b ...
Lexus RX (RX 350L, RX450h) 2016-2026 Repair Manual > Rear Spoiler: Removal
REMOVAL PROCEDURE 1. REMOVE BACK WINDOW UPPER PANEL TRIM (w/o Rear No. 2 Seat) Click here 2. REMOVE BACK WINDOW UPPER PANEL TRIM (w/ Rear No. 2 Seat) Click here 3. REMOVE REAR SPOILER SUB-ASSEMBLY (w/o Rear No. 2 Seat) (a) Disconnect the 2 connectors. (b) Remove the 2 hole pl ...
Lexus RX (RX 350L, RX450h) 2016-{YEAR} Owners Manual
- For your information
- Pictorial index
- For safety and security
- Instrument cluster
- Operation of each component
- Driving
- Lexus Display Audio system
- Interior features
- Maintenance and care
- When trouble arises
- Vehicle specifications
- For owners
Lexus RX (RX 350L, RX450h) 2016-{YEAR} Repair Manual

0.0114