Lexus RX (RX 350L, RX450h) 2016-2026 Repair Manual: Components
COMPONENTS
ILLUSTRATION

| *A | w/o Rear No. 2 Seat | *B | for TMC Made |
| *C | for TMMC Made | - | - |
| *1 | DECK BOARD ASSEMBLY | *2 | DECK SIDE TRIM BOX RH |
| *3 | FRONT DECK FLOOR BOX | *4 | REAR DECK FLOOR BOX |
| *5 | REAR FLOOR FINISH PLATE | *6 | REAR NO. 3 FLOOR BOARD |
| *7 | REAR NO. 4 FLOOR BOARD | *8 | TONNEAU COVER ASSEMBLY |
ILLUSTRATION
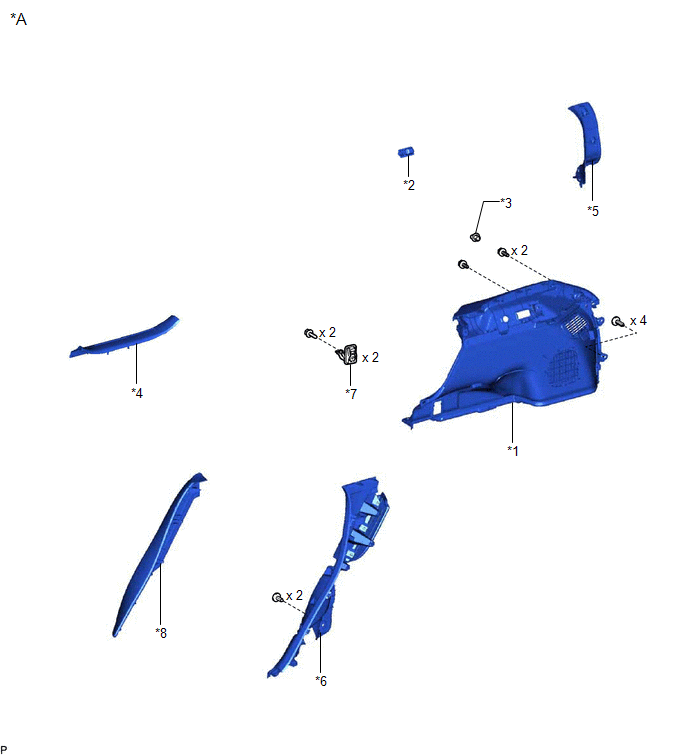
| *A | w/o Rear No. 2 Seat | - | - |
| *1 | DECK TRIM SIDE PANEL ASSEMBLY LH | *2 | NO. 1 LUGGAGE COMPARTMENT LIGHT ASSEMBLY |
| *3 | NO. 1 LUGGAGE COMPARTMENT TRIM HOOK | *4 | REAR DOOR SCUFF PLATE LH |
| *5 | REAR FLOOR FINISH SIDE PLATE LH | *6 | REAR SEAT SIDE GARNISH LH |
| *7 | ROPE HOOK ASSEMBLY | *8 | UPPER QUARTER TRIM PAD LH |
ILLUSTRATION
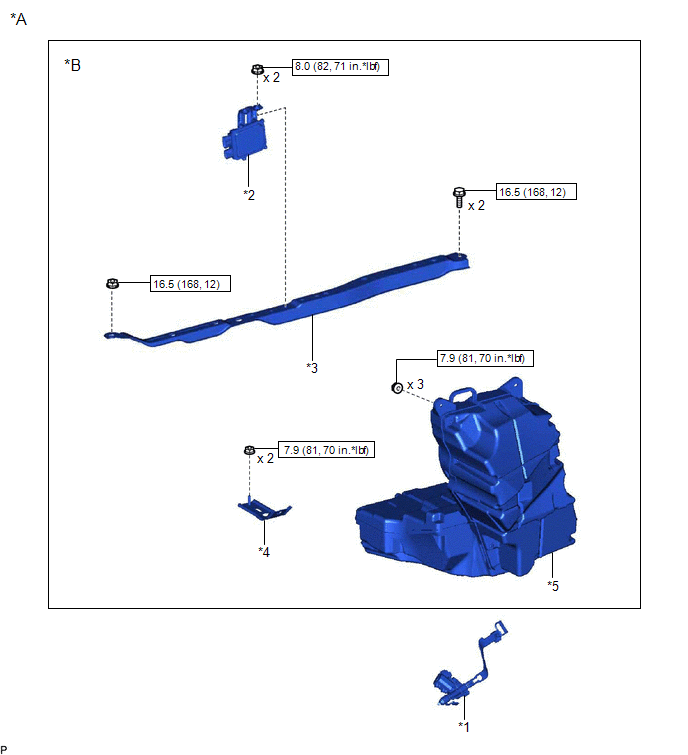
| *A | w/o Rear No. 2 Seat | *B | w/ Woofer |
| *1 | FUEL LID LOCK WITH MOTOR ASSEMBLY | *2 | FUEL PUMP CONTROL ECU ASSEMBLY |
| *3 | NO. 2 DECK BOARD REINFORCEMENT | *4 | REAR NO. 1 SPEAKER BRACKET |
| *5 | REAR NO. 3 SPEAKER ASSEMBLY | - | - |
.png) | N*m (kgf*cm, ft.*lbf): Specified torque | - | - |
ILLUSTRATION
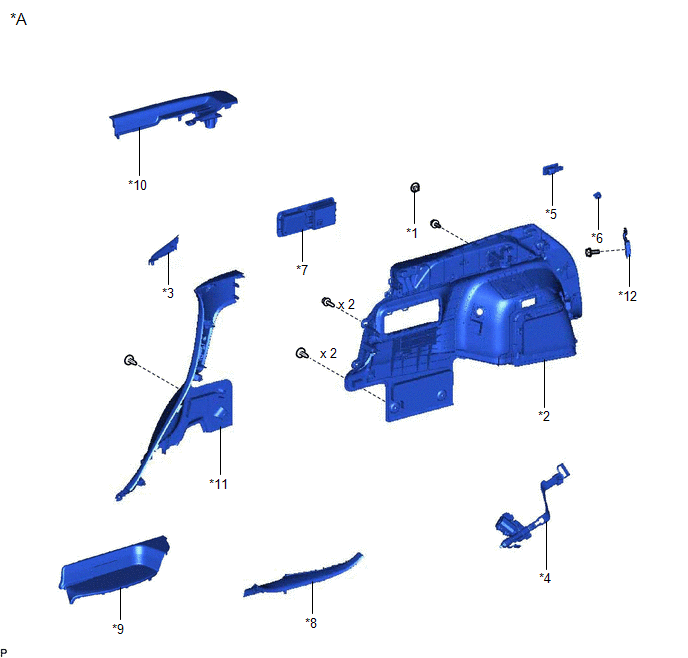
| *A | w/ Rear No. 2 Seat | - | - |
| *1 | COOLER (NO. 2 ROOM TEMP. SENSOR) THERMISTOR | *2 | DECK TRIM SIDE PANEL ASSEMBLY LH |
| *3 | FRONT DECK SIDE TRIM COVER LH | *4 | FUEL LID LOCK WITH MOTOR ASSEMBLY |
| *5 | NO. 1 LUGGAGE COMPARTMENT LIGHT ASSEMBLY | *6 | NO. 1 LUGGAGE COMPARTMENT TRIM HOOK |
| *7 | NO. 2 AIR CONDITIONING CONTROL ASSEMBLY | *8 | REAR DOOR INSIDE SCUFF PLATE LH |
| *9 | REAR DOOR SCUFF PLATE LH | *10 | REAR SEAT OUTER TRACK BRACKET COVER LH |
| *11 | REAR SEAT SIDE GARNISH LH | *12 | ROPE HOOK ASSEMBLY |

 Inspection
INSPECTION PROCEDURE 1. INSPECT FUEL LID LOCK WITH MOTOR ASSEMBLY (a) Check the operation of the fuel lid lock with motor assembly. (1) Apply battery voltage to the fuel lid lock with motor assembl ...
Other materials:
Lexus RX (RX 350L, RX450h) 2016-2026 Repair Manual > Quarter Trim Speaker (w/o Rear No. 2 Seat): Installation
INSTALLATION CAUTION / NOTICE / HINT HINT:
Use the same procedure for the RH side and LH side.
The following procedure is for the LH side.
PROCEDURE 1. INSTALL QUARTER SIDE SPEAKER ASSEMBLY NOTICE: Do not touch the speaker cone. (a) Connect the connector. (b) Engage the clip to temporarily i ...
Lexus RX (RX 350L, RX450h) 2016-2026 Repair Manual > Charging System: Precaution
PRECAUTION INITIALIZATION NOTICE: When the cable is disconnected from the negative (-) battery terminal, initialize the following system(s) after the cable is reconnected. System Name See Procedure Lane Control System Intelligent Clearance Sonar System Parking Assist Monitor Sy ...
Lexus RX (RX 350L, RX450h) 2016-{YEAR} Owners Manual
- For your information
- Pictorial index
- For safety and security
- Instrument cluster
- Operation of each component
- Driving
- Lexus Display Audio system
- Interior features
- Maintenance and care
- When trouble arises
- Vehicle specifications
- For owners
Lexus RX (RX 350L, RX450h) 2016-{YEAR} Repair Manual

0.0108