Lexus RX (RX 350L, RX450h) 2016-2026 Repair Manual: Removal
REMOVAL
PROCEDURE
1. REMOVE INSTRUMENT PANEL GARNISH LH
Click here .gif)
2. REMOVE FRONT DOOR SCUFF PLATE LH
w/o Rear No. 2 Seat:
Click here
w/ Rear No. 2 Seat:
Click here
3. REMOVE COWL SIDE TRIM BOARD LH
Click here
4. REMOVE NO. 1 INSTRUMENT PANEL UNDER COVER SUB-ASSEMBLY
Click here
5. DISCONNECT HOOD LOCK CONTROL LEVER SUB-ASSEMBLY
Click here
6. REMOVE LOWER INSTRUMENT PANEL FINISH PANEL SUB-ASSEMBLY
Click here
7. REMOVE DOOR CONTROL SWITCH (INTEGRATION CONTROL AND PANEL ASSEMBLY)
(a) Using a screwdriver, disengage the 4 claws and remove the door control switch (integration control and panel assembly) as shown in the illustration.
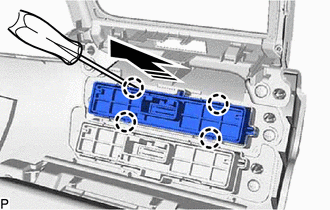
.png) | Remove in this Direction |
 Components
COMPONENTS ILLUSTRATION *1 COWL SIDE TRIM BOARD LH *2 DOOR CONTROL SWITCH (INTEGRATION CONTROL AND PANEL ASSEMBLY) *3 FRONT DOOR SCUFF PLATE LH *4 HOOD LOCK CONTROL LEVER SUB-ASSEM ...
 Inspection
INSPECTION PROCEDURE 1. INSPECT POWER BACK DOOR SWITCH (INTEGRATION CONTROL AND PANEL ASSEMBLY) (a) Check the operation of the power back door switch (integration control and panel assembly). (1) M ...
Other materials:
Lexus RX (RX 350L, RX450h) 2016-2026 Owners Manual > Basic Operations: USB/AUX ports
Connect an iPod, USB memory device or portable audio player to the USB/
AUX port as indicated below. Select "iPod", "USB", "AUX" or "External" on
the audio source selection screen and the device can be operated via Lexus
Display Audio system.
Connecting using the USB/AUX port
1. Press the knob. ...
Lexus RX (RX 350L, RX450h) 2016-2026 Repair Manual > Front Door: Inspection
INSPECTION PROCEDURE 1. INSPECT FRONT DOOR OUTSIDE HANDLE ASSEMBLY LH (a) Apply 6.0 V (4 dry cell batteries in series) to the front door outside handle assembly LH and check that the light comes on. NOTICE: Do not apply more than 6.0 V. OK: Condition Specified Condition Battery positive ...
Lexus RX (RX 350L, RX450h) 2016-{YEAR} Owners Manual
- For your information
- Pictorial index
- For safety and security
- Instrument cluster
- Operation of each component
- Driving
- Lexus Display Audio system
- Interior features
- Maintenance and care
- When trouble arises
- Vehicle specifications
- For owners
Lexus RX (RX 350L, RX450h) 2016-{YEAR} Repair Manual

0.0126