
Lexus RX (RX 350L, RX450h) 2016-2026 Repair Manual: Removal
REMOVAL
CAUTION / NOTICE / HINT
HINT:
- Use the same procedure for the RH side and LH side.
- The following procedure is for the LH side.
PROCEDURE
1. REMOVE BACK WINDOW UPPER PANEL TRIM (w/o Rear No. 2 Seat)
Click here .gif)
2. REMOVE BACK WINDOW UPPER PANEL TRIM (w/ Rear No. 2 Seat)
Click here
3. REMOVE BACK DOOR TRIM COVER LH (w/o Rear No. 2 Seat)
Click here
4. REMOVE BACK DOOR TRIM COVER LH (w/ Rear No. 2 Seat)
Click here
5. REMOVE BACK DOOR TRIM COVER RH
HINT:
Use the same procedure as for the LH side.
6. REMOVE BACK DOOR LOCK COVER (w/o Rear No. 2 Seat)
Click here
7. REMOVE BACK DOOR LOCK COVER (w/ Rear No. 2 Seat)
Click here
8. REMOVE BACK DOOR TRIM BASE
Click here
9. REMOVE DOOR PULL HANDLE
Click here
10. REMOVE NO. 1 LUGGAGE COMPARTMENT LIGHT ASSEMBLY
Click here
11. REMOVE BACK DOOR TRIM PANEL ASSEMBLY (w/o Rear No. 2 Seat)
Click here
12. REMOVE BACK DOOR TRIM PANEL ASSEMBLY (w/ Rear No. 2 Seat)
Click here
13. REMOVE POWER BACK DOOR SENSOR ASSEMBLY (w/o Rear No. 2 Seat)
| (a) Disconnect the connector. |
|
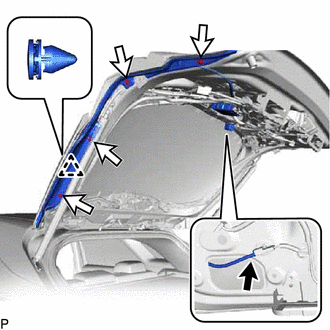
(b) Remove the 4 screws.
(c) Disengage the clip and remove the power back door sensor assembly.
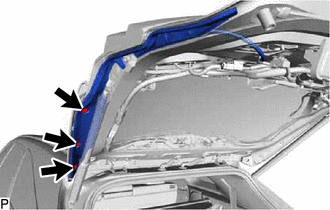
14. REMOVE POWER BACK DOOR SENSOR ASSEMBLY (w/ Rear No. 2 Seat)
| (a) Remove the 3 clips. |
|
| (b) Disconnect the connector. |
|
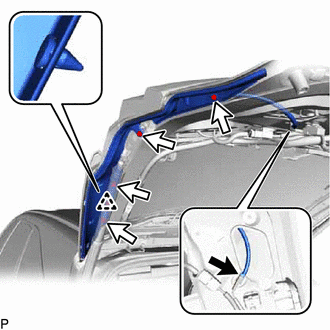
(c) Remove the 4 screws.
(d) Disengage the clip and remove the power back door sensor assembly.
 Components
COMPONENTS ILLUSTRATION *A w/o Rear No. 2 Seat *B w/ Rear No. 2 Seat *1 BACK DOOR LOCK COVER *2 BACK DOOR TRIM BASE *3 BACK DOOR TRIM COVER LH *4 BACK DOOR TRIM COVER RH ...
 Inspection
INSPECTION PROCEDURE 1. INSPECT POWER BACK DOOR SENSOR ASSEMBLY LH (a) Measure the resistance according to the value(s) in the table below. Standard Resistance: Tester Connection Condition ...
Other materials:
Lexus RX (RX 350L, RX450h) 2016-2026 Repair Manual > Heated Steering Wheel Controller: Components
COMPONENTS ILLUSTRATION *1 CRUISE CONTROL MAIN SWITCH *2 SHIFT PADDLE SWITCH (TRANSMISSION SHIFT SWITCH ASSEMBLY) *3 STEERING PAD SWITCH ASSEMBLY *4 STEERING VIBRATION AND HEATER ECU N*m (kgf*cm, ft.*lbf): Specified torque ● Non-reusable part ★ Precoated Part ...
Lexus RX (RX 350L, RX450h) 2016-2026 Repair Manual > Intake Manifold: Removal
REMOVAL CAUTION / NOTICE / HINT The necessary procedures (adjustment, calibration, initialization or registration) that must be performed after parts are removed and installed, or replaced during intake manifold removal/installation are shown below. Necessary Procedures After Parts Removed/Installed ...
Lexus RX (RX 350L, RX450h) 2016-{YEAR} Owners Manual
- For your information
- Pictorial index
- For safety and security
- Instrument cluster
- Operation of each component
- Driving
- Lexus Display Audio system
- Interior features
- Maintenance and care
- When trouble arises
- Vehicle specifications
- For owners
Lexus RX (RX 350L, RX450h) 2016-{YEAR} Repair Manual

0.0103