Lexus RX (RX 350L, RX450h) 2016-2026 Repair Manual: Removal
REMOVAL
PROCEDURE
1. REMOVE BACK WINDOW UPPER PANEL TRIM (w/o Rear No. 2 Seat)
Click here .gif)
2. REMOVE BACK DOOR TRIM COVER LH (w/o Rear No. 2 Seat)
Click here .gif)
3. REMOVE BACK WINDOW UPPER PANEL TRIM (w/ Rear No. 2 Seat)
Click here .gif)
4. REMOVE BACK DOOR TRIM COVER LH (w/ Rear No. 2 Seat)
Click here .gif)
5. REMOVE BACK DOOR TRIM COVER RH
HINT:
Use the same procedure as for the LH side.
6. REMOVE BACK DOOR LOCK COVER (w/o Rear No. 2 Seat)
Click here .gif)
7. REMOVE BACK DOOR LOCK COVER (w/ Rear No. 2 Seat)
Click here .gif)
8. REMOVE BACK DOOR TRIM BASE
Click here .gif)
9. REMOVE DOOR PULL HANDLE
Click here .gif)
10. REMOVE NO. 1 LUGGAGE COMPARTMENT LIGHT ASSEMBLY
Click here .gif)
11. REMOVE BACK DOOR TRIM PANEL ASSEMBLY (w/o Rear No. 2 Seat)
Click here .gif)
12. REMOVE BACK DOOR TRIM PANEL ASSEMBLY (w/ Rear No. 2 Seat)
Click here .gif)
13. REMOVE BACK DOOR OUTSIDE GARNISH SUB-ASSEMBLY
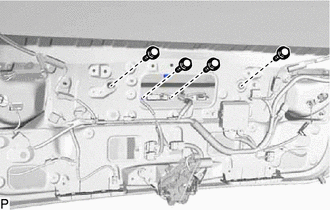
| (a) Remove the 4 bolts. |
|
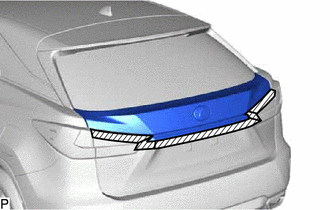
(b) Apply protective tape around the back door outside garnish sub-assembly.

.png) | Protective Tape |
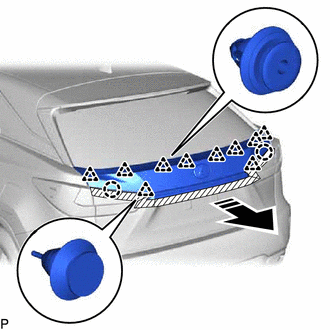
(c) Disengage the 2 claws and 10 clips as shown in the illustration to remove the back door outside garnish sub-assembly.

.png) | Remove in this Direction |
14. REMOVE NO. 1 BACK DOOR NAME PLATE
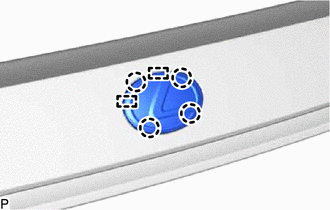
| (a) Disengage the 4 claws and 2 guides to remove the No. 1 back door name plate. |
|
 Installation
INSTALLATION PROCEDURE 1. INSTALL NO. 1 BACK DOOR NAME PLATE (a) Engage the 2 guides and 4 claws to install the No. 1 back door name plate. 2. INSTALL BACK DOOR OUTSIDE GARNISH SUB-ASSEMBLY (a) Pull b ...
Other materials:
Lexus RX (RX 350L, RX450h) 2016-2026 Repair Manual > Trip Switch: Inspection
INSPECTION PROCEDURE 1. INSPECT TRIP SWITCH (a) Measure the resistance according to the value(s) in the table below. Standard Resistance: Tester Connection Condition Specified Condition 5 (RV) - 7 (E) Light control rheostat up switch pressed Below 1 Ω Light control rheostat u ...
Lexus RX (RX 350L, RX450h) 2016-2026 Repair Manual > Quarter Trim Speaker (w/ Rear No. 2 Seat): Components
COMPONENTS ILLUSTRATION *A for RH Side *B for LH Side *1 FRONT DECK SIDE TRIM COVER *2 REAR DOOR INSIDE SCUFF PLATE *3 REAR DOOR SCUFF PLATE *4 REAR SEAT OUTER TRACK BRACKET COVER LH *5 REAR SEAT OUTER TRACK BRACKET COVER RH *6 REAR SEAT SIDE GARNISH ILLUST ...
Lexus RX (RX 350L, RX450h) 2016-{YEAR} Owners Manual
- For your information
- Pictorial index
- For safety and security
- Instrument cluster
- Operation of each component
- Driving
- Lexus Display Audio system
- Interior features
- Maintenance and care
- When trouble arises
- Vehicle specifications
- For owners
Lexus RX (RX 350L, RX450h) 2016-{YEAR} Repair Manual
0.0083


