Lexus RX (RX 350L, RX450h) 2016-2026 Repair Manual: Installation
INSTALLATION
PROCEDURE
1. INSTALL NO. 1 BACK DOOR NAME PLATE
(a) Engage the 2 guides and 4 claws to install the No. 1 back door name plate.
2. INSTALL BACK DOOR OUTSIDE GARNISH SUB-ASSEMBLY
(a) Pull back the lower back window moulding and secure it with tape as shown in the illustration.
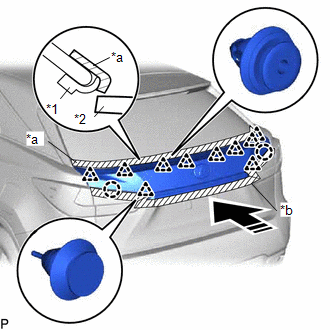
| *1 | Lower Back Window Moulding |
| *2 | Back Door Outside Garnish Sub-assembly |
| *a | Tape |
| *b | Protective Tape |
.png) | Install in this Direction |
NOTICE:
Be careful not to damage the lower back window moulding.
(b) Engage the 2 claws and 10 clips as shown in the illustration.
HINT:
Check that the lower back window moulding is not caught under the back door outside garnish sub-assembly.
(c) Install the back door outside garnish sub-assembly with the 4 bolts.
Torque:
5.0 N·m {51 kgf·cm, 44 in·lbf}
3. INSTALL BACK DOOR TRIM PANEL ASSEMBLY (w/o Rear No. 2 Seat)
Click here .gif)
4. INSTALL BACK DOOR TRIM PANEL ASSEMBLY (w/ Rear No. 2 Seat)
Click here
5. INSTALL NO. 1 LUGGAGE COMPARTMENT LIGHT ASSEMBLY
Click here
6. INSTALL DOOR PULL HANDLE
Click here
7. INSTALL BACK DOOR TRIM BASE
Click here
8. INSTALL BACK DOOR LOCK COVER (w/o Rear No. 2 Seat)
Click here
9. INSTALL BACK DOOR TRIM COVER LH (w/o Rear No. 2 Seat)
Click here
10. INSTALL BACK DOOR LOCK COVER (w/ Rear No. 2 Seat)
Click here
11. INSTALL BACK DOOR TRIM COVER LH (w/ Rear No. 2 Seat)
Click here
12. INSTALL BACK DOOR TRIM COVER RH
HINT:
Use the same procedure as for the LH side.
13. INSTALL BACK WINDOW UPPER PANEL TRIM (w/o Rear No. 2 Seat)
Click here
14. INSTALL BACK WINDOW UPPER PANEL TRIM (w/ Rear No. 2 Seat)
Click here
 Components
COMPONENTS ILLUSTRATION *A w/o Rear No. 2 Seat *B w/ Rear No. 2 Seat *1 BACK DOOR LOCK COVER *2 BACK DOOR TRIM BASE *3 BACK DOOR TRIM COVER LH *4 BACK DOOR TRIM COVER RH ...
 Removal
REMOVAL PROCEDURE 1. REMOVE BACK WINDOW UPPER PANEL TRIM (w/o Rear No. 2 Seat) Click here 2. REMOVE BACK DOOR TRIM COVER LH (w/o Rear No. 2 Seat) Click here 3. REMOVE BACK WINDOW UPPER PANEL TRIM ...
Other materials:
Lexus RX (RX 350L, RX450h) 2016-2026 Repair Manual > Intuitive Parking Assist System (w/ Intelligent Clearance Sonar System): Customize Parameters
CUSTOMIZE PARAMETERS CUSTOMIZE INTUITIVE PARKING ASSIST SYSTEM (a) Customizing with the Techstream. NOTICE:
When the customer requests a change in a function, first make sure that the function can be customized.
Be sure to make a note of the current settings before customizing.
When troublesh ...
Lexus RX (RX 350L, RX450h) 2016-2026 Repair Manual > Transfer Assembly: Disassembly
DISASSEMBLY CAUTION / NOTICE / HINT NOTICE: Before installation of each part, thoroughly clean and dry it. Then apply grease or oil as necessary. Do not use alkaline chemicals to clean aluminum parts, rubber parts or precoated bolts. Also, do not use non-residue solvent or other cleaning oils to cle ...
Lexus RX (RX 350L, RX450h) 2016-{YEAR} Owners Manual
- For your information
- Pictorial index
- For safety and security
- Instrument cluster
- Operation of each component
- Driving
- Lexus Display Audio system
- Interior features
- Maintenance and care
- When trouble arises
- Vehicle specifications
- For owners
Lexus RX (RX 350L, RX450h) 2016-{YEAR} Repair Manual

0.0115