Lexus RX (RX 350L, RX450h) 2016-2026 Repair Manual: Installation
INSTALLATION
CAUTION / NOTICE / HINT
HINT:
- Use the same procedure for the RH side and LH side.
- The following procedure is for the LH side.
PROCEDURE
1. REPAIR INSTRUCTION
Click here .gif)
2. INSTALL REAR INNER BLACK OUT TAPE
(a) Refer to the illustration to position a new rear inner black out tape.
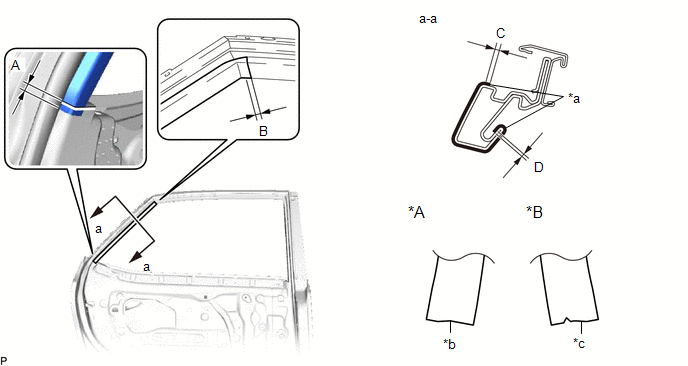
| *A | LH Side | *B | RH Side |
| *a | Edge of Curved Surface | *b | Straight |
| *c | Triangle | - | - |
Standard Measurement:
| Area | Measurement | Area | Measurement |
|---|---|---|---|
| A | 7.0 mm (0.276 in.) | B | 4.0 mm (0.157 in.) |
| C | 1.5 mm (0.0591 in.) | D | 1.0 mm (0.0394 in.) |
(b) Remove the release paper and apply the rear inner black out tape.
3. INSTALL REAR DOOR OUTSIDE STRIPE
(a) Refer to the illustration to position a new rear door outside stripe.
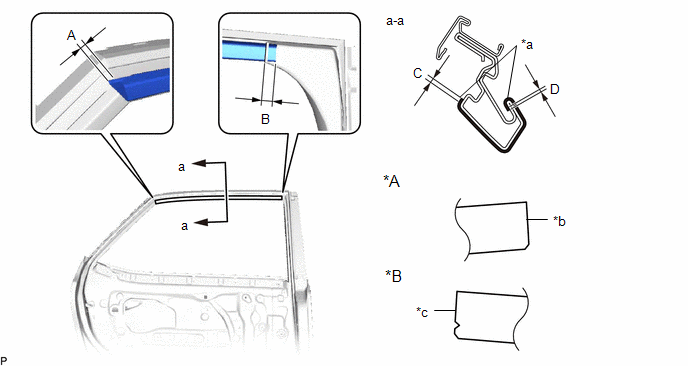
| *A | LH Side | *B | RH Side |
| *a | Edge of Curved Surface | *b | Straight |
| *c | Triangle | - | - |
Standard Measurement:
| Area | Measurement | Area | Measurement |
|---|---|---|---|
| A | 5.0 mm (0.197 in.) | B | 10.0 mm (0.394 in.) |
| C | 1.5 mm (0.0591 in.) | D | 1.0 mm (0.0394 in.) |
(b) Remove the release paper and apply the rear door outside stripe.
4. INSTALL CURTAIN HOOK (w/ Rear Door Sunshade)
Click here
5. INSTALL REAR DOOR LOWER OUTSIDE STRIPE
(a) Refer to the illustration to position a new rear door lower outside stripe.
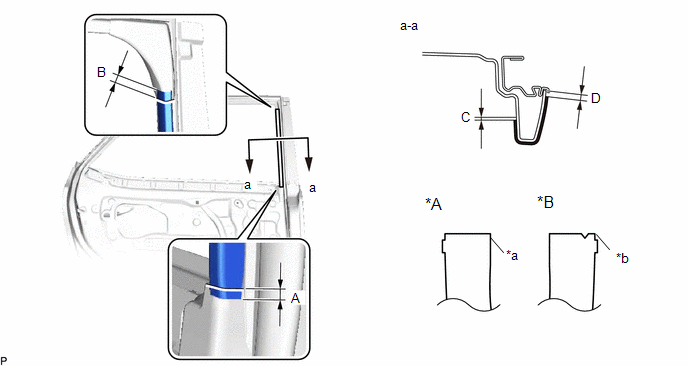
| *A | LH Side | *B | RH Side |
| *a | Straight | *b | Triangle |
Standard Measurement:
| Area | Measurement | Area | Measurement |
|---|---|---|---|
| A | 3.0 mm (0.118 in.) | B | 10.0 mm (0.394 in.) |
| C | 1.2 mm (0.0472 in.) | D | 3.2 mm (0.126 in.) |
(b) Remove the release paper and apply the rear door lower outside stripe.
6. INSTALL REAR DOOR FRAME GARNISH
Click here
7. INSTALL REAR DOOR FRONT BELT SEAL
Click here
8. CONNECT REAR DOOR WEATHERSTRIP
Click here
9. INSTALL REAR DOOR GLASS SUB-ASSEMBLY
Click here
10. INSTALL REAR DOOR REAR GUIDE SEAL
Click here
11. CONNECT REAR DOOR WEATHERSTRIP
Click here
12. INSTALL REAR DOOR WINDOW DIVISION BAR SUB-ASSEMBLY
Click here
13. INSTALL REAR DOOR GLASS RUN
Click here
14. INSTALL REAR DOOR SERVICE HOLE COVER
Click here
15. INSTALL REAR DOOR NO. 2 TRIM BRACKET
Click here
16. INSTALL REAR DOOR INNER GLASS WEATHERSTRIP
Click here
17. INSTALL REAR DOOR TRIM BOARD SUB-ASSEMBLY
Click here
18. INSTALL COURTESY LIGHT ASSEMBLY
Click here
19. INSTALL REAR DOOR ARMREST COVER
Click here
20. INSTALL REAR POWER WINDOW REGULATOR SWITCH ASSEMBLY WITH REAR DOOR UPPER ARMREST BASE PANEL
Click here
21. INSTALL REAR DOOR INSIDE HANDLE BEZEL PLUG
Click here
22. CONNECT CABLE TO NEGATIVE BATTERY TERMINAL
NOTICE:
When disconnecting the cable, some systems need to be initialized after the cable is reconnected.
Click here
23. INITIALIZE POWER WINDOW CONTROL SYSTEM
Click here
24. INSPECT POWER WINDOW OPERATION
Click here
 Removal
REMOVAL CAUTION / NOTICE / HINT The necessary procedures (adjustment, calibration, initialization or registration) that must be performed after parts are removed and installed, or replaced during blac ...
 Front Bumper
...
Other materials:
Lexus RX (RX 350L, RX450h) 2016-2026 Repair Manual > Power Tilt And Power Telescopic Steering Column System: Freeze Frame Data
FREEZE FRAME DATA FREEZE FRAME DATA NOTICE:
Freeze frame data values will vary depending on the measurement conditions, surroundings, or vehicle conditions. For this reason, there may be a problem even when the values are within specifications.
Turn the engine switch on (IG) and park the vehicl ...
Lexus RX (RX 350L, RX450h) 2016-2026 Repair Manual > Shift Paddle Switch: Components
COMPONENTS ILLUSTRATION *1 CRUISE CONTROL MAIN SWITCH *2 NO. 1 SWITCH WIRE *3 SHIFT PADDLE SWITCH (TRANSMISSION SHIFT SWITCH ASSEMBLY) *4 STEERING PAD SWITCH ASSEMBLY *5 STEERING WHEEL ASSEMBLY - - N*m (kgf*cm, ft.*lbf): Specified torque ● Non-reusable part ...
Lexus RX (RX 350L, RX450h) 2016-{YEAR} Owners Manual
- For your information
- Pictorial index
- For safety and security
- Instrument cluster
- Operation of each component
- Driving
- Lexus Display Audio system
- Interior features
- Maintenance and care
- When trouble arises
- Vehicle specifications
- For owners
Lexus RX (RX 350L, RX450h) 2016-{YEAR} Repair Manual

0.012