
Lexus RX (RX 350L, RX450h) 2016-2026 Repair Manual: Installation
INSTALLATION
CAUTION / NOTICE / HINT
HINT:
- Use the same procedure for the RH side and LH side.
- The following procedure is for the LH side.
PROCEDURE
1. INSTALL REAR DOOR BELT MOULDING ASSEMBLY
(a) Engage the 8 claws as shown in the illustration to install the rear door belt moulding assembly.
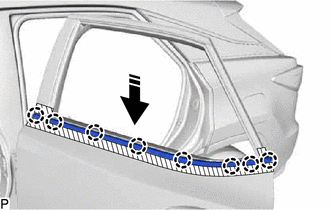
 | Install in this Direction |
2. INSTALL REAR DOOR GLASS SUB-ASSEMBLY
Click here 
3. INSTALL REAR DOOR REAR GUIDE SEAL
Click here
4. CONNECT REAR DOOR WEATHERSTRIP
Click here
5. INSTALL REAR DOOR WINDOW DIVISION BAR SUB-ASSEMBLY
Click here
6. INSTALL REAR DOOR GLASS RUN
Click here
7. INSTALL REAR DOOR SERVICE HOLE COVER
Click here
8. INSTALL REAR DOOR NO. 2 TRIM BRACKET
Click here
9. INSTALL REAR DOOR INNER GLASS WEATHERSTRIP
Click here
10. INSTALL REAR DOOR TRIM BOARD SUB-ASSEMBLY
Click here
11. INSTALL COURTESY LIGHT ASSEMBLY
Click here
12. INSTALL REAR DOOR ARMREST COVER
Click here
13. INSTALL REAR POWER WINDOW REGULATOR SWITCH ASSEMBLY WITH REAR DOOR UPPER ARMREST BASE PANEL
Click here
14. INSTALL REAR DOOR INSIDE HANDLE BEZEL PLUG
Click here
15. CONNECT CABLE TO NEGATIVE BATTERY TERMINAL
NOTICE:
When disconnecting the cable, some systems need to be initialized after the cable is reconnected.
Click here
16. INITIALIZE POWER WINDOW CONTROL SYSTEM
Click here
17. INSPECT POWER WINDOW OPERATION
Click here
 Components
COMPONENTS ILLUSTRATION *1 COURTESY LIGHT ASSEMBLY *2 REAR DOOR ARMREST COVER *3 REAR DOOR INNER GLASS WEATHERSTRIP *4 REAR DOOR INSIDE HANDLE BEZEL PLUG *5 REAR DOOR TRIM BO ...
 Removal
REMOVAL CAUTION / NOTICE / HINT The necessary procedures (adjustment, calibration, initialization or registration) that must be performed after parts are removed and installed, or replaced during rear ...
Other materials:
Lexus RX (RX 350L, RX450h) 2016-2026 Repair Manual > Sfi System: Intake Air Temperature Sensor 1 Bank 1 Circuit Short to Ground (P011011)
DESCRIPTION The intake air temperature sensor, mounted on the mass air flow meter sub-assembly, monitors the intake air temperature. The intake air temperature sensor has a built-in thermistor with a resistance that varies according to the temperature of the intake air. When the intake air temperat ...
Lexus RX (RX 350L, RX450h) 2016-2026 Repair Manual > Ultrasonic Sensor (for Front): Installation
INSTALLATION PROCEDURE 1. INSTALL FRONT CORNER ULTRASONIC SENSOR RETAINER HINT:
Perform this procedure only when replacement of the front corner ultrasonic sensor retainer is necessary.
If a front corner ultrasonic sensor retainer has been removed, replace it with a new one. Install the front c ...
Lexus RX (RX 350L, RX450h) 2016-{YEAR} Owners Manual
- For your information
- Pictorial index
- For safety and security
- Instrument cluster
- Operation of each component
- Driving
- Lexus Display Audio system
- Interior features
- Maintenance and care
- When trouble arises
- Vehicle specifications
- For owners
Lexus RX (RX 350L, RX450h) 2016-{YEAR} Repair Manual

0.0213