Lexus RX (RX 350L, RX450h) 2016-2026 Repair Manual: Installation
INSTALLATION
CAUTION / NOTICE / HINT
HINT:
- Use the same procedure for the RH side and LH side.
- The following procedure is for the LH side.
PROCEDURE
1. INSTALL ROOF DRIP SIDE FINISH MOULDING CLIP
NOTICE:
When installing new roof drip side finish moulding clips, remove any double-sided tape remaining where the roof drip side finish moulding clips will be installed on the vehicle body and clean the vehicle body with a non-residue solvent.
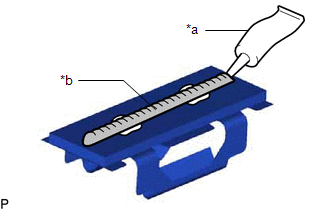
| (a) Apply a 2 to 3 mm (0.0787 to 0.118 in.) bead of adhesive (3M DP-105 or equivalent) to each new roof drip side finish moulding clip. HINT: Adhesive strength (tensile strength): 13.7 MPa (140.0 kgf/cm2, 1987 psi) or more (when the temperature is 23°C (73°F).) |
|
(b) except Panoramic Moon Roof:
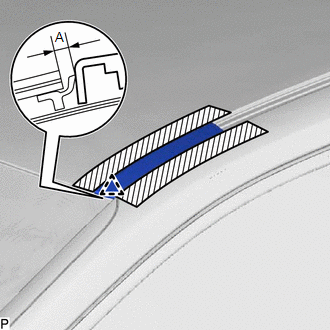
(1) Install the roof drip side finish moulding clips to the positions on the roof panel shown in the illustration. Determine the locations and firmly press and install the roof drip side finish moulding clips after lightly applying adhesive.
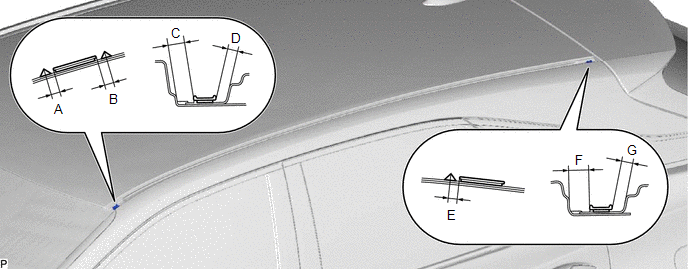
Standard Measurement:
| Area | Measurement | Area | Measurement |
|---|---|---|---|
| A | 3.5 to 4.5 mm (0.138 to 0.177 in.) | B | 3.5 to 4.5 mm (0.138 to 0.177 in.) |
| C | 7.4 mm (0.291 in.) | D | 4.0 to 5.0 mm (0.157 to 0.197 in.) |
| E | 3.5 to 4.5 mm (0.138 to 0.177 in.) | F | 8.9 mm (0.350 in.) |
| G | 4.5 to 5.5 mm (0.177 to 0.217 in.) | - | - |
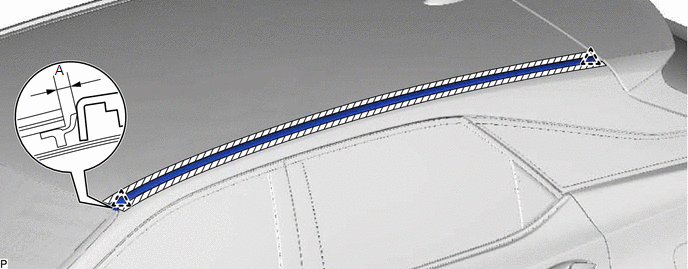
(c) for Panoramic Moon Roof:
(1) Install the roof drip side finish moulding clip to the position on the roof panel shown in the illustration. Determine the locations and firmly press and install the roof drip side finish moulding clip after lightly applying adhesive.

Standard Measurement:
| Area | Measurement | Area | Measurement |
|---|---|---|---|
| A | 3.5 to 4.5 mm (0.138 to 0.177 in.) | B | 8.9 mm (0.350 in.) |
| C | 4.5 to 5.5 mm (0.177 to 0.217 in.) | - | - |
(d) Install the roof drip side finish moulding when 40 minutes or more have elapsed after pressing and installing the roof drip side finish moulding clips.
HINT:
- Initial hardening time: 40 minutes
- Complete hardening time: 24 hours
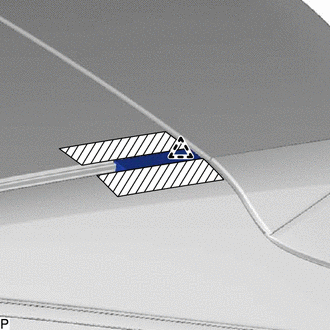
2. INSTALL CENTER ROOF DRIP SIDE FINISH MOULDING (w/o Roof Rack)
(a) Engage the 2 clips to install the center roof drip side finish moulding as shown in the illustration.
Standard Measurement:
| Area | Measurement | Area | Measurement |
|---|---|---|---|
| A | 4.0 mm (0.157 in.) | - | - |
3. INSTALL REAR ROOF DRIP SIDE FINISH MOULDING (w/ Roof Rack)
| (a) Engage the clip to install the rear roof drip side finish moulding. |
|
4. INSTALL ROOF DRIP SIDE FINISH MOULDING (w/ Roof Rack)
(a) except Panoramic Moon Roof:
| (1) Engage the clip to install the roof drip side finish mounting as shown in the illustration. Standard Measurement:
|
|
5. INSTALL ROOF RACK ASSEMBLY (w/ Roof Rack)
w/o Rear No. 2 Seat: Click here .gif)
w/ Rear No. 2 Seat: Click here
 Removal
REMOVAL CAUTION / NOTICE / HINT The necessary procedures (adjustment, calibration, initialization or registration) that must be performed after parts are removed and installed, or replaced during roof ...

Other materials:
Lexus RX (RX 350L, RX450h) 2016-2026 Repair Manual > Automatic Transaxle System: Lost Communication with ECM/PCM "A" Missing Message (U010087)
DESCRIPTION The engine control unit and transmission control unit are located inside the ECM. The engine control unit intercommunicates with the transmission control unit using CAN communication. If there is a problem in this intercommunication, the ECM stores this DTC. DTC No. Detection Item ...
Lexus RX (RX 350L, RX450h) 2016-2026 Repair Manual > Rear Bumper (w/o Rear No. 2 Seat): Reassembly
REASSEMBLY PROCEDURE 1. INSTALL RECEIVER HITCH BRACKET SUB-ASSEMBLY (w/ Towing Hitch) (a) Install the receiver hitch bracket sub-assembly with the 6 bolts. Torque: 80 N·m {816 kgf·cm, 59 ft·lbf} NOTICE: Because the receiver hitch bracket sub-assembly is very heavy, it may cause injury or fall ...
Lexus RX (RX 350L, RX450h) 2016-{YEAR} Owners Manual
- For your information
- Pictorial index
- For safety and security
- Instrument cluster
- Operation of each component
- Driving
- Lexus Display Audio system
- Interior features
- Maintenance and care
- When trouble arises
- Vehicle specifications
- For owners
Lexus RX (RX 350L, RX450h) 2016-{YEAR} Repair Manual

0.0153