Lexus RX (RX 350L, RX450h) 2016-2026 Repair Manual: Relay
On-vehicle Inspection
ON-VEHICLE INSPECTION
PROCEDURE
1. INSPECT HORN RELAY ASSEMBLY
| (a) Remove the HORN relay. |
|
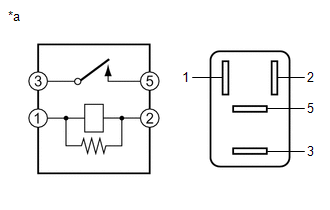
(b) Measure the resistance according to the value(s) in the table below.
Standard Resistance:
| Tester Connection | Condition | Specified Condition |
|---|---|---|
| 3 - 5 | Battery voltage not applied between terminals 1 and 2 | 10 kΩ or higher |
| 3 - 5 | Battery voltage applied between terminals 1 and 2 | Below 1 Ω |
If the result is not as specified, replace the HORN relay.
 Data List / Active Test
DATA LIST / ACTIVE TEST PERFORM ACTIVE TEST HINT: Using the Techstream to perform Active Tests allows relays, VSVs, actuators and other items to be operated without removing any parts. This non-intrus ...
 Lighting (ext)
...
Other materials:
Lexus RX (RX 350L, RX450h) 2016-2026 Repair Manual > Back Door Lock: Removal
REMOVAL PROCEDURE 1. REMOVE BACK WINDOW UPPER PANEL TRIM (w/o Rear No. 2 Seat) Click here 2. REMOVE BACK WINDOW UPPER PANEL TRIM (w/ Rear No. 2 Seat) Click here 3. REMOVE BACK DOOR TRIM COVER LH (w/o Rear No. 2 Seat) Click here 4. REMOVE BACK DOOR TRIM COVER LH (w/ Rear No. 2 Seat) Click he ...
Lexus RX (RX 350L, RX450h) 2016-2026 Repair Manual > Active Control Engine Mount: On-vehicle Inspection
ON-VEHICLE INSPECTION PROCEDURE 1. INSPECT FRONT ENGINE MOUNTING INSULATOR (a) Disconnect the vacuum hose from the front engine mounting insulator assembly. (b) Using a vacuum pump, apply vacuum of 80 kPa (600 mmHg, 23.6 in.Hg) and wait for 1 minute. *a Vacuum Hose (c) Che ...
Lexus RX (RX 350L, RX450h) 2016-{YEAR} Owners Manual
- For your information
- Pictorial index
- For safety and security
- Instrument cluster
- Operation of each component
- Driving
- Lexus Display Audio system
- Interior features
- Maintenance and care
- When trouble arises
- Vehicle specifications
- For owners
Lexus RX (RX 350L, RX450h) 2016-{YEAR} Repair Manual

0.009