Lexus RX (RX 350L, RX450h) 2016-2026 Repair Manual: Adjustment
ADJUSTMENT
CAUTION / NOTICE / HINT
HINT:
- Use the same procedure for the RH side and LH side.
- The following procedure is for the LH side.
PROCEDURE
1. PREPARE VEHICLE FOR FOG LIGHT AIM ADJUSTMENT
(a) Prepare the vehicle:
- Ensure that there is no damage or deformation to the vehicle body around the fog lights.
- Fill the fuel tank.
- Make sure that the oil is filled to the specified level.
- Make sure that the engine coolant is filled to the specified level.
- Inflate the tires to the appropriate pressure.
- Unload the trunk and vehicle, ensuring that the spare tire, tools and jack are in their original positions.
- Sit a person of average weight (68 kg, 150 lb) in the driver's seat.
2. PREPARE FOR FOG LIGHT AIMING
| (a) Prepare the vehicle:
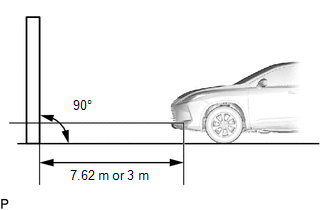
NOTICE: A distance of 7.62 m (25 ft.) between the vehicle (fog light bulb center) and the wall is necessary for proper aim adjustment. If sufficient space is not available, secure a distance of exactly 3 m (9.84 ft.) to allow for checking and adjustment of fog light aim. (The size of the target zone will change with the distance, so follow the instructions in the illustration.) |
|
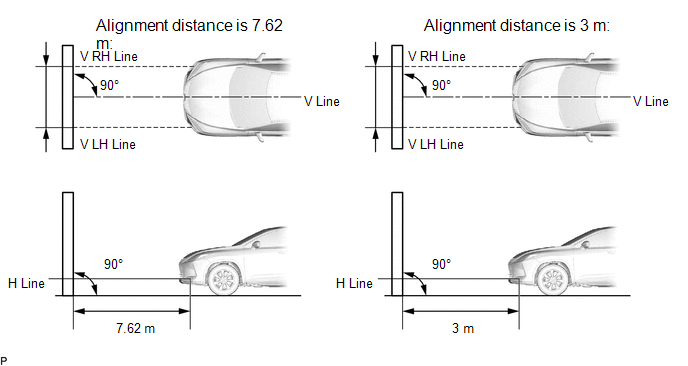
(b) Prepare a piece of thick white paper (approximately 2 m (6.56 ft.) (height) x 4 m (13.1 ft.) (width)) to use as a screen.
(c) Draw a vertical line down the center of the screen (V line).
(d) Set the screen as shown in the illustration.
HINT:
- Stand the screen perpendicular to the ground.
- Align the V line on the screen with the center of the vehicle.
| (e) Draw base lines (H, V LH, and V RH lines) on the screen as shown in the illustration. HINT: Mark the fog light bulb center marks on the screen. If the center mark cannot be observed on the fog light, use the center of the fog light bulb. (1) H Line (Fog light height): Draw a horizontal line across the screen so that it passes through the center marks. The H line should be at the same height as the fog light bulb center marks of the fog lights. (2) V LH Line, V RH Line (Center mark position of left-hand (LH) and right-hand (RH) fog lights): Draw 2 vertical lines so that they intersect the H line at each center mark (aligned with the center of the fog light bulbs). |
|
3. INSPECT FOG LIGHT AIMING
(a) Cover the fog light or disconnect the connector of the fog light on the opposite side to prevent light from the fog light that is not being inspected from affecting the fog light aiming inspection.
(b) Start the engine.
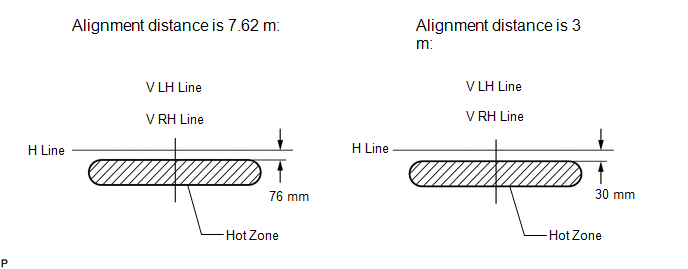
(c) Turn on the fog lights and check if the upper edge of the hot zone for each fog light matches the upper edge as shown in the illustration.
HINT:
-
If the alignment distance is 7.62 m (25 ft.):
The upper edge of the hot zone for the fog light should be 76 mm (2.99 in.) below the H line.
-
If the alignment distance is 3 m (9.84 ft.):
The upper edge of the hot zone for the fog light should be 30 mm (1.18 in.) below the H line.
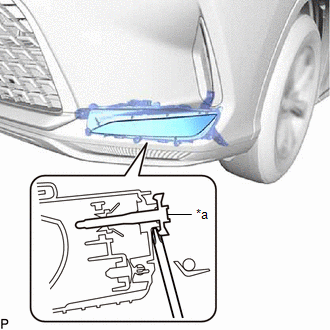
4. ADJUST FOG LIGHT AIMING
| (a) Adjust the aim vertically: Adjust the aim of each fog light to the specified range by turning each aiming screw with a screwdriver. NOTICE: The final turn of the aiming screw should be made in the clockwise direction. If the screw is tightened excessively, loosen it and then retighten it, so that the final turn of the screw is in the clockwise direction. HINT: If it is not possible to correctly adjust the fog light aim, check the fog light assembly. |
|
 Inspection
INSPECTION PROCEDURE 1. INSPECT FOG LIGHT ASSEMBLY LH (a) Apply battery voltage to the fog light assembly LH and check that the light comes on. OK: Condition Specified Condition Battery p ...
 Installation
INSTALLATION CAUTION / NOTICE / HINT HINT:
Use the same procedure for the RH side and LH side.
The following procedure is for the LH side.
PROCEDURE 1. INSTALL FOG LIGHT ASSEMBLY (a) Install t ...
Other materials:
Lexus RX (RX 350L, RX450h) 2016-2026 Repair Manual > Power Mirror Control System (w/ Memory): AUTO Power Retract Mirrors do not operate
DESCRIPTION The multiplex network master switch assembly sends the auto retractable outer mirror switch signal to the main body ECU (multiplex network body ECU) via LIN communication. The main body ECU (multiplex network body ECU) sends the auto retract/return signal to the outer mirror control ECU ...
Lexus RX (RX 350L, RX450h) 2016-2026 Repair Manual > Intelligent Clearance Sonar System: Steering Angle Midpoint Initial Setting Incomplete (C1AEA)
DESCRIPTION When the clearance warning ECU assembly detects that the steering angle neutral point memorization is incomplete during self diagnosis, C1AEA is stored. DTC No. Detection Item DTC Detection Condition Trouble Area C1AEA Steering Angle Midpoint Initial Setting Incomplete S ...
Lexus RX (RX 350L, RX450h) 2016-{YEAR} Owners Manual
- For your information
- Pictorial index
- For safety and security
- Instrument cluster
- Operation of each component
- Driving
- Lexus Display Audio system
- Interior features
- Maintenance and care
- When trouble arises
- Vehicle specifications
- For owners
Lexus RX (RX 350L, RX450h) 2016-{YEAR} Repair Manual

0.009