Lexus RX (RX 350L, RX450h) 2016-2026 Repair Manual: Installation
INSTALLATION
PROCEDURE
1. INSTALL REAR HEIGHT CONTROL SENSOR SUB-ASSEMBLY RH
| (a) Temporarily install the rear height control sensor sub-assembly RH with the 2 nuts. Torque: 5.0 N·m {51 kgf·cm, 44 in·lbf} |
|
.png)
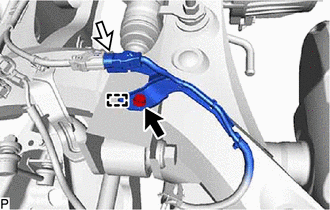
(b) Engage the guide.
(c) Connect the rear height control sensor sub-assembly RH with the bolt.
Torque:
5.4 N·m {55 kgf·cm, 48 in·lbf}
| (d) Engage the guide. |
|
(e) Install the rear height control sensor sub-assembly RH with the bolt.
NOTICE:
If the rear height control sensor sub-assembly RH has been struck or dropped, replace it with a new one.
Torque:
5.0 N·m {51 kgf·cm, 44 in·lbf}
(f) Connect the connector.
2. INSTALL REAR WHEEL (for RH Side)
Click here .gif)
3. CONNECT CABLE TO NEGATIVE BATTERY TERMINAL
NOTICE:
When disconnecting the cable, some systems need to be initialized after the cable is reconnected.
Click here
4. PERFORM INITIALIZATION
Click here
5. INSPECT HEADLIGHT AIMING
Click here
 Inspection
INSPECTION PROCEDURE 1. INSPECT REAR HEIGHT CONTROL SENSOR SUB-ASSEMBLY RH (a) Connect 3 dry cell batteries (1.5 V) in series. NOTICE: Do not use rechargeable batteries as they may not output a voltag ...
 High Mounted Stop Light Assembly
ComponentsCOMPONENTS ILLUSTRATION *1 CENTER STOP LIGHT ASSEMBLY - - RemovalREMOVAL PROCEDURE 1. REMOVE REAR SPOILER SUB-ASSEMBLY Click here 2. REMOVE CENTER STOP LIGHT ASSEMBLY (a) App ...
Other materials:
Lexus RX (RX 350L, RX450h) 2016-2026 Repair Manual > Power Tilt And Power Telescopic Steering Column System: Customize Parameters
CUSTOMIZE PARAMETERS CUSTOMIZE POWER TILT AND POWER TELESCOPIC STEERING COLUMN SYSTEM HINT: The following items can be customized. NOTICE:
When the customer requests a change in a function, first make sure that the function can be customized.
Record the current settings before customizing.
( ...
Lexus RX (RX 350L, RX450h) 2016-2026 Repair Manual > Sfi System: Engine Difficult to Start
DESCRIPTION Problem Symptom Suspected Area Trouble Area
Engine speed fluctuation due to abnormal combustion
Idle speed too low or high
Strong engine vibration due to above symptoms
Ignition malfunction
Deviation in air fuel ratio (Excessive or insufficient intake air volume ...
Lexus RX (RX 350L, RX450h) 2016-{YEAR} Owners Manual
- For your information
- Pictorial index
- For safety and security
- Instrument cluster
- Operation of each component
- Driving
- Lexus Display Audio system
- Interior features
- Maintenance and care
- When trouble arises
- Vehicle specifications
- For owners
Lexus RX (RX 350L, RX450h) 2016-{YEAR} Repair Manual

0.0095