Lexus RX (RX 350L, RX450h) 2016-2026 Repair Manual: High Mounted Stop Light Assembly
Components
COMPONENTS
ILLUSTRATION
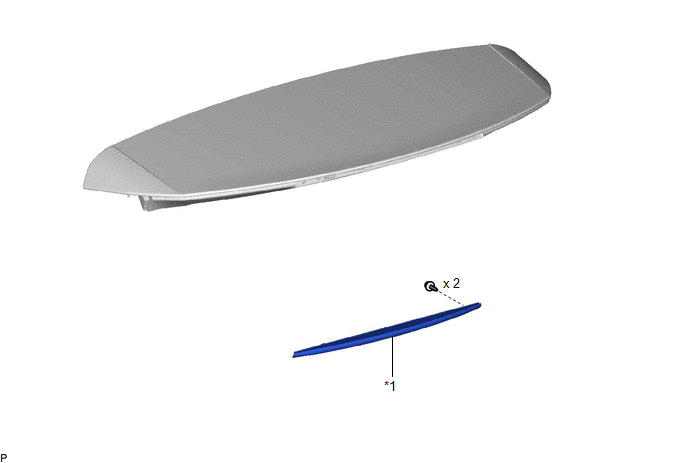
| *1 | CENTER STOP LIGHT ASSEMBLY | - | - |
Removal
REMOVAL
PROCEDURE
1. REMOVE REAR SPOILER SUB-ASSEMBLY
Click here .gif)
2. REMOVE CENTER STOP LIGHT ASSEMBLY
(a) Apply protective tape to the area shown in the illustration.
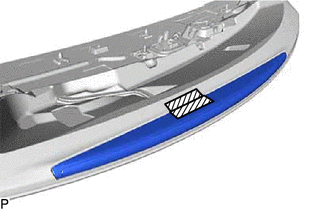
.png) | Protective Tape |
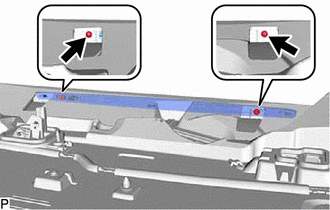
| (b) Remove the 2 screws. |
|
| (c) Using a moulding remover, disengage the claw and 2 guides as shown in the illustration. |
|
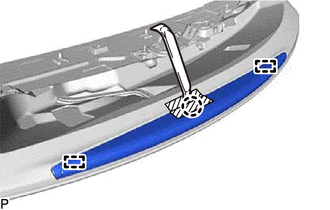
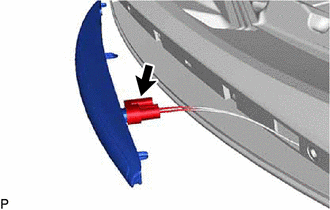
| (d) Disconnect the connector to remove the center stop light assembly. |
|
Inspection
INSPECTION
PROCEDURE
1. INSPECT CENTER STOP LIGHT ASSEMBLY
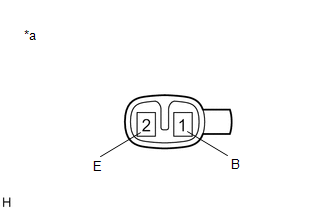
| (a) Apply battery voltage to the center stop light assembly and check that the light comes on. OK:
If the result is not as specified, replace the center stop light assembly. |
|
Installation
INSTALLATION
PROCEDURE
1. INSTALL CENTER STOP LIGHT ASSEMBLY
(a) Connect the connector.
(b) Engage the 2 guides and claw.
(c) Install the center stop light assembly with the 2 screws.
(d) Remove the protective tape.
2. INSTALL REAR SPOILER SUB-ASSEMBLY
Click here .gif)
 Installation
INSTALLATION PROCEDURE 1. INSTALL REAR HEIGHT CONTROL SENSOR SUB-ASSEMBLY RH (a) Temporarily install the rear height control sensor sub-assembly RH with the 2 nuts. Torque: 5.0 N·m {51 kgf·cm, 4 ...
 License Plate Light Assembly
ComponentsCOMPONENTS ILLUSTRATION *1 LICENSE PLATE LIGHT ASSEMBLY - - RemovalREMOVAL CAUTION / NOTICE / HINT HINT:
Use the same procedure for the RH side and LH side.
The following p ...
Other materials:
Lexus RX (RX 350L, RX450h) 2016-2026 Repair Manual > Rear No. 1 Seat Assembly (for 60/40 Split Seat Type Lh Side): Components
COMPONENTS ILLUSTRATION *1 REAR DOOR SCUFF PLATE LH *2 REAR NO. 1 SEAT ASSEMBLY LH *3 REAR SEAT HEADREST ASSEMBLY *4 REAR SEAT INNER TRACK BRACKET COVER LH *5 REAR SEAT OUTER TRACK BRACKET COVER LH *6 REAR SEAT OUTER TRACK BRACKET COVER LH *7 SEAT INNER TRACK BRAC ...
Lexus RX (RX 350L, RX450h) 2016-2026 Repair Manual > Seat Heater System: Front Right Seat Heat Sensor Circuit (B14C0)
DESCRIPTION Output to the front seat cushion heater temperature sensor stops if one of the following occurs: 1) the temperature sensor is open or shorted; or 2) the temperature sensor is damaged and its output value does not change. DTC No. Detection Item DTC Detection Condition Trouble Are ...
Lexus RX (RX 350L, RX450h) 2016-{YEAR} Owners Manual
- For your information
- Pictorial index
- For safety and security
- Instrument cluster
- Operation of each component
- Driving
- Lexus Display Audio system
- Interior features
- Maintenance and care
- When trouble arises
- Vehicle specifications
- For owners
Lexus RX (RX 350L, RX450h) 2016-{YEAR} Repair Manual

0.0119