Lexus RX (RX 350L, RX450h) 2016-2026 Repair Manual: Headlight Swivel ECU LH Communication (B2410,B2411)
DESCRIPTION
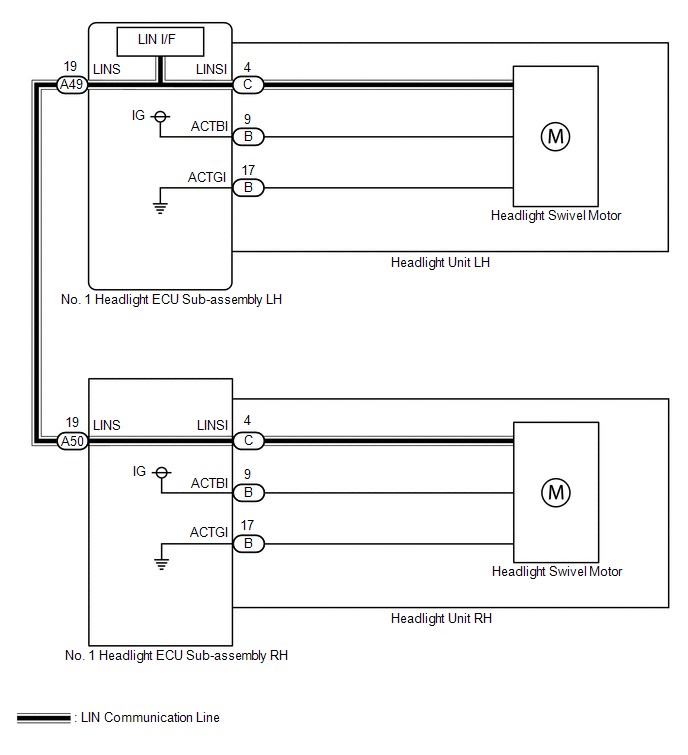
Each No. 1 headlight ECU sub-assembly and headlight swivel motor communicate via LIN communication.
The headlight swivel motor operates according to power supplied and automatic headlight beam level control signals from its respective No. 1 headlight ECU sub-assembly and sends its operating state to the No. 1 headlight ECU sub-assembly.
| DTC No. | Detection Item | DTC Detection Condition | Trouble Area | DTC Output from |
|---|---|---|---|---|
| B2410 | Headlight Swivel ECU LH Communication |
|
| AFS |
| B2411 | Headlight Swivel ECU RH Communication |
|
| AFS |
WIRING DIAGRAM
CAUTION / NOTICE / HINT
NOTICE:
-
If the No. 1 headlight ECU sub-assembly LH has been replaced, it is necessary to synchronize the vehicle information and initialize the No. 1 headlight ECU sub-assembly LH.
Click here
.gif)
-
If the headlight assembly LH has been replaced, it is necessary to synchronize the vehicle information and initialize the No. 1 headlight ECU sub-assembly LH.*
Click here
- When replacing the No. 1 headlight ECU sub-assembly LH, always replace it with a new one. If a No. 1 headlight ECU sub-assembly LH which was installed to another vehicle is used, the information stored in it will not match the information from the vehicle and a DTC may be stored.
-
When replacing the headlight assembly LH, always replace it with a new one. If a headlight assembly LH which was installed to another vehicle is used, the information stored in it will not match the information from the vehicle and a DTC may be stored.*
- *: for TMMC Made
PROCEDURE
| 1. | CLEAR DTC |
(a) Connect the Techstream to the DLC3.
(b) Turn the engine switch on (IG).
(c) Turn the Techstream on.
(d) Enter the following menus: Body Electrical / AFS / Trouble Codes.
(e) Clear the DTCs.
Body Electrical > AFS > Clear DTCs
|
.gif)
| 2. | CHECK FOR DTC |
(a) Connect the Techstream to the DLC3.
(b) Turn the engine switch on (IG).
(c) Wait 10 seconds or more.
(d) Turn the Techstream on.
(e) Enter the following menus: Body Electrical / AFS / Trouble Codes.
(f) Check for DTCs.
Body Electrical > AFS > Trouble CodesOK:
DTC B2410 and B2411 are not output.
| Result | Proceed to |
|---|---|
| OK | A |
| NG (DTC B2410 is output) | B |
| NG (DTC B2411 is output) | C |
| NG (DTC B2410 and B2411 are output) | D |
| A | .gif) | USE SIMULATION METHOD TO CHECK |
| C | | GO TO STEP 4 |
| D | | GO TO STEP 7 |
|
| 3. | INSPECT NO. 1 HEADLIGHT ECU SUB-ASSEMBLY LH |

| *a | Component without harness connected (No. 1 Headlight ECU Sub-assembly LH) | - | - |
(a) Remove the No. 1 headlight ECU sub-assembly LH.
Click here
(b) Measure the resistance according to the value(s) in the table below.
Standard Resistance:
| Tester Connection | Condition | Specified Condition |
|---|---|---|
| A49-19 (LINS) - C-4 (LINSI) | Always | Below 1 Ω |
| Result | Proceed to |
|---|---|
| OK (for TMC Made) | A |
| OK (for TMMC Made) | B |
| NG | C |
| A | | REPLACE HEADLIGHT UNIT LH |
| B | | REPLACE HEADLIGHT ASSEMBLY LH |
| C | | REPLACE NO. 1 HEADLIGHT ECU SUB-ASSEMBLY LH |
| 4. | CHECK HARNESS AND CONNECTOR (NO. 1 HEADLIGHT ECU SUB-ASSEMBLY LH - NO. 1 HEADLIGHT ECU SUB-ASSEMBLY RH) |
(a) Disconnect the A49 No. 1 headlight ECU sub-assembly LH connector.
(b) Disconnect the A50 No. 1 headlight ECU sub-assembly RH connector.
(c) Measure the resistance according to the value(s) in the table below.
Standard Resistance:
| Tester Connection | Condition | Specified Condition |
|---|---|---|
| A49-19 (LINS) - A50-19 (LINS) | Always | Below 1 Ω |
| NG | | REPAIR OR REPLACE HARNESS OR CONNECTOR |
|
| 5. | CHECK NO. 1 HEADLIGHT ECU SUB-ASSEMBLY LH (LINS TERMINAL SIGNAL OUTPUT) |
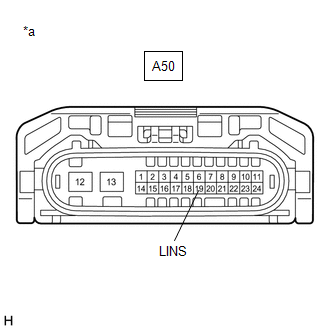
| *a | Front view of wire harness connector (to No. 1 Headlight ECU Sub-assembly RH) |
(a) Connect the A49 No. 1 headlight ECU sub-assembly LH connector.
(b) Using a Techstream, check the waveform.
OK:
| Tester Connection | Condition | Specified Condition |
|---|---|---|
| A50-19 (LINS) - Body ground | Engine switch on (IG) | Pulse generation |
| NG | | REPLACE NO. 1 HEADLIGHT ECU SUB-ASSEMBLY LH |
|
| 6. | INSPECT NO. 1 HEADLIGHT ECU SUB-ASSEMBLY RH |
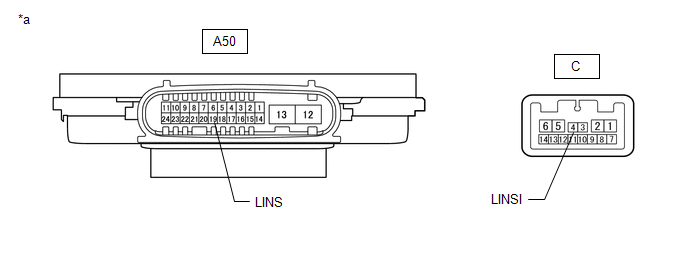
| *a | Component without harness connected (No. 1 Headlight ECU Sub-assembly RH) | - | - |
(a) Remove the No. 1 headlight ECU sub-assembly RH.
Click here
(b) Measure the resistance according to the value(s) in the table below.
Standard Resistance:
| Tester Connection | Condition | Specified Condition |
|---|---|---|
| A50-19 (LINS) - C-4 (LINSI) | Always | Below 1 Ω |
| Result | Proceed to |
|---|---|
| OK (for TMC Made) | A |
| OK (for TMMC Made) | B |
| NG | C |
| A | | REPLACE HEADLIGHT UNIT RH |
| B | | REPLACE HEADLIGHT ASSEMBLY RH |
| C | | REPLACE NO. 1 HEADLIGHT ECU SUB-ASSEMBLY RH |
| 7. | CHECK HARNESS AND CONNECTOR (NO. 1 HEADLIGHT ECU SUB-ASSEMBLY LH - NO. 1 HEADLIGHT ECU SUB-ASSEMBLY RH) |
(a) Disconnect the A49 No. 1 headlight ECU sub-assembly LH connector.
(b) Disconnect the A50 No. 1 headlight ECU sub-assembly RH connector.
(c) Measure the resistance according to the value(s) in the table below.
Standard Resistance:
| Tester Connection | Condition | Specified Condition |
|---|---|---|
| A49-19 (LINS) or A50-19 (LINS) - Body ground | Always | 10 kΩ or higher |
| NG | | REPAIR OR REPLACE HARNESS OR CONNECTOR |
|
| 8. | CLEAR DTC |
(a) Connect the A49 No. 1 headlight ECU sub-assembly LH connector.
(b) Connect the Techstream to the DLC3.
(c) Turn the engine switch on (IG).
(d) Turn the Techstream on.
(e) Enter the following menus: Body Electrical / AFS / Trouble Codes.
(f) Clear the DTCs.
Body Electrical > AFS > Clear DTCs
|
| 9. | CHECK FOR DTC |
(a) Connect the Techstream to the DLC3.
(b) Turn the engine switch on (IG).
(c) Wait 10 seconds or more.
(d) Turn the Techstream on.
(e) Enter the following menus: Body Electrical / AFS / Trouble Codes.
(f) Check for DTCs.
Body Electrical > AFS > Trouble Codes| Result | Proceed to |
|---|---|
| DTC B2411 is output | A |
| DTC B2410 and B2411 are output | B |
| B | | GO TO STEP 13 |
|
| 10. | CHECK NO. 1 HEADLIGHT ECU SUB-ASSEMBLY RH |
(a) Remove the No. 1 headlight ECU sub-assembly RH.
Click here
(b) Connect the A50 No. 1 headlight ECU sub-assembly RH connector.
|
| 11. | CLEAR DTC |
(a) Connect the Techstream to the DLC3.
(b) Turn the engine switch on (IG).
(c) Turn the Techstream on.
(d) Enter the following menus: Body Electrical / AFS / Trouble Codes.
(e) Clear the DTCs.
Body Electrical > AFS > Clear DTCs
|
| 12. | CHECK FOR DTC |
(a) Connect the Techstream to the DLC3.
(b) Turn the engine switch on (IG).
(c) Wait 10 seconds or more.
(d) Turn the Techstream on.
(e) Enter the following menus: Body Electrical / AFS / Trouble Codes.
(f) Check for DTCs.
Body Electrical > AFS > Trouble Codes| Result | Proceed to |
|---|---|
| DTC B2411 is output (for TMC Made) | A |
| DTC B2411 is output (for TMMC Made) | B |
| DTC B2410 and B2411 are output | C |
| A | | REPLACE HEADLIGHT UNIT RH |
| B | | REPLACE HEADLIGHT ASSEMBLY RH |
| C | | REPLACE NO. 1 HEADLIGHT ECU SUB-ASSEMBLY RH |
| 13. | CHECK NO. 1 HEADLIGHT ECU SUB-ASSEMBLY LH |
(a) Remove the No. 1 headlight ECU sub-assembly LH.
Click here
(b) Connect the A49 No. 1 headlight ECU sub-assembly LH connector.
(c) Connect the A50 No. 1 headlight ECU sub-assembly RH connector.
|
| 14. | CLEAR DTC |
(a) Connect the Techstream to the DLC3.
(b) Turn the engine switch on (IG).
(c) Turn the Techstream on.
(d) Enter the following menus: Body Electrical / AFS / Trouble Codes.
(e) Clear the DTCs.
Body Electrical > AFS > Clear DTCs
|
| 15. | CHECK FOR DTC |
(a) Connect the Techstream to the DLC3.
(b) Turn the engine switch on (IG).
(c) Wait 10 seconds or more.
(d) Turn the Techstream on.
(e) Enter the following menus: Body Electrical / AFS / Trouble Codes.
(f) Check for DTCs.
Body Electrical > AFS > Trouble Codes| Result | Proceed to |
|---|---|
| DTC B2410 is output (for TMC Made) | A |
| DTC B2410 is output (for TMMC Made) | B |
| DTC B2410 and B2411 are output | C |
| A | | REPLACE HEADLIGHT UNIT LH |
| B | | REPLACE HEADLIGHT ASSEMBLY LH |
| C | | REPLACE NO. 1 HEADLIGHT ECU SUB-ASSEMBLY LH |
 Automatic High Beam Camera (B124C)
DESCRIPTION The main body ECU (multiplex network body ECU) detects a high beam headlight illumination request signal of the automatic high beam system from the forward recognition camera. DTC No. ...
 Headlight Swivel Motor LH (B2412,B2413,B2417,B2418)
DESCRIPTION The No. 1 headlight ECU sub-assembly LH sends automatic headlight beam level control signals to each headlight swivel motor and headlight leveling motor via LIN communication. Each No. 1 h ...
Other materials:
Lexus RX (RX 350L, RX450h) 2016-2026 Repair Manual > Wiper Switch: Components
COMPONENTS ILLUSTRATION *1 LOWER STEERING COLUMN COVER *2 UPPER STEERING COLUMN COVER *3 WINDSHIELD WIPER SWITCH ASSEMBLY - - N*m (kgf*cm, ft.*lbf): Specified torque - - ...
Lexus RX (RX 350L, RX450h) 2016-2026 Repair Manual > Curtain Shield Airbag Assembly (w/ Rear No. 2 Seat): On-vehicle Inspection
ON-VEHICLE INSPECTION CAUTION / NOTICE / HINT CAUTION: Be sure to correctly follow the removal and installation procedures for the curtain shield airbag assemblies. PROCEDURE 1. INSPECT CURTAIN SHIELD AIRBAG ASSEMBLY (for Vehicle not Involved in Collision) (a) Perform a diagnostic system check. Clic ...
Lexus RX (RX 350L, RX450h) 2016-{YEAR} Owners Manual
- For your information
- Pictorial index
- For safety and security
- Instrument cluster
- Operation of each component
- Driving
- Lexus Display Audio system
- Interior features
- Maintenance and care
- When trouble arises
- Vehicle specifications
- For owners
Lexus RX (RX 350L, RX450h) 2016-{YEAR} Repair Manual

0.0121