Lexus RX (RX 350L, RX450h) 2016-2026 Repair Manual: Removal
REMOVAL
CAUTION / NOTICE / HINT
HINT:
- Use the same procedure for the RH side and LH side.
- The following procedure is for the LH side.
PROCEDURE
1. REMOVE REAR NO. 2 SEAT ASSEMBLY
Click here .gif)
2. REMOVE REAR DOOR SCUFF PLATE
Click here
3. REMOVE REAR DOOR INSIDE SCUFF PLATE
Click here
4. REMOVE REAR SEAT OUTER TRACK BRACKET COVER LH (for LH Side)
for 60/40 Split Seat Type:
Click here
for Captain Seat Type:
Click here
5. REMOVE REAR SEAT OUTER TRACK BRACKET COVER RH (for RH Side)
for 60/40 Split Seat Type:
Click here
for Captain Seat Type:
HINT:
Use the same procedure as for the LH side.
Click here
6. REMOVE FRONT DECK SIDE TRIM COVER
Click here
7. REMOVE REAR SEAT SIDE GARNISH
Click here
8. REMOVE NO. 1 LUGGAGE COMPARTMENT TRIM HOOK (for LH Side)
Click here
9. REMOVE ROPE HOOK ASSEMBLY (for LH Side)
Click here
10. REMOVE NO. 1 LUGGAGE COMPARTMENT LIGHT ASSEMBLY (for LH Side)
Click here
11. REMOVE NO. 1 LUGGAGE COMPARTMENT TRIM HOOK (for RH Side)
Click here
12. REMOVE ROPE HOOK ASSEMBLY (for RH Side)
HINT:
Use the same procedure as for the LH side.
13. REMOVE NO. 1 LUGGAGE COMPARTMENT LIGHT ASSEMBLY (for RH Side)
Click here
14. REMOVE NO. 2 AIR CONDITIONING CONTROL ASSEMBLY (for LH Side)
Click here
15. REMOVE COOLER (NO. 2 ROOM TEMP. SENSOR) THERMISTOR (for LH Side)
Click here
16. REMOVE DECK TRIM SIDE PANEL ASSEMBLY LH (for LH Side)
Click here
17. REMOVE DECK TRIM SIDE PANEL ASSEMBLY RH (for RH Side)
Click here
18. REMOVE REAR LIGHT COVER (for Bulb Type Turn Signal Light)
Click here
19. REMOVE REAR LIGHT COVER (for LED Type Turn Signal Light)
Click here
20. REMOVE REAR COMBINATION LIGHT ASSEMBLY
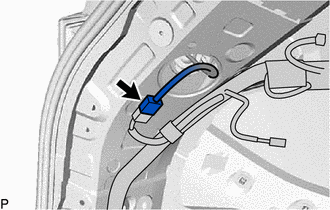
| (a) Disconnect the connector. |
|
(b) Apply protective tape around the rear combination light assembly as shown in the illustration.
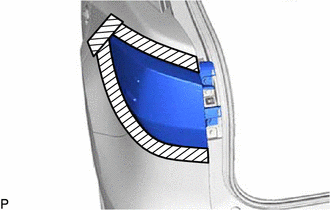
.png) | Protective Tape |
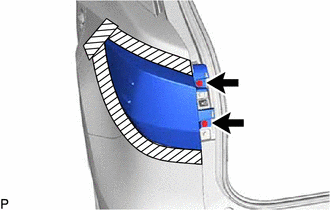
| (c) Remove the 2 screws. |
|
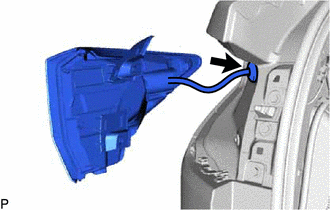
(d) Pull the rear combination light assembly toward the rear of the vehicle as shown in the illustration to disengage the pin and 3 guides and separate the rear combination light assembly.
NOTICE:
To prevent the rear combination light assembly from falling when disengaging the pin, lightly hold the rear combination light assembly.
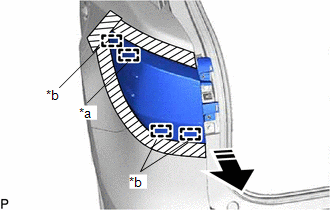
| *a | Pin |
| *b | Guide |
.png) | Remove in this Direction |
| (e) Disengage the grommet to remove the rear combination light assembly. |
|
 Components
COMPONENTS ILLUSTRATION *A for RH Side *B for LH Side *1 FRONT DECK SIDE TRIM COVER *2 REAR DOOR INSIDE SCUFF PLATE *3 REAR DOOR SCUFF PLATE *4 REAR SEAT OUTER TRACK BRAC ...
 Disassembly
DISASSEMBLY CAUTION / NOTICE / HINT HINT:
Use the same procedure for the RH side and LH side.
The following procedure is for the LH side.
PROCEDURE 1. REMOVE REAR COMBINATION LIGHT CAP (for LE ...
Other materials:
Lexus RX (RX 350L, RX450h) 2016-2026 Repair Manual > Telematics System: Operation Check
OPERATION CHECK DCM OPERATION HISTORY HINT:
This function shows the telematics network status when the DCM (telematics transceiver) was operated. Use this when no DTC is present but this telematics system was unable to connect to the call center. This symptom may occur if cell phone signal streng ...
Lexus RX (RX 350L, RX450h) 2016-2026 Repair Manual > Rear Seatback Heater (for 60/40 Split Seat Type Rh Side): Installation
INSTALLATION CAUTION / NOTICE / HINT CAUTION: Wear protective gloves. Sharp areas on the seat frame may injure your hands. PROCEDURE 1. INSTALL SEAT HEATER ASSEMBLY (w/o Rear No. 2 Seat) (a) Install the seat heater assembly to the separate type rear seatback cover with 10 new tag pins. 2. INSTALL SE ...
Lexus RX (RX 350L, RX450h) 2016-{YEAR} Owners Manual
- For your information
- Pictorial index
- For safety and security
- Instrument cluster
- Operation of each component
- Driving
- Lexus Display Audio system
- Interior features
- Maintenance and care
- When trouble arises
- Vehicle specifications
- For owners
Lexus RX (RX 350L, RX450h) 2016-{YEAR} Repair Manual

0.0106