Lexus RX (RX 350L, RX450h) 2016-2026 Repair Manual: Inspection
INSPECTION
PROCEDURE
1. INSPECT OUTER REAR VIEW MIRROR ASSEMBLY RH
(a) Check the operation of the mirror surface.
NOTICE:
If the mirror surface is fully turned to the right, left, upward or downward position, the motor slips and produces a clicking noise. This is not a malfunction.
| (1) Disconnect the outer rear view mirror assembly RH connector. |
|
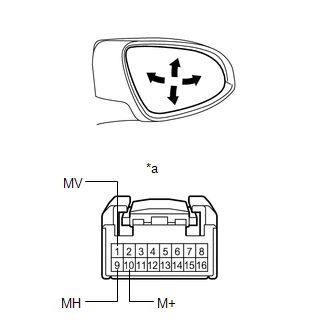
(2) Apply battery voltage and check the operation of the mirror surface.
OK:
| Battery Connection | Specified Condition |
|---|---|
| Battery positive (+) → Terminal 1 (MV) Battery negative (-) → Terminal 10 (M+) | Turns upward |
| Battery positive (+) → Terminal 10 (M+) Battery negative (-) → Terminal 1 (MV) | Turns downward |
| Battery positive (+) → Terminal 9 (MH) Battery negative (-) → Terminal 10 (M+) | Turns left |
| Battery positive (+) → Terminal 10 (M+) Battery negative (-) → Terminal 9 (MH) | Turns right |
If the result is not as specified, replace the outer rear view mirror assembly RH.
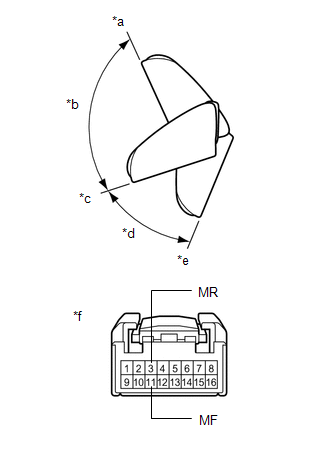
(b) Check the operation of the retractable mirror. (for TMMC Made)
NOTICE:
- Disconnect and reconnect the battery between each mirror position check.
- The mirror position cannot be changed manually when the battery is connected. To change the mirror position manually, the battery must be disconnected first.
- If the motor is kept energized, even after each mirror position check, it may lead to a motor malfunction. Make sure to disconnect the battery immediately after performing each mirror position check.
| (1) Disconnect the outer mirror actuator assembly RH connector. |
|
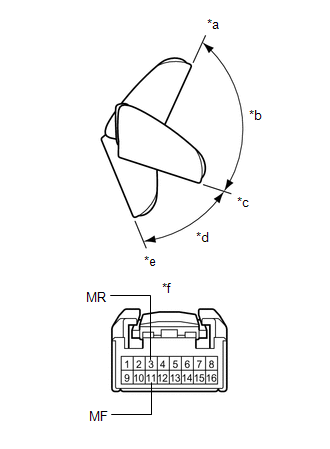
(2) For each position: Disconnect the battery, set the mirror position by hand, connect the battery, and check the retractable mirror movement.
OK:
| Battery Connection | Condition | Specified Condition |
|---|---|---|
| Battery positive (+) → Terminal 3 (MR) Battery negative (-) → Terminal 11 (MF) | Forward position (A) | Moves from (A) to (E) |
| Battery positive (+) → Terminal 11 (MF) Battery negative (-) → Terminal 3 (MR) | Forward position (A) | Does not move |
| Battery positive (+) → Terminal 3 (MR) Battery negative (-) → Terminal 11 (MF) | Position between forward position (A) and driving position (C) | Moves from (B) to (E) |
| Battery positive (+) → Terminal 11 (MF) Battery negative (-) → Terminal 3 (MR) | Position between forward position (A) and driving position (C) | Moves from (B) to (A) |
| Battery positive (+) → Terminal 3 (MR) Battery negative (-) → Terminal 11 (MF) | Driving position (C) | Moves from (C) to (E) |
| Battery positive (+) → Terminal 11 (MF) Battery negative (-) → Terminal 3 (MR) | Driving position (C) | Does not move |
| Battery positive (+) → Terminal 3 (MR) Battery negative (-) → Terminal 11 (MF) | Position between driving position (C) and retracted position (E) | Moves from (D) to (E) |
| Battery positive (+) → Terminal 11 (MF) Battery negative (-) → Terminal 3 (MR) | Position between driving position (C) and retracted position (E) | Moves from (D) to (C) |
| Battery positive (+) → Terminal 3 (MR) Battery negative (-) → Terminal 11 (MF) | Retracted position (E) | Does not move |
| Battery positive (+) → Terminal 11 (MF) Battery negative (-) → Terminal 3 (MR) | Retracted position (E) | Moves from (E) to (C) |
If the result is not as specified, replace the outer mirror actuator assembly RH.
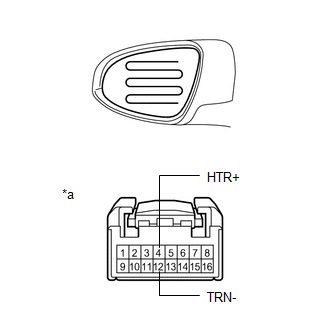
(c) Check the operation of the mirror heater.
| (1) Disconnect the outer rear view mirror assembly RH connector. |
|
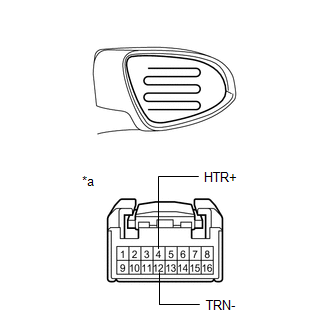
(2) Measure the resistance according to the value(s) in the table below.
Standard Resistance:
| Tester Connection | Condition | Specified Condition |
|---|---|---|
| 4 (HTR+) - 12 (TRN-) | 25°C (77°F) | 3.57 to 4.83 Ω |
(3) Connect a cable from the positive (+) battery terminal to terminal 4 and the negative (-) battery terminal to terminal 12, then check that the mirror becomes warm.
HINT:
It takes a short time for the mirror to become warm.
OK:
Mirror becomes warm.
2. INSPECT INSPECT OUTER MIRROR RETRACTOR RH (for TMK Made)
(a) Check the operation of the retractable mirror.
NOTICE:
- Disconnect and reconnect the battery between each mirror position check.
- The mirror position cannot be changed manually when the battery is connected. To change the mirror position manually, the battery must be disconnected first.
- If the motor is kept energized, even after each mirror position check, it may lead to a motor malfunction. Make sure to disconnect the battery immediately after performing each mirror position check.
| (1) Disconnect the outer mirror retractor RH connector. |
|
(2) For each position: Disconnect the battery, set the mirror position by hand, connect the battery, and check the retractable mirror movement.
OK:
| Battery Connection | Condition | Specified Condition |
|---|---|---|
| Battery positive (+) → Terminal 3 (MR) Battery negative (-) → Terminal 11 (MF) | Forward position (A) | Moves from (A) to (E) |
| Battery positive (+) → Terminal 11 (MF) Battery negative (-) → Terminal 3 (MR) | Forward position (A) | Does not move |
| Battery positive (+) → Terminal 3 (MR) Battery negative (-) → Terminal 11 (MF) | Position between forward position (A) and driving position (C) | Moves from (B) to (E) |
| Battery positive (+) → Terminal 11 (MF) Battery negative (-) → Terminal 3 (MR) | Position between forward position (A) and driving position (C) | Moves from (B) to (A) |
| Battery positive (+) → Terminal 3 (MR) Battery negative (-) → Terminal 11 (MF) | Driving position (C) | Moves from (C) to (E) |
| Battery positive (+) → Terminal 11 (MF) Battery negative (-) → Terminal 3 (MR) | Driving position (C) | Does not move |
| Battery positive (+) → Terminal 3 (MR) Battery negative (-) → Terminal 11 (MF) | Position between driving position (C) and retracted position (E) | Moves from (D) to (E) |
| Battery positive (+) → Terminal 11 (MF) Battery negative (-) → Terminal 3 (MR) | Position between driving position (C) and retracted position (E) | Moves from (D) to (C) |
| Battery positive (+) → Terminal 3 (MR) Battery negative (-) → Terminal 11 (MF) | Retracted position (E) | Does not move |
| Battery positive (+) → Terminal 11 (MF) Battery negative (-) → Terminal 3 (MR) | Retracted position (E) | Moves from (E) to (C) |
If the result is not as specified, replace the outer mirror retractor RH.
3. INSPECT OUTER REAR VIEW MIRROR ASSEMBLY LH
(a) Check the operation of the mirror surface.
NOTICE:
If the mirror surface is fully turned to the right, left, upward or downward position, the motor slips and produces a clicking noise. This is not a malfunction.
| (1) Disconnect the outer rear view mirror assembly LH connector. |
|
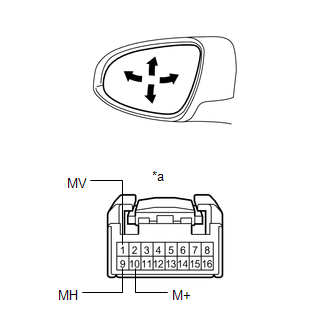
(2) Apply battery voltage and check the operation of the mirror surface.
OK:
| Battery Connection | Specified Condition |
|---|---|
| Battery positive (+) → Terminal 1 (MV) Battery negative (-) → Terminal 10 (M+) | Turns upward |
| Battery positive (+) → Terminal 10 (M+) Battery negative (-) → Terminal 1 (MV) | Turns downward |
| Battery positive (+) → Terminal 9 (MH) Battery negative (-) → Terminal 10 (M+) | Turns right |
| Battery positive (+) → Terminal 10 (M+) Battery negative (-) → Terminal 9 (MH) | Turns left |
If the result is not as specified, replace the outer rear view mirror assembly LH.
(b) Check the operation of the retractable mirror. (for TMMC Made)
NOTICE:
- Disconnect and reconnect the battery between each mirror position check.
- The mirror position cannot be changed manually when the battery is connected. To change the mirror position manually, the battery must be disconnected first.
- If the motor is kept energized, even after each mirror position check, it may lead to a motor malfunction. Make sure to disconnect the battery immediately after performing each mirror position check.
| (1) Disconnect the outer mirror actuator assembly LH connector. |
|
(2) For each position: Disconnect the battery, set the mirror position by hand, connect the battery, and check the retractable mirror movement.
OK:
| Battery Connection | Condition | Specified Condition |
|---|---|---|
| Battery positive (+) → Terminal 3 (MR) Battery negative (-) → Terminal 11 (MF) | Forward position (A) | Moves from (A) to (E) |
| Battery positive (+) → Terminal 11 (MF) Battery negative (-) → Terminal 3 (MR) | Forward position (A) | Does not move |
| Battery positive (+) → Terminal 3 (MR) Battery negative (-) → Terminal 11 (MF) | Position between forward position (A) and driving position (C) | Moves from (B) to (E) |
| Battery positive (+) → Terminal 11 (MF) Battery negative (-) → Terminal 3 (MR) | Position between forward position (A) and driving position (C) | Moves from (B) to (A) |
| Battery positive (+) → Terminal 3 (MR) Battery negative (-) → Terminal 11 (MF) | Driving position (C) | Moves from (C) to (E) |
| Battery positive (+) → Terminal 11 (MF) Battery negative (-) → Terminal 3 (MR) | Driving position (C) | Does not move |
| Battery positive (+) → Terminal 3 (MR) Battery negative (-) → Terminal 11 (MF) | Position between driving position (C) and retracted position (E) | Moves from (D) to (E) |
| Battery positive (+) → Terminal 11 (MF) Battery negative (-) → Terminal 3 (MR) | Position between driving position (C) and retracted position (E) | Moves from (D) to (C) |
| Battery positive (+) → Terminal 3 (MR) Battery negative (-) → Terminal 11 (MF) | Retracted position (E) | Does not move |
| Battery positive (+) → Terminal 11 (MF) Battery negative (-) → Terminal 3 (MR) | Retracted position (E) | Moves from (E) to (C) |
If the result is not as specified, replace the outer mirror actuator assembly LH.
(c) Check the operation of the mirror heater.
| (1) Disconnect the outer rear view mirror assembly LH connector. |
|
(2) Measure the resistance according to the value(s) in the table below.
Standard Resistance:
| Tester Connection | Condition | Specified Condition |
|---|---|---|
| 4 (HTR+) - 12 (TRN-) | 25°C (77°F) | 3.57 to 4.83 Ω |
(3) Connect a cable from the positive (+) battery terminal to terminal 4 and the negative (-) battery terminal to terminal 12, then check that the mirror becomes warm.
HINT:
It takes a short time for the mirror to become warm.
OK:
Mirror becomes warm.
4. INSPECT OUTER MIRROR RETRACTOR LH (for TMK Made)
(a) Check the operation of the retractable mirror.
NOTICE:
- Disconnect and reconnect the battery between each mirror position check.
- The mirror position cannot be changed manually when the battery is connected. To change the mirror position manually, the battery must be disconnected first.
- If the motor is kept energized, even after each mirror position check, it may lead to a motor malfunction. Make sure to disconnect the battery immediately after performing each mirror position check.
| (1) Disconnect the outer mirror retractor LH connector. |
|
(2) For each position: Disconnect the battery, set the mirror position by hand, connect the battery, and check the retractable mirror movement.
OK:
| Battery Connection | Condition | Specified Condition |
|---|---|---|
| Battery positive (+) → Terminal 3 (MR) Battery negative (-) → Terminal 11 (MF) | Forward position (A) | Moves from (A) to (E) |
| Battery positive (+) → Terminal 11 (MF) Battery negative (-) → Terminal 3 (MR) | Forward position (A) | Does not move |
| Battery positive (+) → Terminal 3 (MR) Battery negative (-) → Terminal 11 (MF) | Position between forward position (A) and driving position (C) | Moves from (B) to (E) |
| Battery positive (+) → Terminal 11 (MF) Battery negative (-) → Terminal 3 (MR) | Position between forward position (A) and driving position (C) | Moves from (B) to (A) |
| Battery positive (+) → Terminal 3 (MR) Battery negative (-) → Terminal 11 (MF) | Driving position (C) | Moves from (C) to (E) |
| Battery positive (+) → Terminal 11 (MF) Battery negative (-) → Terminal 3 (MR) | Driving position (C) | Does not move |
| Battery positive (+) → Terminal 3 (MR) Battery negative (-) → Terminal 11 (MF) | Position between driving position (C) and retracted position (E) | Moves from (D) to (E) |
| Battery positive (+) → Terminal 11 (MF) Battery negative (-) → Terminal 3 (MR) | Position between driving position (C) and retracted position (E) | Moves from (D) to (C) |
| Battery positive (+) → Terminal 3 (MR) Battery negative (-) → Terminal 11 (MF) | Retracted position (E) | Does not move |
| Battery positive (+) → Terminal 11 (MF) Battery negative (-) → Terminal 3 (MR) | Retracted position (E) | Moves from (E) to (C) |
If the result is not as specified, replace the outer mirror retractor LH.
 Removal
REMOVAL CAUTION / NOTICE / HINT The necessary procedures (adjustment, calibration, initialization, or registration) that must be performed after parts are removed and installed, or replaced during sid ...
 Disassembly
DISASSEMBLY CAUTION / NOTICE / HINT HINT:
Use the same procedure for the RH side and LH side.
The following procedure is for the LH side.
PROCEDURE 1. REMOVE OUTER MIRROR Click here 2. REMOV ...
Other materials:
Lexus RX (RX 350L, RX450h) 2016-2026 Repair Manual > Air Conditioning System: Air Mix Damper Control Servo Motor Circuit (Driver Side) (B1446/46)
DESCRIPTION The No. 1 air conditioning radiator damper servo sub-assembly (driver side air mix) sends pulse signals to inform the air conditioning amplifier assembly of the damper position. The air conditioning amplifier assembly activates the motor (normal or reverse) based on these signals to move ...
Lexus RX (RX 350L, RX450h) 2016-2026 Repair Manual > Differential Oil Seal: Components
COMPONENTS ILLUSTRATION *1 FRONT WHEEL OPENING EXTENSION PAD LH *2 NO. 3 ENGINE UNDER COVER *3 FRONT FENDER APRON SEAL LH - - ILLUSTRATION *1 DRIVE SHAFT BEARING BRACKET *2 FRONT DRIVE SHAFT OIL SEAL LH *3 FRONT DRIVE SHAFT OIL SEAL RH *4 O-RING *5 RE ...
Lexus RX (RX 350L, RX450h) 2016-{YEAR} Owners Manual
- For your information
- Pictorial index
- For safety and security
- Instrument cluster
- Operation of each component
- Driving
- Lexus Display Audio system
- Interior features
- Maintenance and care
- When trouble arises
- Vehicle specifications
- For owners
Lexus RX (RX 350L, RX450h) 2016-{YEAR} Repair Manual

0.0148