Lexus RX (RX 350L, RX450h) 2016-2026 Repair Manual: Inspection
INSPECTION
PROCEDURE
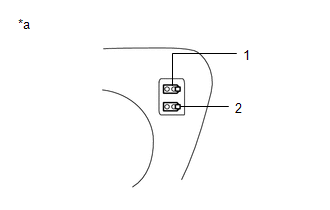
1. INSPECT OUTER MIRROR RH
| (a) Check the outer mirror heater operation. (1) Measure the resistance according to the value(s) in the table below. Standard Resistance:
If the result is not as specified, replace the outer mirror RH. |
|
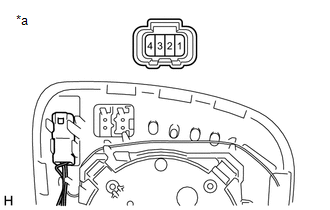
(b) Check the operation of the outer rear view mirror indicator. (w/ Blind Spot Monitor System)
NOTICE:
Do not apply a voltage of more than 6 V.
(1) Connect 4 new 1.5 V dry-cell batteries in series.
| (2) Apply 6 V battery voltage to the terminals of the connector, and check that the outer rear view mirror indicator comes on. OK:
If the result is not as specified, replace the outer mirror RH. |
|
2. INSPECT OUTER MIRROR LH
| (a) Check the outer mirror heater operation. (1) Measure the resistance according the value(s) in the table below. Standard Resistance:
If the result is not as specified, replace the outer mirror LH. |
|

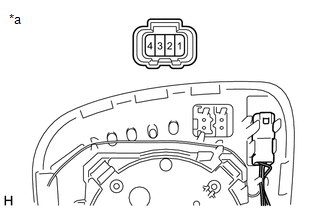
(b) Check the operation of the outer rear view mirror indicator. (w/ Blind Spot Monitor System)
NOTICE:
Do not apply a voltage of more than 6 V.
(1) Connect 4 new 1.5 V dry-cell batteries in series.
| (2) Apply 6 V battery voltage to the terminals of the connector, and check that the outer rear view mirror indicator comes on. OK:
If the result is not as specified, replace the outer mirror LH. |
|
 Removal
REMOVAL CAUTION / NOTICE / HINT HINT:
Use the same procedure for the RH side and LH side.
The following procedure is for the LH side.
PROCEDURE 1. REMOVE OUTER MIRROR (a) Apply protective tape ...
 Installation
INSTALLATION CAUTION / NOTICE / HINT HINT:
Use the same procedure for the RH side and LH side.
The following procedure is for the LH side.
PROCEDURE 1. INSTALL OUTER MIRROR (a) Connect the 2 c ...
Other materials:
Lexus RX (RX 350L, RX450h) 2016-2026 Repair Manual > Fuel Lid Opener Motor Assembly: Inspection
INSPECTION PROCEDURE 1. INSPECT FUEL LID LOCK WITH MOTOR ASSEMBLY (a) Check the operation of the fuel lid lock with motor assembly. (1) Apply battery voltage to the fuel lid lock with motor assembly connector, and check that the fuel lid lock with motor assembly operates smoothly as follows. OK: ...
Lexus RX (RX 350L, RX450h) 2016-2026 Repair Manual > Blind Spot Monitor System: Yaw Rate Sensor (C1A46)
DESCRIPTION The blind spot monitor sensor receives yaw rate signals from the yaw rate and acceleration sensor via CAN communication. DTC No. Detection Item DTC Detection Condition Trouble Area C1A46 Yaw Rate Sensor A fail flag is transmitted from the yaw rate and acceleration sensor ...
Lexus RX (RX 350L, RX450h) 2016-{YEAR} Owners Manual
- For your information
- Pictorial index
- For safety and security
- Instrument cluster
- Operation of each component
- Driving
- Lexus Display Audio system
- Interior features
- Maintenance and care
- When trouble arises
- Vehicle specifications
- For owners
Lexus RX (RX 350L, RX450h) 2016-{YEAR} Repair Manual

0.0145