Lexus RX (RX 350L, RX450h) 2016-2026 Repair Manual: Reassembly
REASSEMBLY
PROCEDURE
1. INSTALL REAR SLIDING ROOF GARNISH
| (a) Engage the 3 guides and 4 claws to install the rear sliding roof garnish to the sliding roof housing panel. |
|
.png)
2. INSTALL NO. 1 SLIDING ROOF SIDE GARNISH LH
(a) Clean the sliding roof housing panel.
(1) Using a heat light, heat the sliding roof housing panel.
Heating Temperature| Item | Temperature |
|---|---|
| Sliding Roof Housing Panel | 20 to 30°C (68 to 86°F) |
CAUTION:
- Do not touch the heat light and heated parts, touching the heat light may result in burns.
- Touching heated parts for a long time may result in burns.
.png)
| *a | Heated Part |
| *b | Heat Light |
NOTICE:
Do not heat the sliding roof housing panel excessively.
(2) Remove the double-sided tape from the sliding roof housing panel.
(3) Clean off any tape adhesive residue with cleaner.
(b) Coat the installation area of the sliding roof housing panel with primer.
(c) Remove the release paper from a new No. 1 sliding roof side garnish LH.
HINT:
After removing the release paper, keep the exposed adhesive free from foreign matter.
(d) Engage the clip and install the No. 1 sliding roof side garnish LH.
.png)
| *A | Back Side | - | - |
.png) | Double-sided Tape | - | - |
(e) Install the 6 nuts.
Torque:
6.3 N·m {64 kgf·cm, 56 in·lbf}
3. INSTALL NO. 1 SLIDING ROOF SIDE GARNISH RH
HINT:
Use the same procedure as for the LH side.
4. INSTALL NO. 1 SLIDE ROOF PANEL SUB-ASSEMBLY
(a) Clean the sliding roof housing panel.
(1) Using a heat light, heat the sliding roof housing panel.
Heating Temperature| Item | Temperature |
|---|---|
| Sliding Roof Housing Panel | 20 to 30°C (68 to 86°F) |
CAUTION:
- Do not touch the heat light and heated parts, touching the heat light may result in burns.
- Touching heated parts for a long time may result in burns.
| *a | Heated Part |
| *b | Heat Light |
NOTICE:
Do not heat the sliding roof housing panel excessively.
(2) Remove the double-sided tape from the sliding roof housing panel.
(3) Clean off any tape adhesive residue with cleaner.
(b) Coat the installation area of the sliding roof housing panel with primer.
(c) Remove the release paper from a new No. 1 sliding roof panel sub-assembly.
HINT:
After removing the release paper, keep the exposed adhesive free from foreign matter.
(d) Engage the guide and 6 clips, and install the No. 1 sliding roof panel sub-assembly.
.png)
| | Double-sided Tape |
(e) Using a T25 "TORX" socket wrench, install the screw.
Torque:
6.3 N·m {64 kgf·cm, 56 in·lbf}
5. INSTALL NO. 2 SLIDE ROOF PANEL SUB-ASSEMBLY
(a) Using a T25 "TORX" socket wrench, temporarily install the No. 2 slide roof panel sub-assembly with the 2 screws and 4 nuts.
.png)
.png) | Nut |
.png) | "TORX" Screw |
(b) Using a T25 "TORX" socket wrench, tighten the 2 screws.
Torque:
5.0 N·m {51 kgf·cm, 44 in·lbf}
(c) Tighten the 4 nuts to install the No. 2 slide roof panel sub-assembly.
Torque:
5.0 N·m {51 kgf·cm, 44 in·lbf}
6. INSTALL SUNSHADE TRIM SUB-ASSEMBLY
| (a) Using a T25 "TORX" socket wrench, install the sunshade trim sub-assembly with the 4 screws. Torque: 5.0 N·m {51 kgf·cm, 44 in·lbf} |
|
.png)
(b) Wrap the sunshade cover as shown in the illustration.
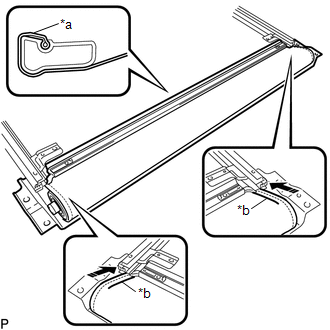
| *a | Sunshade Cover |
| *b | End of Sunshade Cover |
.png) | Install in this Direction |
(c) Insert the ends of the sunshade cover into the slide roof rail sub-assembly as shown in the illustration.
| (d) Engage the 2 guides and 2 claws. |
|
.png)
(e) Using a T25 "TORX" socket wrench, install the 2 screws.
Torque:
5.0 N·m {51 kgf·cm, 44 in·lbf}
(f) Slide the sunshade trim sub-assembly as shown in the illustration.
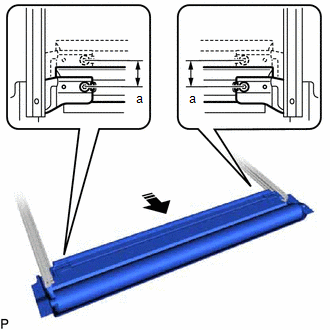
| | Slide |
Standard:
| Area | Dimension |
|---|---|
| a | 30 mm (1.18 in.) |
7. INSTALL SLIDE ROOF RAIL SUB-ASSEMBLY
(a) Install the slide roof rail sub-assembly with the 18 nuts.
.png)
Torque:
6.3 N·m {64 kgf·cm, 56 in·lbf}
8. INSTALL SLIDING ROOF DRIVE GEAR ASSEMBLY (for Roof Sunshade)
(a) Apply MP grease to the gear of the sliding roof drive gear assembly.
| (b) Install the sliding roof drive gear assembly with the 2 bolts. Torque: 5.4 N·m {55 kgf·cm, 48 in·lbf} |
|
.png)
9. INSTALL SLIDING ROOF DRIVE GEAR ASSEMBLY (for Sliding Roof)
(a) Apply MP grease to the gear of the sliding roof drive gear assembly.
| (b) Install the sliding roof drive gear assembly with the 2 bolts. Torque: 5.4 N·m {55 kgf·cm, 48 in·lbf} |
|
.png)
10. INSTALL NO. 2 ROOF WIRE
| (a) Engage the claw to install the No. 2 roof wire. |
|
.png)
(b) Connect the connector.
11. INSTALL ROOM LIGHT BRACKET
| (a) Engage the clamp. |
|
.png)
(b) Install the room light bracket with the 4 nuts.
Torque:
6.3 N·m {64 kgf·cm, 56 in·lbf}
 Installation
INSTALLATION PROCEDURE 1. INSTALL SLIDING ROOF HOUSING ASSEMBLY (a) Pass a string under the windshield outside moulding as shown in the illustration. *1 Windshield Outside Moulding - - * ...
 Removal
REMOVAL CAUTION / NOTICE / HINT The necessary procedures (adjustment, calibration, initialization or registration) that must be performed after parts are removed and installed, or replaced during slid ...
Other materials:
Lexus RX (RX 350L, RX450h) 2016-2026 Repair Manual > Blower Motor Controller: Components
COMPONENTS ILLUSTRATION *1 REAR DOOR INSIDE SCUFF PLATE RH *2 REAR DOOR SCUFF PLATE RH *3 REAR FLOOR FINISH PLATE *4 REAR SEAT OUTER TRACK BRACKET COVER RH ILLUSTRATION *1 DECK TRIM SIDE PANEL ASSEMBLY RH *2 FRONT DECK SIDE TRIM COVER RH *3 NO. 1 LUGGAGE COMPAR ...
Lexus RX (RX 350L, RX450h) 2016-2026 Repair Manual > Refrigerant (for Hfo-1234yf(r1234yf)): On-vehicle Inspection
ON-VEHICLE INSPECTION PROCEDURE 1. INSPECT REFRIGERANT PRESSURE WITH MANIFOLD GAUGE SET HINT: The following examples show the readings of a manifold gauge set and the corresponding air conditioning system problems. (a) Read the manifold gauge pressure when the following conditions are met:
Doors ...
Lexus RX (RX 350L, RX450h) 2016-{YEAR} Owners Manual
- For your information
- Pictorial index
- For safety and security
- Instrument cluster
- Operation of each component
- Driving
- Lexus Display Audio system
- Interior features
- Maintenance and care
- When trouble arises
- Vehicle specifications
- For owners
Lexus RX (RX 350L, RX450h) 2016-{YEAR} Repair Manual

0.009