Lexus RX (RX 350L, RX450h) 2016-2026 Repair Manual: Installation
INSTALLATION
PROCEDURE
1. INSTALL SLIDING ROOF HOUSING ASSEMBLY
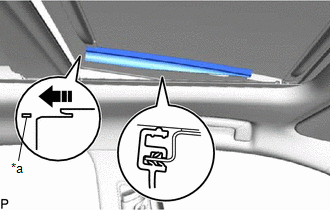
(a) Pass a string under the windshield outside moulding as shown in the illustration.
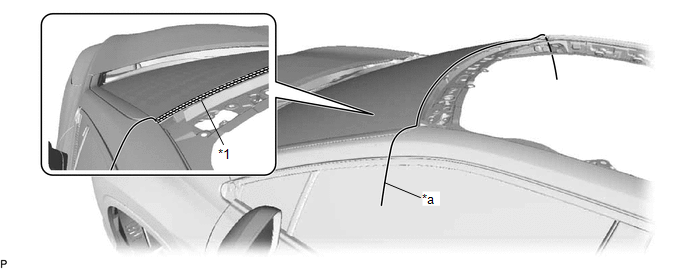
| *1 | Windshield Outside Moulding | - | - |
| *a | String | - | - |
(b) Engage the 2 guides.
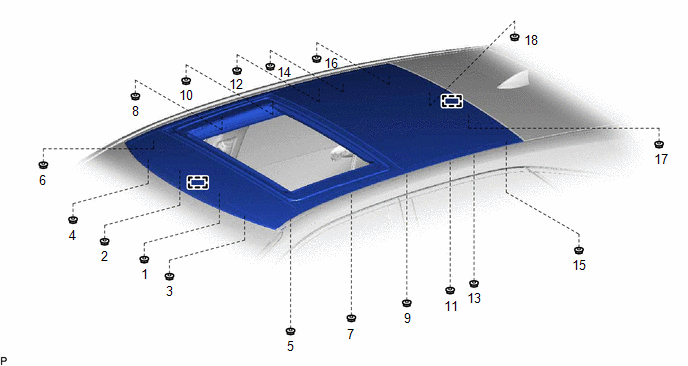
(c) Temporarily install the sliding roof housing assembly with the 18 nuts.
(d) Tighten the 18 nuts to install the sliding roof housing assembly.
HINT:
Tighten the nuts in the order shown in the illustration.
Torque:
5.5 N·m {56 kgf·cm, 49 in·lbf}
| (e) Apply soapy water to the windshield outside moulding. |
|
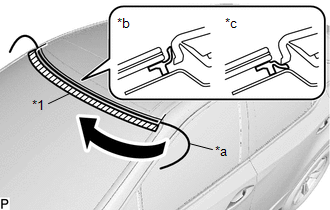
(f) Slowly pull out the string to install the windshield outside moulding to the correct position.
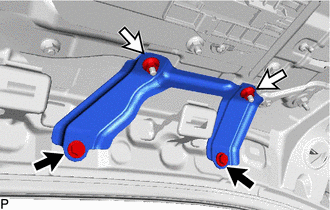
2. INSTALL ROOF RACK ASSEMBLY LH
Click here .gif)
3. INSTALL ROOF RACK ASSEMBLY RH
HINT:
Use the same procedure as for the LH side.
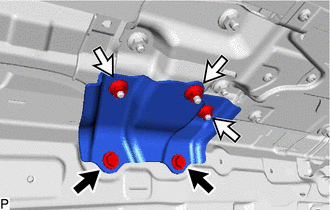
4. INSTALL REAR SLIDING ROOF HOUSING MOUNTING BRACKET LH
(a) Install the rear sliding roof housing mounting bracket LH with the bolt and nut.
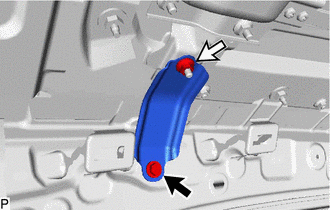
.png) | Bolt |
.png) | Nut |
Torque:
Bolt :
8.0 N·m {82 kgf·cm, 71 in·lbf}
Nut :
5.5 N·m {56 kgf·cm, 49 in·lbf}
5. INSTALL REAR SLIDING ROOF HOUSING MOUNTING BRACKET RH
HINT:
Use the same procedure as for the LH side.
6. INSTALL CENTER SLIDING ROOF HOUSING MOUNTING BRACKET LH
(a) Install the center sliding roof housing mounting bracket LH with the 2 bolts and 3 nuts.
| | Bolt |
| | Nut |
Torque:
Bolt :
8.0 N·m {82 kgf·cm, 71 in·lbf}
Nut :
5.5 N·m {56 kgf·cm, 49 in·lbf}
7. INSTALL CENTER SLIDING ROOF HOUSING MOUNTING BRACKET RH
HINT:
Use the same procedure as for the LH side.
8. INSTALL FRONT SLIDING ROOF HOUSING MOUNTING BRACKET LH
(a) Install the front sliding roof housing mounting bracket LH with the 2 bolts and 2 nuts.
| | Bolt |
| | Nut |
Torque:
Bolt :
8.0 N·m {82 kgf·cm, 71 in·lbf}
Nut :
5.5 N·m {56 kgf·cm, 49 in·lbf}
9. INSTALL FRONT SLIDING ROOF HOUSING MOUNTING BRACKET RH
HINT:
Use the same procedure as for the LH side.
10. INSTALL SLIDING ROOF GLASS SUB-ASSEMBLY
(a) Using a T25 "TORX" socket wrench, temporarily install the sliding roof glass sub-assembly with the 6 screws.
(b) Perform a level check.
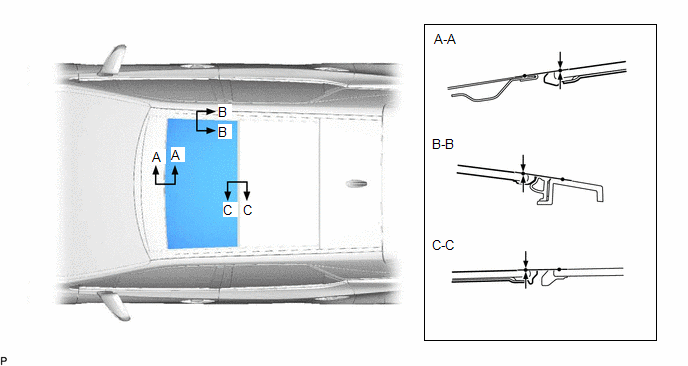
(1) Check the difference in level of the sliding roof glass sub-assembly when the sliding roof glass sub-assembly is fully closed.
HINT:
"+" represents the condition that the glass is above the panel level. "-" represents the condition that the glass is below the panel level.
| Area | Measurement | Area | Measurement |
|---|---|---|---|
| A-A | 0 + 2.0 mm (0 + 0.0787 in.) 0 - 1.0 mm (0 - 0.0394 in.) | B-B | 0 + 2.2 mm (0 + 0.0866 in.) 0 - 2.2 mm (0 - 0.0866 in.) |
| C-C | 0 + 2.4 mm (0 + 0.0945 in.) 0 - 1.0 mm (0 - 0.0394 in.) | - | - |
(c) Perform a gap check.
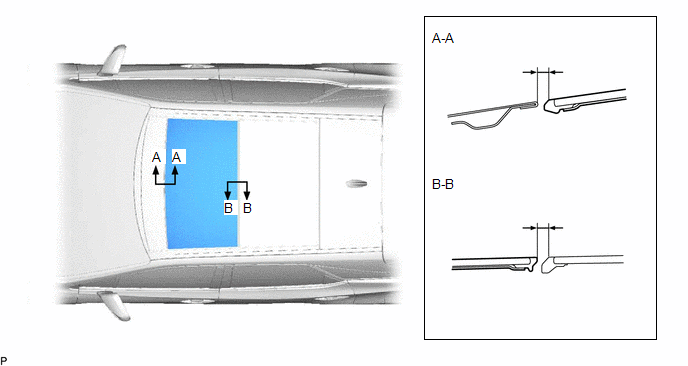
(1) Check the gap between the sliding roof glass sub-assembly and sliding roof housing assembly.
| Area | Measurement | Area | Measurement |
|---|---|---|---|
| A-A | 4.6 to 7.0 mm (0.181 to 0.276 in.) | B-B | 5.4 to 7.4 mm (0.213 to 0.291 in.) |
(d) After adjusting the sliding roof glass sub-assembly, using a T25 "TORX" socket wrench, tighten the 6 screws.
Torque:
5.0 N·m {51 kgf·cm, 44 in·lbf}
11. CHECK FOR WATER LEAK
(a) After adjusting the sliding roof glass sub-assembly, check for water leakage into the vehicle interior.
(b) If there are any leaks, readjust the sliding roof glass sub-assembly.
12. INSTALL CURTAIN SHIELD AIRBAG ASSEMBLY LH
Click here
13. INSTALL CURTAIN SHIELD AIRBAG ASSEMBLY RH
HINT:
Use the same procedure as for the LH side.
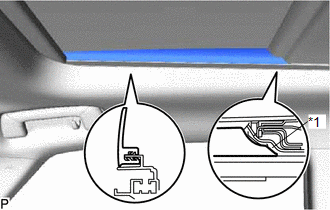
14. INSTALL NO. 4 SLIDING ROOF SIDE GARNISH LH
(a) Move the sliding roof glass sub-assembly to the fully tilted up position.
(b) Align the rear edge of the No. 4 sliding roof side garnish LH with the plate and temporarily install the No. 4 sliding roof side garnish LH.
| *a | Plate |
.png) | Install in this Direction |
(c) Slide the No. 4 sliding roof side garnish LH as shown in the illustration to fit the plate into the groove of the No. 4 sliding roof side garnish LH and install it.
15. INSTALL NO. 4 SLIDING ROOF SIDE GARNISH RH
HINT:
Use the same procedure as for the LH side.
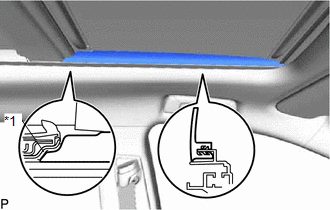
16. INSTALL NO. 3 SLIDING ROOF SIDE GARNISH LH
| (a) Install the No. 3 sliding roof side garnish LH. HINT: Make sure the front edge of the No. 3 sliding roof side garnish LH is contacting the rear sliding roof side garnish. |
|
17. INSTALL NO. 3 SLIDING ROOF SIDE GARNISH RH
HINT:
Use the same procedure as for the LH side.
18. INSTALL NO. 2 SLIDING ROOF SIDE GARNISH LH
| (a) Install the No. 2 sliding roof side garnish LH. HINT: Make sure the front edge of the No. 2 sliding roof side garnish LH is contacting the rear sliding roof side garnish. |
|
19. INSTALL NO. 2 SLIDING ROOF SIDE GARNISH RH
HINT:
Use the same procedure as for the LH side.
20. INITIALIZE PANORAMIC MOON ROOF SYSTEM
Click here
21. CHECK PANORAMIC MOON ROOF SYSTEM
Click here
 Disassembly
DISASSEMBLY PROCEDURE 1. REMOVE ROOM LIGHT BRACKET (a) Remove the 4 nuts. (b) Disengage the clamp to remove the room light bracket. 2. REMOVE NO. 2 ROOF WIRE (a) Disconnect the conne ...
 Reassembly
REASSEMBLY PROCEDURE 1. INSTALL REAR SLIDING ROOF GARNISH (a) Engage the 3 guides and 4 claws to install the rear sliding roof garnish to the sliding roof housing panel. 2. INSTALL NO. ...
Other materials:
Lexus RX (RX 350L, RX450h) 2016-2026 Repair Manual > Mass Air Flow Meter: Removal
REMOVAL CAUTION / NOTICE / HINT The necessary procedures (adjustment, calibration, initialization or registration) that must be performed after parts are removed and installed, or replaced during mass air flow meter sub-assembly removal/installation are shown below. Necessary Procedures After Parts ...
Lexus RX (RX 350L, RX450h) 2016-2026 Repair Manual > Air Conditioning System: Air Conditioning Control Panel Circuit
DESCRIPTION The radio receiver assembly (A/C control panel) switch signals are sent to the air conditioning amplifier assembly via CAN communication. WIRING DIAGRAM CAUTION / NOTICE / HINT NOTICE: Inspect the fuses for circuits related to this system before performing the following procedure. PROCE ...
Lexus RX (RX 350L, RX450h) 2016-{YEAR} Owners Manual
- For your information
- Pictorial index
- For safety and security
- Instrument cluster
- Operation of each component
- Driving
- Lexus Display Audio system
- Interior features
- Maintenance and care
- When trouble arises
- Vehicle specifications
- For owners
Lexus RX (RX 350L, RX450h) 2016-{YEAR} Repair Manual

0.0105