Lexus RX (RX 350L, RX450h) 2016-2026 Repair Manual: Inspection
INSPECTION
PROCEDURE
1. INSPECT POWER WINDOW REGULATOR MOTOR ASSEMBLY LH
| (a) Connect a positive (+) battery lead to connector terminal 2 (B). NOTICE: Do not connect a positive (+) battery lead to any terminals other than terminal 2 (B) to avoid damaging the pulse sensor inside the motor. |
|
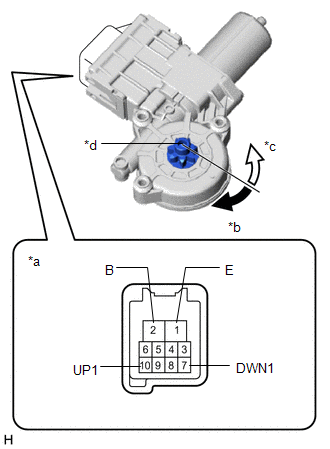
(b) Connect a negative (-) battery lead to connector terminals 1 (E) and 7 (DWN1) or 10 (UP1).
(c) Check that the motor gear rotates smoothly as follows:
OK:
| Measurement Condition | Specified Condition |
|---|---|
| Motor gear rotates clockwise |
| Motor gear rotates counterclockwise |
- If the result is not as specified, replace the power window regulator motor assembly LH.
CAUTION:
Initialize the power window control system after installing the power window regulator motor and regulator assembly.
2. INSPECT POWER WINDOW REGULATOR MOTOR ASSEMBLY RH
| (a) Connect a positive (+) battery lead to connector terminal 2 (B). NOTICE: Do not connect a positive (+) battery lead to any terminals other than terminal 2 (B) to avoid damaging the pulse sensor inside the motor. |
|
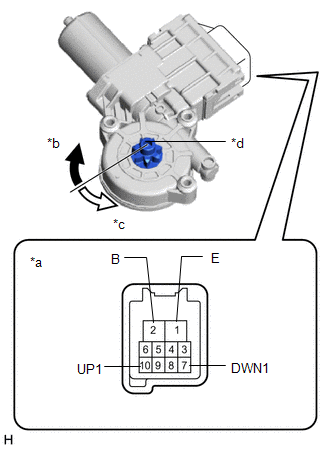
(b) Connect a negative (-) battery lead to connector terminals 1 (E) and 7 (DWN1) or 10 (UP1).
(c) Check that the motor gear rotates smoothly as follows:
OK:
| Measurement Condition | Specified Condition |
|---|---|
| Motor gear rotates counterclockwise |
| Motor gear rotates clockwise |
- If the result is not as specified, replace the power window regulator motor assembly RH.
CAUTION:
Initialize the power window control system after installing the power window regulator motor and regulator assembly.
 Removal
REMOVAL CAUTION / NOTICE / HINT The necessary procedures (adjustment, calibration, initialization or registration) that must be performed after parts are removed and installed, or replaced during powe ...
 Installation
INSTALLATION CAUTION / NOTICE / HINT HINT:
Use the same procedure for the RH side and LH side.
The following procedure is for the LH side.
PROCEDURE 1. PRECAUTION NOTICE: After turning the eng ...
Other materials:
Lexus RX (RX 350L, RX450h) 2016-2026 Repair Manual > Mass Air Flow Meter: Inspection
INSPECTION PROCEDURE 1. INSPECT MASS AIR FLOW METER SUB-ASSEMBLY (a) Perform a visual check for any foreign matter on the intake air temperature sensor (thermistor) of the mass air flow meter sub-assembly shown in the illustration. OK: There is no foreign matter. If the result is not as specifie ...
Lexus RX (RX 350L, RX450h) 2016-2026 Repair Manual > Automatic Transaxle System: Input/Turbine Speed Sensor "B" Circuit Short to Battery (P276512,P276514,P276531)
DESCRIPTION The transmission revolution sensor (NC3) detects the automatic transmission No. 3 clutch drum rotation speed. DTC No. Detection Item DTC Detection Condition Trouble Area MIL Memory Note P276512 Input/Turbine Speed Sensor "B" Circuit Short to Battery 1. Diagnosis Co ...
Lexus RX (RX 350L, RX450h) 2016-{YEAR} Owners Manual
- For your information
- Pictorial index
- For safety and security
- Instrument cluster
- Operation of each component
- Driving
- Lexus Display Audio system
- Interior features
- Maintenance and care
- When trouble arises
- Vehicle specifications
- For owners
Lexus RX (RX 350L, RX450h) 2016-{YEAR} Repair Manual

0.0127