Lexus RX (RX 350L, RX450h) 2016-2026 Repair Manual: Installation
INSTALLATION
PROCEDURE
1. INSTALL HEADLIGHT WASHER ACTUATOR SUB-ASSEMBLY LH
(a) Engage the guide and claw as indicated by the arrows, in the order shown in the illustration to install the headlight washer actuator sub-assembly LH.
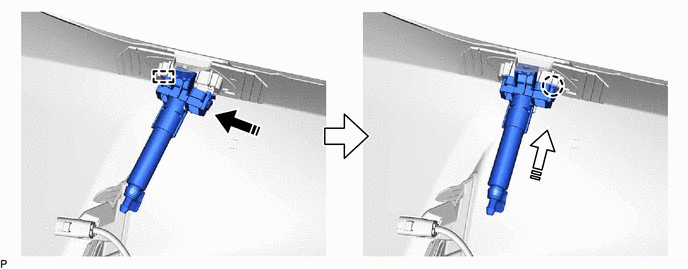
.png) | Install in this Direction (1) | .png) | Install in this Direction (2) |
(b) Install the screw.
(c) Engage the claw to connect the No. 4 headlight cleaner hose as shown in the illustration.
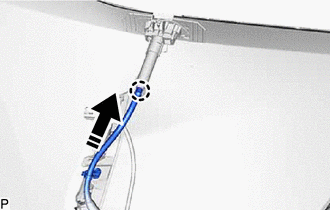
| | Connect in this Direction |
2. INSTALL HEADLIGHT WASHER ACTUATOR SUB-ASSEMBLY RH
HINT:
Use the same procedure as for the LH side.
3. INSTALL HEADLIGHT WASHER COVER LH
Click here .gif)
4. INSTALL HEADLIGHT WASHER COVER RH
HINT:
Use the same procedure as for the LH side.
5. INSTALL FRONT BUMPER ASSEMBLY
Click here
 Components
COMPONENTS ILLUSTRATION *1 FRONT BUMPER ASSEMBLY *2 HEADLIGHT WASHER ACTUATOR SUB-ASSEMBLY LH *3 HEADLIGHT WASHER ACTUATOR SUB-ASSEMBLY RH *4 HEADLIGHT WASHER COVER LH *5 HEA ...
 Removal
REMOVAL CAUTION / NOTICE / HINT The necessary procedures (adjustment, calibration, initialization or registration) that must be performed after parts are removed and installed, or replaced during head ...
Other materials:
Lexus RX (RX 350L, RX450h) 2016-2026 Repair Manual > Power Seat Switch(w/ Seat Position Memory System): Components
COMPONENTS ILLUSTRATION *A for Sports Seat Type - - *1 FRONT SEAT CUSHION SHIELD LH *2 INNER NO. 1 FRONT SEAT CUSHION SHIELD LH ILLUSTRATION *1 FRONT SEAT CUSHION SHIELD LH *2 POSITION CONTROL ECU AND SWITCH ASSEMBLY LH *3 RECLINING POWER SEAT SWITCH KNOB *4 ...
Lexus RX (RX 350L, RX450h) 2016-2026 Repair Manual > Rear Door Window Frame Moulding: Components
COMPONENTS ILLUSTRATION *1 REAR DOOR REAR WINDOW FRAME MOULDING *2 REAR DOOR UPPER WINDOW FRAME MOULDING *3 REAR DOOR WEATHERSTRIP *4 REAR DOOR WINDOW FRAME MOULDING SUB-ASSEMBLY *5 RIVET - - ● Non-reusable part - - ...
Lexus RX (RX 350L, RX450h) 2016-{YEAR} Owners Manual
- For your information
- Pictorial index
- For safety and security
- Instrument cluster
- Operation of each component
- Driving
- Lexus Display Audio system
- Interior features
- Maintenance and care
- When trouble arises
- Vehicle specifications
- For owners
Lexus RX (RX 350L, RX450h) 2016-{YEAR} Repair Manual

0.0094