Lexus RX (RX 350L, RX450h) 2016-2026 Repair Manual: Removal
REMOVAL
CAUTION / NOTICE / HINT
The necessary procedures (adjustment, calibration, initialization or registration) that must be performed after parts are removed and installed, or replaced during headlight washer actuator sub-assembly removal/installation are shown below.
Necessary Procedure After Parts Removed/Installed/Replaced| Replaced Part or Performed Procedure | Necessary Procedure | Effect/Inoperative Function when Necessary Procedure not Performed | Link |
|---|---|---|---|
| Front bumper assembly | Front television camera view adjustment | Panoramic view monitor system | |
| Front bumper assembly (w/ Intelligent clearance sonar system) |
|
| |
PROCEDURE
1. REMOVE FRONT BUMPER ASSEMBLY
Click here .gif)
2. REMOVE HEADLIGHT WASHER COVER LH
Click here
3. REMOVE HEADLIGHT WASHER COVER RH
HINT:
Use the same procedure as for the LH side.
4. REMOVE HEADLIGHT WASHER ACTUATOR SUB-ASSEMBLY LH
(a) Disengage the claw and disconnect the No. 4 headlight cleaner hose as shown in the illustration.
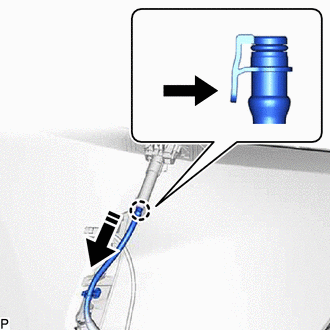
.png) | Push |
.png) | Disconnect in this Direction |
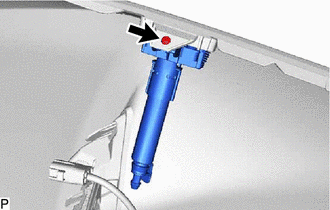
| (b) Remove the screw. |
|
(c) Disengage the claw and guide as indicated by the arrows, in the order shown in the illustration to remove the headlight washer actuator sub-assembly LH.
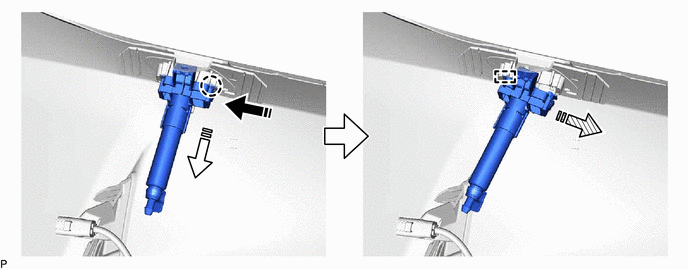
| | Remove in this Direction (1) | .png) | Remove in this Direction (2) |
 | Remove in this Direction (3) | - | - |
5. REMOVE HEADLIGHT WASHER ACTUATOR SUB-ASSEMBLY RH
HINT:
Use the same procedure as for the LH side.
 Installation
INSTALLATION PROCEDURE 1. INSTALL HEADLIGHT WASHER ACTUATOR SUB-ASSEMBLY LH (a) Engage the guide and claw as indicated by the arrows, in the order shown in the illustration to install the headlight wa ...
 Headlight Cleaner Actuator Cover
RemovalREMOVAL PROCEDURE 1. REMOVE HEADLIGHT WASHER COVER LH (a) Disengage the claw as indicated by the arrows, in the order shown in the illustration to remove the headlight washer cover LH. R ...
Other materials:
Lexus RX (RX 350L, RX450h) 2016-2026 Repair Manual > Power Steering Ecu: Removal
REMOVAL CAUTION / NOTICE / HINT The necessary procedures (adjustment, calibration, initialization, or registration) that must be performed after parts are removed, installed, or replaced during the power steering ECU assembly removal/installation are shown below. Necessary Procedure After Parts Remo ...
Lexus RX (RX 350L, RX450h) 2016-2026 Repair Manual > Generator (for 180 A Type): Inspection
INSPECTION PROCEDURE 1. INSPECT GENERATOR PULLEY WITH CLUTCH (a) Hold the center of the generator pulley with clutch, and confirm that the outer ring turns counterclockwise and does not turn clockwise. OK: The outer ring turns counterclockwise and does not turn clockwise. If the result is not as sp ...
Lexus RX (RX 350L, RX450h) 2016-{YEAR} Owners Manual
- For your information
- Pictorial index
- For safety and security
- Instrument cluster
- Operation of each component
- Driving
- Lexus Display Audio system
- Interior features
- Maintenance and care
- When trouble arises
- Vehicle specifications
- For owners
Lexus RX (RX 350L, RX450h) 2016-{YEAR} Repair Manual

0.0118