Lexus RX (RX 350L, RX450h) 2016-2026 Repair Manual: Removal
REMOVAL
PROCEDURE
1. REMOVE REAR SPOILER SUB-ASSEMBLY (w/o Rear No. 2 Seat)
Click here .gif)
2. REMOVE BACK WINDOW UPPER PANEL TRIM (w/ Rear No. 2 Seat)
Click here
3. REMOVE BACK DOOR TRIM COVER LH (w/ Rear No. 2 Seat)
Click here
4. REMOVE BACK DOOR TRIM COVER RH (w/ Rear No. 2 Seat)
HINT:
Use the same procedure as for the LH side.
5. REMOVE BACK DOOR LOCK COVER (w/ Rear No. 2 Seat)
Click here
6. REMOVE BACK DOOR TRIM BASE (w/ Rear No. 2 Seat)
Click here
7. REMOVE DOOR PULL HANDLE (w/ Rear No. 2 Seat)
Click here
8. REMOVE NO. 1 LUGGAGE COMPARTMENT LIGHT ASSEMBLY (w/ Rear No. 2 Seat)
Click here
9. REMOVE BACK DOOR TRIM PANEL ASSEMBLY (w/ Rear No. 2 Seat)
Click here
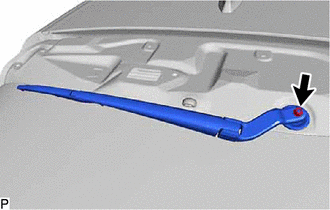
10. REMOVE REAR WIPER ARM AND BLADE ASSEMBLY (w/o Rear No. 2 Seat)
| (a) Remove the nut and rear wiper arm and blade assembly. |
|
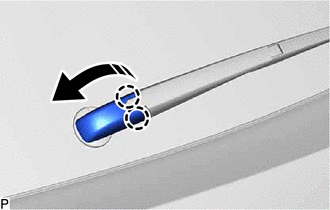
11. REMOVE REAR WIPER ARM HEAD CAP (w/ Rear No. 2 Seat)
(a) Disengage the 2 claws and open the rear wiper arm head cap as shown in the illustration.
.png) | Remove in this Direction |
(b) Disengage the 2 claws to remove the rear wiper arm head cap as shown in the illustration.

| | Remove in this Direction |
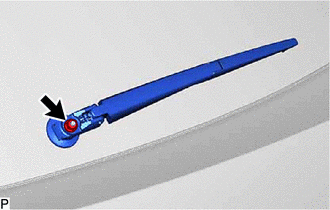
12. REMOVE REAR WIPER ARM AND BLADE ASSEMBLY (w/ Rear No. 2 Seat)
| (a) Remove the nut and rear wiper arm and blade assembly. |
|
13. REMOVE REAR WIPER MOTOR GROMMET
| (a) Remove the rear wiper motor grommet. |
|
14. REMOVE REAR WIPER MOTOR AND BRACKET ASSEMBLY
| (a) Remove the 3 bolts. HINT: Remove the bolts and rear wiper motor and bracket assembly as a set. |
|
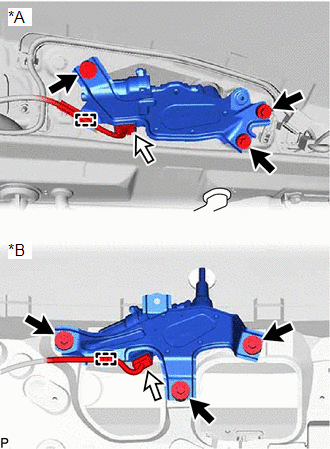
(b) Disengage the clamp.
(c) Disconnect the connector to remove the rear wiper motor and bracket assembly.
 On-vehicle Inspection
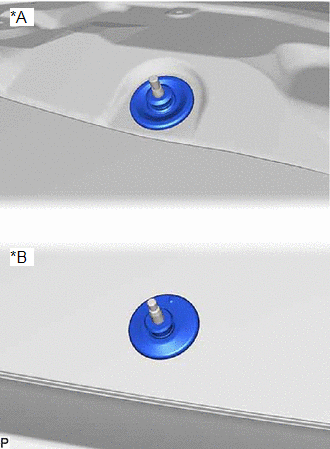
ON-VEHICLE INSPECTION PROCEDURE 1. INSPECT REAR WIPER MOTOR AND BRACKET ASSEMBLY *A w/o Rear No. 2 Seat *B w/ Rear No. 2 Seat *a Alignment Mark - - (a) Operate the rear wiper mo ...
 Inspection
INSPECTION PROCEDURE 1. INSPECT REAR WIPER MOTOR AND BRACKET ASSEMBLY (a) Check the wiper intermittent operation. (1) Connect a battery positive (+) lead to terminal 4 (+B) and a negative (-) lead ...
Other materials:
Lexus RX (RX 350L, RX450h) 2016-2026 Repair Manual > Radiator: Components
COMPONENTS ILLUSTRATION *1 FRONT WHEEL OPENING EXTENSION PAD LH *2 FRONT WHEEL OPENING EXTENSION PAD RH *3 NO. 1 ENGINE UNDER COVER *4 NO. 3 ENGINE UNDER COVER ILLUSTRATION *A for USA - - *1 BATTERY *2 INLET AIR CLEANER ASSEMBLY *3 BATTERY CLAMP SUB-A ...
Lexus RX (RX 350L, RX450h) 2016-2026 Repair Manual > Meter / Gauge System: Entire Combination Meter does not Operate
DESCRIPTION This circuit is the power source circuit for the combination meter assembly. This circuit provides two types of power sources; one is a constant power source, and the other is an IG power source. WIRING DIAGRAM CAUTION / NOTICE / HINT NOTICE:
When replacing the combination meter asse ...
Lexus RX (RX 350L, RX450h) 2016-{YEAR} Owners Manual
- For your information
- Pictorial index
- For safety and security
- Instrument cluster
- Operation of each component
- Driving
- Lexus Display Audio system
- Interior features
- Maintenance and care
- When trouble arises
- Vehicle specifications
- For owners
Lexus RX (RX 350L, RX450h) 2016-{YEAR} Repair Manual

0.0095