Lexus RX (RX 350L, RX450h) 2016-2026 Repair Manual: Installation
INSTALLATION
PROCEDURE
1. INSTALL REAR WIPER MOTOR AND BRACKET ASSEMBLY
(a) Connect the connector.
(b) Engage the clamp.
(c) Install the rear wiper motor and bracket assembly with the 3 bolts.
Torque:
5.5 N·m {56 kgf·cm, 49 in·lbf}
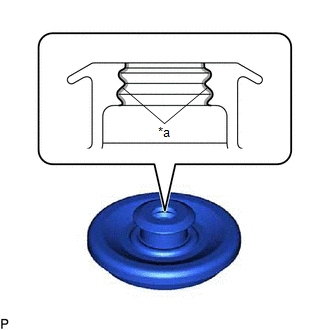
2. INSTALL REAR WIPER MOTOR GROMMET
| (a) Apply MP grease to the entire surface of the rear wiper motor grommet lip. HINT: Make sure that the hole does not get clogged with grease and the grooves on the lip are filled with grease. |
|
(b) w/o Rear No. 2 Seat:
(1) Install the rear wiper motor grommet.
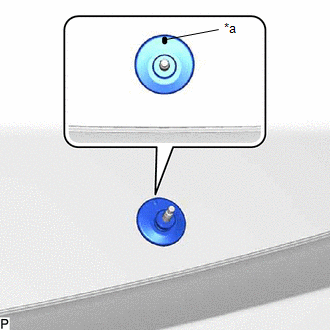
(c) w/ Rear No. 2 Seat:
| (1) Install the rear wiper motor grommet. HINT: Install the rear wiper motor grommet with its alignment mark facing up. |
|
3. INSTALL REAR WIPER ARM AND BLADE ASSEMBLY
| (a) When reusing the rear wiper arm and blade assembly: (1) Clean the wiper arm serrations to remove any burrs, dirt, etc. NOTICE: Do not grind down the wiper arm serrations. |
|
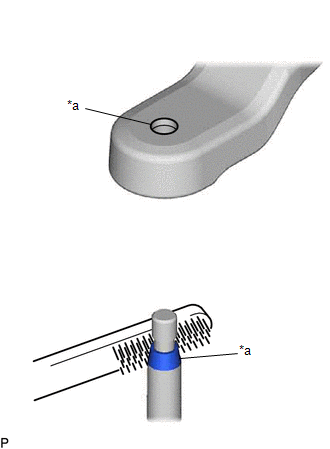
(b) When reusing the rear wiper motor and bracket assembly:
(1) Clean the wiper pivot serrations with a wire brush.
(c) Turn the engine switch on (IG).
(d) Operate the wiper and stop the rear wiper motor and bracket assembly at the automatic stop position.
(e) Turn the engine switch off.
(f) Install the rear wiper arm and blade assembly with the nut to the position shown in the illustration.
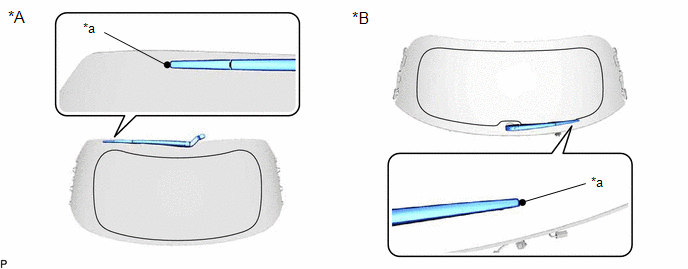
| *A | w/o Rear No. 2 Seat | *B | w/ Rear No. 2 Seat |
| *a | Alignment Mark | - | - |
Torque:
5.5 N·m {56 kgf·cm, 49 in·lbf}
HINT:
Hold the rear wiper arm by hand while tightening the nut.
(g) Turn the engine switch on (IG).
(h) Operate the rear wiper while spraying washer fluid onto the back door glass. Make sure that the rear wiper functions properly and the wiper does not come into contact with the vehicle body.
(i) Turn the engine switch off.
(j) Lift the wiper arm twice after the wiper stops and check the wiper set position.
4. INSTALL REAR WIPER ARM HEAD CAP (w/ Rear No. 2 Seat)
(a) Engage the 2 claws as shown in the illustration.
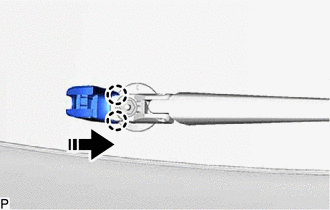
.png) | Install in this Direction |
(b) Engage the 2 claws to install the rear wiper arm head cap as shown in the illustration.
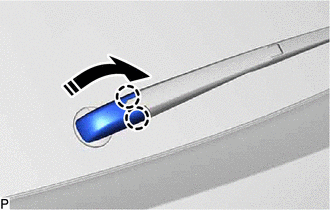
| | Install in this Direction |
5. INSTALL REAR SPOILER SUB-ASSEMBLY (w/o Rear No. 2 Seat)
Click here .gif)
6. INSTALL BACK DOOR TRIM PANEL ASSEMBLY (w/ Rear No. 2 Seat)
Click here
7. INSTALL NO. 1 LUGGAGE COMPARTMENT LIGHT ASSEMBLY (w/ Rear No. 2 Seat)
Click here
8. INSTALL DOOR PULL HANDLE (w/ Rear No. 2 Seat)
Click here
9. INSTALL BACK DOOR TRIM BASE (w/ Rear No. 2 Seat)
Click here
10. INSTALL BACK DOOR LOCK COVER (w/ Rear No. 2 Seat)
Click here
11. INSTALL BACK DOOR TRIM COVER LH (w/ Rear No. 2 Seat)
Click here
12. INSTALL BACK DOOR TRIM COVER RH (w/ Rear No. 2 Seat)
HINT:
Use the same procedure as for the LH side.
13. INSTALL BACK WINDOW UPPER PANEL TRIM (w/ Rear No. 2 Seat)
Click here
 Inspection
INSPECTION PROCEDURE 1. INSPECT REAR WIPER MOTOR AND BRACKET ASSEMBLY (a) Check the wiper intermittent operation. (1) Connect a battery positive (+) lead to terminal 4 (+B) and a negative (-) lead ...

Other materials:
Lexus RX (RX 350L, RX450h) 2016-2026 Repair Manual > Front Brake: Inspection
INSPECTION PROCEDURE 1. INSPECT BRAKE CYLINDER AND PISTON (a) Check the front disc brake cylinder bore and front disc brake piston for rust and scoring. If necessary, replace the front disc brake cylinder assembly and front disc brake piston. 2. INSPECT PAD LINING THICKNESS (a) Using a ruler, mea ...
Lexus RX (RX 350L, RX450h) 2016-2026 Repair Manual > Rear Seat Side Airbag Assembly (for Captain Seat Type): Installation
INSTALLATION PROCEDURE 1. INSTALL REAR SEAT AIRBAG ASSEMBLY (a) Install the rear seat airbag assembly with 2 new nuts. Torque: 5.5 N·m {56 kgf·cm, 49 in·lbf} NOTICE:
Do not reuse the nuts.
Make sure that the rear seatback frame sub-assembly is not deformed. If it is deformed, replace it wit ...
Lexus RX (RX 350L, RX450h) 2016-{YEAR} Owners Manual
- For your information
- Pictorial index
- For safety and security
- Instrument cluster
- Operation of each component
- Driving
- Lexus Display Audio system
- Interior features
- Maintenance and care
- When trouble arises
- Vehicle specifications
- For owners
Lexus RX (RX 350L, RX450h) 2016-{YEAR} Repair Manual

0.012