Lexus RX (RX 350L, RX450h) 2016-2026 Repair Manual: Removal
REMOVAL
PROCEDURE
1. REMOVE FRONT WHEEL RH
Click here .gif)
2. REMOVE FRONT FENDER MOULDING SUB-ASSEMBLY RH
HINT:
Use the same procedure as for the LH side.
Click here
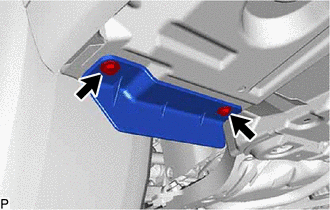
3. REMOVE FRONT WHEEL OPENING EXTENSION PAD RH
| (a) Remove the 2 screws and front wheel opening extension pad RH. |
|
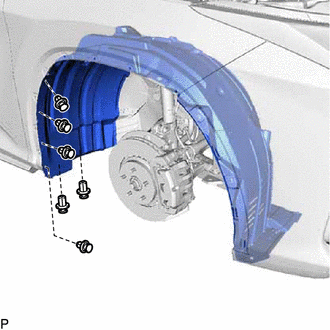
4. REMOVE FRONT FENDER SPLASH SHIELD SUB-ASSEMBLY RH
| (a) Remove the 6 screws. |
|
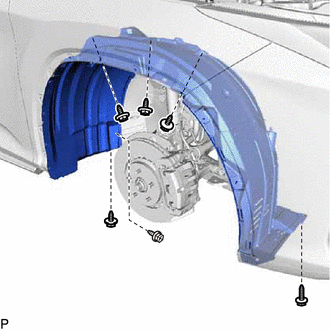
| (b) Remove the clip. |
|
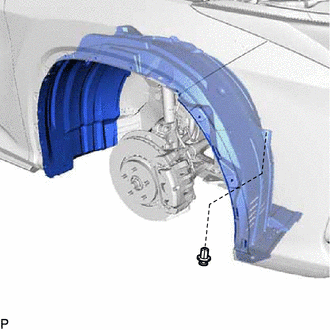
(c) for TMMC Made:
| (1) Remove the clip. |
|
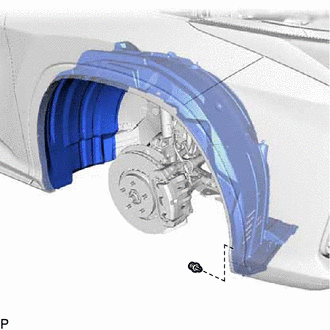
| (d) Remove the 6 clips and front fender splash shield sub-assembly RH. |
|
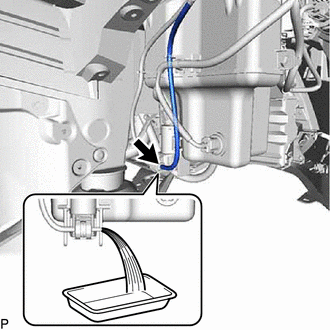
5. DRAIN WASHER FLUID
| (a) Disconnect the rear washer hose from the washer motor and pump assembly, and drain the washer fluid. HINT: Use a container to collect the washer fluid. |
|
6. REMOVE WASHER MOTOR AND PUMP ASSEMBLY
(a) Disconnect the washer hose.
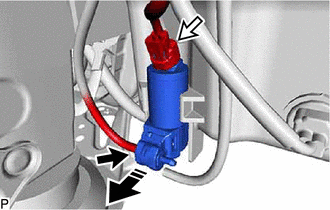
.png) | Remove in this Direction |
(b) Disconnect the connector.
(c) Remove the washer motor and pump assembly as shown in the illustration.
 Inspection
INSPECTION PROCEDURE 1. INSPECT WASHER MOTOR AND PUMP ASSEMBLY (a) for Front Washer: (1) Remove the washer jar. (2) Disconnect the washer motor and pump assembly connector. HINT: This check should ...
 Installation
INSTALLATION PROCEDURE 1. INSTALL WASHER MOTOR AND PUMP ASSEMBLY (a) Install the washer motor and pump assembly as shown in the illustration. Install in this Direction (b) Connect the connec ...
Other materials:
Lexus RX (RX 350L, RX450h) 2016-2026 Repair Manual > Rear Seat Cushion Heater (for 60/40 Split Seat Type Lh Side): Inspection
INSPECTION PROCEDURE 1. INSPECT SEAT HEATER ASSEMBLY (a) Measure the resistance according to the value(s) in the table below. Standard Resistance: Tester Connection Condition Specified Condition H1-1 - H-4 Seat heater temperature 20 °C (68 °F) 3.75 to 4.51 Ω H-1 - I-1 Alw ...
Lexus RX (RX 350L, RX450h) 2016-2026 Repair Manual > Vehicle Stability Control System: VSC does not Operate or VSC does not Operate Correctly
DESCRIPTION When TRAC or VSC is operating, the skid control ECU (brake actuator assembly) blinks the slip indicator light to inform the driver that slippage occurred. When a communication malfunction with the ECM is detected, TRAC and VSC are disabled. Also, TRAC and VSC are disabled when a DTC is s ...
Lexus RX (RX 350L, RX450h) 2016-{YEAR} Owners Manual
- For your information
- Pictorial index
- For safety and security
- Instrument cluster
- Operation of each component
- Driving
- Lexus Display Audio system
- Interior features
- Maintenance and care
- When trouble arises
- Vehicle specifications
- For owners
Lexus RX (RX 350L, RX450h) 2016-{YEAR} Repair Manual

0.0131