Lexus RX (RX 350L, RX450h) 2016-2026 Repair Manual: Removal
REMOVAL
PROCEDURE
1. CHANGE POWER TILT AND POWER TELESCOPIC STEERING COLUMN SYSTEM SETTINGS
Click here .gif)
2. REMOVE LOWER STEERING COLUMN COVER
NOTICE:
Removing the lower steering column cover in the incorrect order will cause the parts to break.
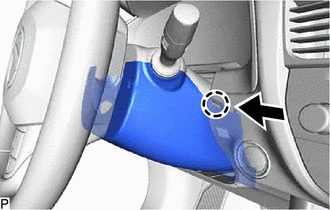
| (a) Turn the steering wheel assembly to the left and remove the screw. |
|
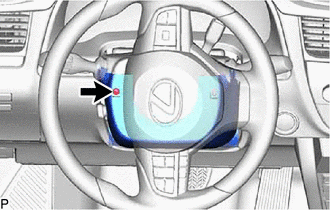
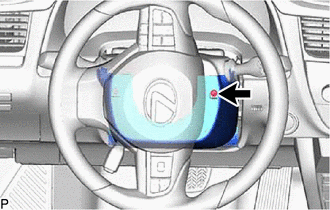
| (b) Turn the steering wheel assembly to the right and remove the screw. |
|
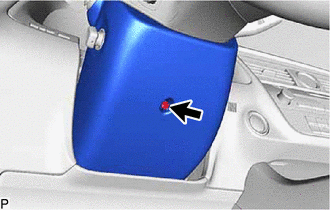
| (c) Remove the screw. |
|
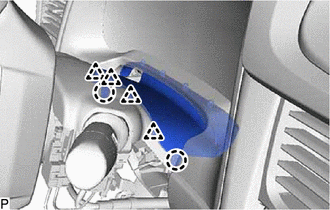
(d) Push the left side of the lower steering column cover and disengage the claw as shown in the illustration.
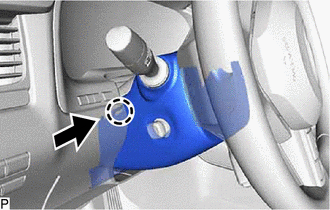
.png) | Push |
(e) Push the right side of the lower steering column cover and disengage the claw as shown in the illustration.
| | Push |
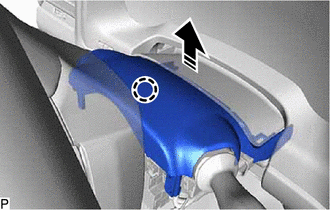
(f) Disengage the 2 claws to remove the lower steering column cover as shown in the illustration.

.png) | Remove in this Direction |
3. REMOVE UPPER STEERING COLUMN COVER
| (a) Disengage the 2 claws and 4 clips to separate the instrument cluster finish panel sub-assembly. |
|
(b) Disengage the claw to remove the upper steering column cover as shown in the illustration.
| | Remove in this Direction |
4. REMOVE WINDSHIELD WIPER SWITCH ASSEMBLY
| (a) Disconnect the 2 connectors. |
|
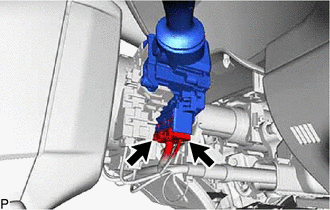
(b) Using a screwdriver, disengage the claw and remove the windshield wiper switch assembly as shown in the illustration.
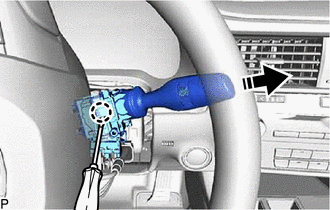
| | Remove in this Direction |
NOTICE:
If the claw is pulled with excessive force, it may break.
 Inspection
INSPECTION PROCEDURE 1. INSPECT WINDSHIELD WIPER SWITCH ASSEMBLY (a) Measure the resistance according to the value(s) in the table below. Standard Resistance: Front Washer Switch Tester Connect ...
 Installation
INSTALLATION PROCEDURE 1. INSTALL WINDSHIELD WIPER SWITCH ASSEMBLY (a) Engage the claw as shown in the illustration to install the windshield wiper switch assembly. Install in this Direction ...
Other materials:
Lexus RX (RX 350L, RX450h) 2016-2026 Owners Manual > Bluetooth Phone: Using a Bluetooth phone
message
Once a MAP-profile compatible Bluetooth phone is registered, you can
check the E-mail/SMS/MMS and reply to a message using the following procedures:
Checking messages
1. Go to message screen: "MENU" button → "Phone" → "Messages"
2. Select a message.
Moving the controller to the left while o ...
Lexus RX (RX 350L, RX450h) 2016-2026 Repair Manual > Rear Axle Carrier (for Awd): Installation
INSTALLATION CAUTION / NOTICE / HINT HINT:
Use the same procedure for the RH side and LH side.
The following procedure is for the LH side.
PROCEDURE 1. INSTALL LOWER CONTROL ARM PIN (for TMMC Made) (a) Secure the rear axle carrier sub-assembly in a vise using aluminum plates. NOTICE: Do n ...
Lexus RX (RX 350L, RX450h) 2016-{YEAR} Owners Manual
- For your information
- Pictorial index
- For safety and security
- Instrument cluster
- Operation of each component
- Driving
- Lexus Display Audio system
- Interior features
- Maintenance and care
- When trouble arises
- Vehicle specifications
- For owners
Lexus RX (RX 350L, RX450h) 2016-{YEAR} Repair Manual

0.0097