Lexus RX (RX 350L, RX450h) 2016-2026 Repair Manual: Transfer Oil
On-vehicle Inspection
ON-VEHICLE INSPECTION
PROCEDURE
1. INSPECT TRANSFER OIL
(a) Lift the vehicle.
NOTICE:
Set the vehicle on a lift so that the vehicle is kept level when it is lifted up (make sure that the tilt angle from the front to rear of the vehicle is within +/-1°).
| (b) Remove the filler plug (No. 1 transfer case plug) and gasket from the transfer assembly. |
|
.png)
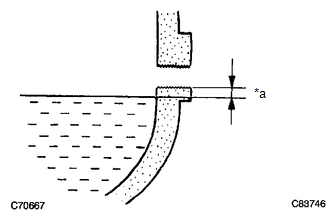
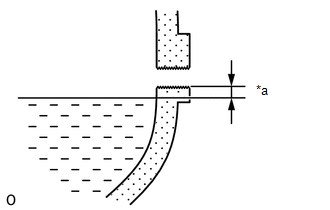
| (c) Check that the oil level is between 0 and 5 mm (0 and 0.197 in.) from the bottom lip of the filler plug (No. 1 transfer case plug) hole. NOTICE:
|
|

(d) Check for oil leakage if the oil level is low.
(e) Install the filler plug (No. 1 transfer case plug) and a new gasket to the transfer assembly.
Torque:
49 N·m {500 kgf·cm, 36 ft·lbf}
2. ADJUST TRANSFER OIL
(a) Lift the vehicle.
NOTICE:
Set the vehicle on a lift so that the vehicle is kept level when it is lifted up (make sure that the tilt angle from the front to rear of the vehicle is within +/-1°).
| (b) Remove the filler plug (No. 1 transfer case plug) and gasket from the transfer assembly. |
|
| (c) Add transfer oil until the oil level is between 0 and 5 mm (0 and 0.197 in.) from the bottom lip of the filler plug (No. 1 transfer case plug) hole. Oil Type: Toyota Genuine Differential gear oil LT 75W-85 GL-5 or equivalent Standard Capacity: 0.8 liters (0.8 US qts, 0.7 Imp. qts) NOTICE:
|
|
(d) After waiting for approximately 5 minutes, recheck the oil level.
(e) Install the filler plug (No. 1 transfer case plug) and a new gasket to the transfer assembly.
Torque:
49 N·m {500 kgf·cm, 36 ft·lbf}
Replacement
REPLACEMENT
PROCEDURE
1. DRAIN TRANSFER OIL
(a) Lift the vehicle.
NOTICE:
Set the vehicle on a lift so that the vehicle is kept level when it is lifted up (make sure that the tilt angle from the front to rear of the vehicle is within +/-1°).
| (b) Remove the filler plug (No. 1 transfer case plug) and gasket from the transfer assembly. |
|
.png)
| (c) Remove the transfer drain plug and gasket and drain the transfer oil. |
|
.png)
(d) Install the transfer drain plug and a new gasket.
Torque:
49 N·m {500 kgf·cm, 36 ft·lbf}
2. ADD TRANSFER OIL
| (a) Add transfer oil until the oil level is between 0 and 5 mm (0 and 0.197 in.) from the bottom lip of the filler plug (No. 1 transfer case plug) hole. Oil Type: Toyota Genuine Differential gear oil LT 75W-85 GL-5 or equivalent Standard Capacity: 0.8 liters (0.8 US qts, 0.7 Imp. qts) NOTICE:
|
|
(b) After waiting for approximately 5 minutes, recheck the oil level.
(c) Install the filler plug (No. 1 transfer case plug) and a new gasket to the transfer assembly.
Torque:
49 N·m {500 kgf·cm, 36 ft·lbf}
 Transfer Case Rear Oil Seal
ComponentsCOMPONENTS ILLUSTRATION *1 TRANSFER EXTENSION HOUSING TYPE T OIL SEAL - - ● Non-reusable part MP grease ReplacementREPLACEMENT PROCEDURE 1. REMOVE PROPELLER SHAFT W ...
 Transfer System
...
Other materials:
Lexus RX (RX 350L, RX450h) 2016-2026 Repair Manual > Theft Deterrent System: Terminals Of Ecu
TERMINALS OF ECU CHECK MAIN BODY ECU (MULTIPLEX NETWORK BODY ECU) AND INSTRUMENT PANEL JUNCTION BLOCK ASSEMBLY (a) Remove the main body ECU (multiplex network body ECU) from the instrument panel junction block assembly. Click here (b) Reconnect the instrument panel junction block assembly conne ...
Lexus RX (RX 350L, RX450h) 2016-2026 Repair Manual > Navigation System: Parts Location
PARTS LOCATION ILLUSTRATION *1 TELEPHONE MICROPHONE ASSEMBLY *2 ENGINE ROOM RELAY BLOCK AND JUNCTION BLOCK ASSEMBLY - AMP FUSE - ECU-IG1 NO. 8 FUSE - RADIO NO. 1 FUSE - RADIO NO. 2 FUSE *3 INSTRUMENT PANEL JUNCTION BLOCK ASSEMBLY - ECU-IG2 NO. 3 FUSE - DCM FUSE - ECU-DCC NO. 2 FUSE - ...
Lexus RX (RX 350L, RX450h) 2016-{YEAR} Owners Manual
- For your information
- Pictorial index
- For safety and security
- Instrument cluster
- Operation of each component
- Driving
- Lexus Display Audio system
- Interior features
- Maintenance and care
- When trouble arises
- Vehicle specifications
- For owners
Lexus RX (RX 350L, RX450h) 2016-{YEAR} Repair Manual

0.0096