Lexus RX (RX 350L, RX450h) 2016-2026 Repair Manual: Installation
INSTALLATION
PROCEDURE
1. INSTALL ELECTRICAL KEY AND TIRE PRESSURE WARNING ECU AND RECEIVER
NOTICE:
- Do not drop the electrical key and tire pressure warning ECU and receiver, strike it with tools or subject it to impact.
- If the electrical key and tire pressure warning ECU and receiver is subjected to an impact, replace it with a new one.
| (a) Connect the connector. |
|
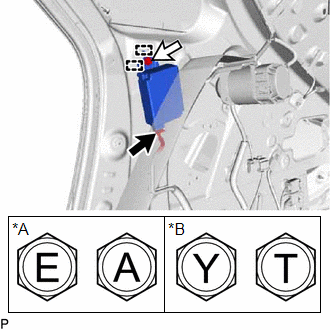
(b) Engage the 2 guides and install the electrical key and tire pressure warning ECU and receiver with the bolt.
Torque:
for Type A :
8.3 N·m {85 kgf·cm, 73 in·lbf}
for Type B :
10 N·m {102 kgf·cm, 7 ft·lbf}
NOTICE:
There are four types of bolts and the tightening torque depends on the type of bolt used as shown in the illustration. Therefore, confirm the tightening torque before installing the bolt.
2. INSTALL ROOF SIDE INNER GARNISH ASSEMBLY RH (w/o Rear No. 2 Seat)
HINT:
Use the same procedure as for the LH side.
Click here .gif)
3. INSTALL DECK TRIM SIDE PANEL ASSEMBLY RH (w/o Rear No. 2 Seat)
Click here
4. INSTALL RECLINING REMOTE CONTROL BEZEL RH (w/o Rear No. 2 Seat)
w/o Rear Power Seat System:
Click here
5. INSTALL FOLD SEAT SWITCH ASSEMBLY (w/o Rear No. 2 Seat)
w/ Rear Power Seat System:
Click here
6. INSTALL NO. 1 LUGGAGE COMPARTMENT LIGHT ASSEMBLY (w/o Rear No. 2 Seat)
Click here
7. INSTALL ROPE HOOK ASSEMBLY (w/o Rear No. 2 Seat)
HINT:
Use the same procedure as for the LH side.
Click here
8. INSTALL NO. 1 LUGGAGE COMPARTMENT TRIM HOOK (w/o Rear No. 2 Seat)
Click here
9. INSTALL REAR FLOOR FINISH SIDE PLATE RH (w/o Rear No. 2 Seat)
HINT:
Use the same procedure as for the LH side.
Click here
10. INSTALL REAR SEAT SIDE GARNISH RH (w/o Rear No. 2 Seat)
HINT:
Use the same procedure as for the LH side.
Click here
11. INSTALL UPPER QUARTER TRIM PAD RH (w/o Rear No. 2 Seat)
HINT:
Use the same procedure as for the LH side.
Click here
12. INSTALL REAR SEAT ASSEMBLY RH (w/o Rear No. 2 Seat)
Click here
13. INSTALL REAR DOOR SCUFF PLATE RH (w/o Rear No. 2 Seat)
HINT:
Use the same procedure as for the LH side.
Click here
14. INSTALL REAR FLOOR FINISH PLATE (w/o Rear No. 2 Seat)
Click here
15. INSTALL DECK SIDE TRIM BOX RH (w/o Rear No. 2 Seat)
Click here
16. INSTALL REAR NO. 4 FLOOR BOARD (w/o Rear No. 2 Seat)
Click here
17. INSTALL REAR DECK FLOOR BOX (w/o Rear No. 2 Seat)
Click here
18. INSTALL REAR NO. 3 FLOOR BOARD (w/o Rear No. 2 Seat)
Click here
19. INSTALL DECK BOARD ASSEMBLY (w/o Rear No. 2 Seat)
Click here
20. INSTALL TONNEAU COVER ASSEMBLY (w/o Rear No. 2 Seat)
Click here
21. INSTALL ROOF SIDE INNER GARNISH ASSEMBLY RH (w/ Rear No. 2 Seat)
HINT:
Use the same procedure as for the LH side.
Click here
22. CONNECT REAR NO. 2 SEAT OUTER BELT ASSEMBLY RH (w/ Rear No. 2 Seat)
HINT:
Use the same procedure as for the LH side.
Click here
23. INSTALL DECK TRIM SIDE PANEL ASSEMBLY RH (w/ Rear No. 2 Seat)
Click here
24. INSTALL NO. 1 LUGGAGE COMPARTMENT LIGHT ASSEMBLY (w/ Rear No. 2 Seat)
Click here
25. INSTALL ROPE HOOK ASSEMBLY (w/ Rear No. 2 Seat)
HINT:
Use the same procedure as for the LH side.
Click here
26. INSTALL NO. 1 LUGGAGE COMPARTMENT TRIM HOOK (w/ Rear No. 2 Seat)
Click here
27. INSTALL REAR SEAT SIDE GARNISH RH (w/ Rear No. 2 Seat)
Click here
28. INSTALL FRONT DECK SIDE TRIM COVER RH (w/ Rear No. 2 Seat)
HINT:
Use the same procedure as for the LH side.
Click here
29. INSTALL REAR SEAT OUTER TRACK BRACKET COVER RH (w/ Rear No. 2 Seat)
for 60/40 Split Seat Type:
Click here
for Captain Seat Type:
HINT:
Use the same procedure as for the LH side.
Click here
30. INSTALL REAR DOOR INSIDE SCUFF PLATE RH (w/ Rear No. 2 Seat)
HINT:
Use the same procedure as for the LH side.
Click here
31. INSTALL REAR DOOR SCUFF PLATE RH (w/ Rear No. 2 Seat)
HINT:
Use the same procedure as for the LH side.
Click here
32. INSTALL REAR NO. 2 SEAT ASSEMBLY (w/ Rear No. 2 Seat)
Click here
33. REGISTER TRANSMITTER ID
Click here
34. INSPECT TIRE PRESSURE WARNING SYSTEM
Click here
35. PERFORM INITIALIZATION
Click here
 Removal
REMOVAL CAUTION / NOTICE / HINT The necessary procedures (adjustment, calibration, initialization or registration) that must be performed after parts are removed and installed, or replaced during elec ...
 Door Control Switch
ComponentsCOMPONENTS ILLUSTRATION *1 POWER WINDOW REGULATOR SWITCH ASSEMBLY *2 POWER WINDOW REGULATOR SWITCH ASSEMBLY WITH FRONT DOOR UPPER ARMREST BASE PANEL InspectionINSPECTION PROCEDU ...
Other materials:
Lexus RX (RX 350L, RX450h) 2016-2026 Repair Manual > Shift Lever: Inspection
INSPECTION PROCEDURE 1. INSPECT SHIFT LOCK CONTROL ECU HINT: If the results of the following inspections are as specified but a malfunction has occurred, replace the transmission floor shift assembly. (a) Inspect wire harness: (1) Disconnect the shift lock control ECU connector. (2 ...
Lexus RX (RX 350L, RX450h) 2016-2026 Repair Manual > Rear Seat Assembly (for 60/40 Split Seat Type Rh Side): Installation
INSTALLATION CAUTION / NOTICE / HINT CAUTION: Wear protective gloves. Sharp areas on the seat frame may injure your hands. PROCEDURE 1. INSTALL REAR SEAT ASSEMBLY RH (a) Place the rear seat assembly RH in the cabin. NOTICE: Be careful not to damage the vehicle body. (b) Lift the seat track adjusting ...
Lexus RX (RX 350L, RX450h) 2016-{YEAR} Owners Manual
- For your information
- Pictorial index
- For safety and security
- Instrument cluster
- Operation of each component
- Driving
- Lexus Display Audio system
- Interior features
- Maintenance and care
- When trouble arises
- Vehicle specifications
- For owners
Lexus RX (RX 350L, RX450h) 2016-{YEAR} Repair Manual

0.01