Lexus RX (RX 350L, RX450h) 2016-2026 Repair Manual: Inspection
INSPECTION
PROCEDURE
1. INSPECT REAR DOOR LOCK WITH MOTOR ASSEMBLY LH
| (a) Check the operation of the door lock motor. (1) Apply battery voltage and check the operation of the door lock motor. OK:
If the result is not as specified, replace the rear door lock with motor assembly LH. |
|
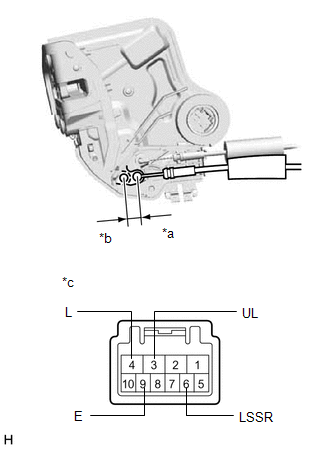
(b) Check the operation of the unlock detection switch.
(1) Measure the resistance according to the value(s) in the table below.
Standard Resistance:
| Tester Connection | Condition | Specified Condition |
|---|---|---|
| 6 (LSSR) - 9 (E) | Locked | 10 kΩ or higher |
| 6 (LSSR) - 9 (E) | Unlocked | Below 1 Ω |
If the result is not as specified, replace the rear door lock with motor assembly LH.
2. INSPECT REAR DOOR LOCK WITH MOTOR ASSEMBLY RH
| (a) Check the operation of the door lock motor. (1) Apply battery voltage and check the operation of the door lock motor. OK:
If the result is not as specified, replace the rear door lock with motor assembly RH. |
|
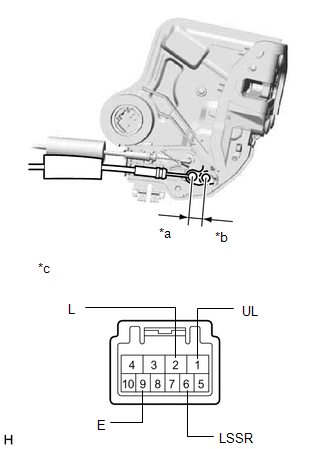
(b) Check the operation of the unlock detection switch.
(1) Measure the resistance according to the value(s) in the table below.
Standard Resistance:
| Tester Connection | Condition | Specified Condition |
|---|---|---|
| 6 (LSSR) - 9 (E) | Locked | 10 kΩ or higher |
| 6 (LSSR) - 9 (E) | Unlocked | Below 1 Ω |
If the result is not as specified, replace the rear door lock with motor assembly RH.
 Components
COMPONENTS ILLUSTRATION *1 COURTESY LIGHT ASSEMBLY *2 REAR DOOR ARMREST COVER *3 REAR DOOR INNER GLASS WEATHERSTRIP *4 REAR DOOR INSIDE HANDLE BEZEL PLUG *5 REAR DOOR TRIM BO ...
 Installation
INSTALLATION CAUTION / NOTICE / HINT HINT:
Use the same procedure for the RH side and LH side.
The following procedure is for the LH side.
PROCEDURE 1. PRECAUTION NOTICE: After turning the eng ...
Other materials:
Lexus RX (RX 350L, RX450h) 2016-2026 Repair Manual > Camshaft Oil Control Solenoid (for Bank 1): Inspection
INSPECTION PROCEDURE 1. INSPECT CAMSHAFT TIMING OIL CONTROL SOLENOID ASSEMBLY HINT: Use the same procedure for the intake side and exhaust side. (a) Check the resistance. (1) Measure the resistance according to the value(s) in the table below. Standard Resistance: Tester Connection Conditio ...
Lexus RX (RX 350L, RX450h) 2016-2026 Repair Manual > Can Communication System: Lost Communication with Rear Gate Module (U0230)
DESCRIPTION DTC No. Detection Item DTC Detection Condition Trouble Area Note U0230 Lost Communication with Rear Gate Module No communication from the multiplex network door ECU continues.
Multiplex network door ECU branch line or connector
Power source circuit of multiplex ...
Lexus RX (RX 350L, RX450h) 2016-{YEAR} Owners Manual
- For your information
- Pictorial index
- For safety and security
- Instrument cluster
- Operation of each component
- Driving
- Lexus Display Audio system
- Interior features
- Maintenance and care
- When trouble arises
- Vehicle specifications
- For owners
Lexus RX (RX 350L, RX450h) 2016-{YEAR} Repair Manual

0.01