
Lexus RX (RX 350L, RX450h) 2016-2026 Repair Manual: Installation
INSTALLATION
PROCEDURE
1. INSTALL CLEAN AIR FILTER
(a) Engage the 4 guides as indicated by the arrows, in the order shown in the illustration to install the clean air filter to the air filter case.
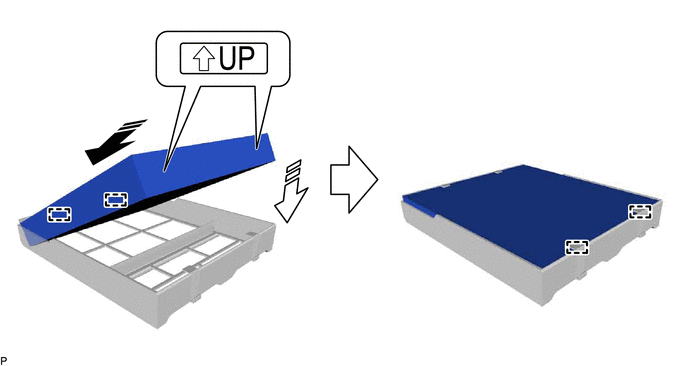
.png) | Install in this Direction (1) | .png) | Install in this Direction (2) |
NOTICE:
Make sure that the "UP" marks are facing the correct direction before installing the clean air filter.
(b) Install the air filter sub-assembly as shown in the illustration.
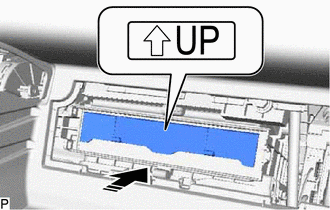
| | Install in this Direction |
NOTICE:
Make sure that the "UP" mark is facing the correct direction before installing the air filter sub-assembly.
2. INSTALL AIR FILTER COVER PLATE
(a) Engage the 2 guides and claw as indicated by the arrows, in the order shown in the illustration to install the air filter cover plate.
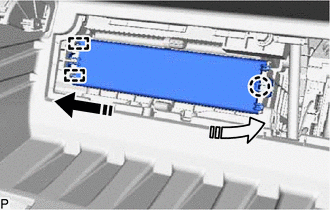
| | Install in this Direction (1) |
| | Install in this Direction (2) |
3. INSTALL INSTRUMENT LOWER COVER
(a) Engage the 3 guides and 2 claws to install the instrument lower cover as shown in the illustration.
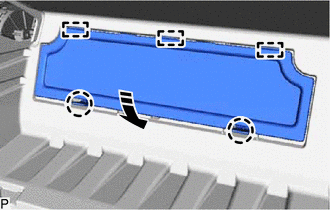
| | Install in this Direction |
4. INSTALL GLOVE COMPARTMENT DOOR ASSEMBLY
(a) With the glove compartment door assembly opened approximately 52.5° from its closed position, engage the 2 hinges horizontally.
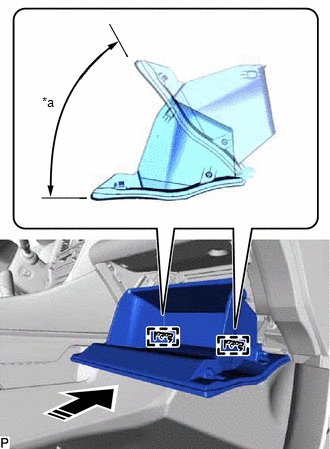
| *a | 52.5° |
| | Install in this Direction |
NOTICE:
Engaging the hinges from an upward angle will deform the hinges. Be sure to install the glove compartment door assembly horizontally.
| (b) Slightly bend the stoppers (A) and (B) in the directions indicated by the arrows shown in the illustration and engage the stoppers to install the glove compartment door assembly. |
|
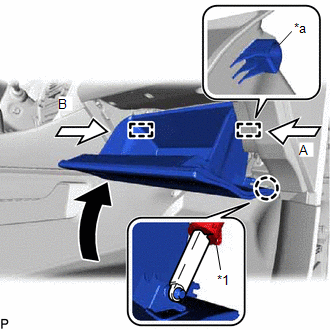
(c) Engage the claw to connect the glove compartment door stopper sub-assembly.
 Removal
REMOVAL PROCEDURE 1. REMOVE GLOVE COMPARTMENT DOOR ASSEMBLY (a) Disengage the claw to disconnect the glove compartment door stopper sub-assembly. *1 Glove Compartment Door Stopper Su ...

Other materials:
Lexus RX (RX 350L, RX450h) 2016-2026 Repair Manual > Sfi System: Low Pressure Fuel System Pressure - Too High (P008B00)
DESCRIPTION Refer to DTC P008A00. Click here DTC No. Detection Item DTC Detection Condition Trouble Area MIL Memory Note P008B00 Low Pressure Fuel System Pressure - Too High Actual fuel pressure (for low pressure side) value higher than target fuel pressure (for low pressure ...
Lexus RX (RX 350L, RX450h) 2016-2026 Repair Manual > Rear No. 1 Seat Assembly (for 60/40 Split Seat Type Rh Side): Removal
REMOVAL CAUTION / NOTICE / HINT The necessary procedures (adjustment, calibration, initialization or registration) that must be performed after parts are removed and installed, or replaced during rear No. 1 seat assembly removal/installation are shown below. Necessary Procedure After Parts Removed/I ...
Lexus RX (RX 350L, RX450h) 2016-{YEAR} Owners Manual
- For your information
- Pictorial index
- For safety and security
- Instrument cluster
- Operation of each component
- Driving
- Lexus Display Audio system
- Interior features
- Maintenance and care
- When trouble arises
- Vehicle specifications
- For owners
Lexus RX (RX 350L, RX450h) 2016-{YEAR} Repair Manual

0.0121